DT Management
DT Management allows users to create and manage Business Data Types (BDTs). Data Types are managed on the separate "Data Type" page rather than on the Core Component page.
Find a DT
Open the "Data Type" page by clicking "Core Component" and then "View/Edit Data Type". The Data Type page lists Data Types; the current UI does not expose a separate CDT or BDT indicator in the list itself. Like the Core Component page, it includes a Library selector and a "Branch" selector. If the user has not chosen a library preference yet, connectCenter preselects the default library. The search bar is labeled "Search by DEN", and the Advanced Search provides the "State", "Definition", "Module", "Deprecated", "Commonly Used", "New", "Owner", "Updater", "Updated start date", "Updated end date", "Namespace", and "Tag" filters.
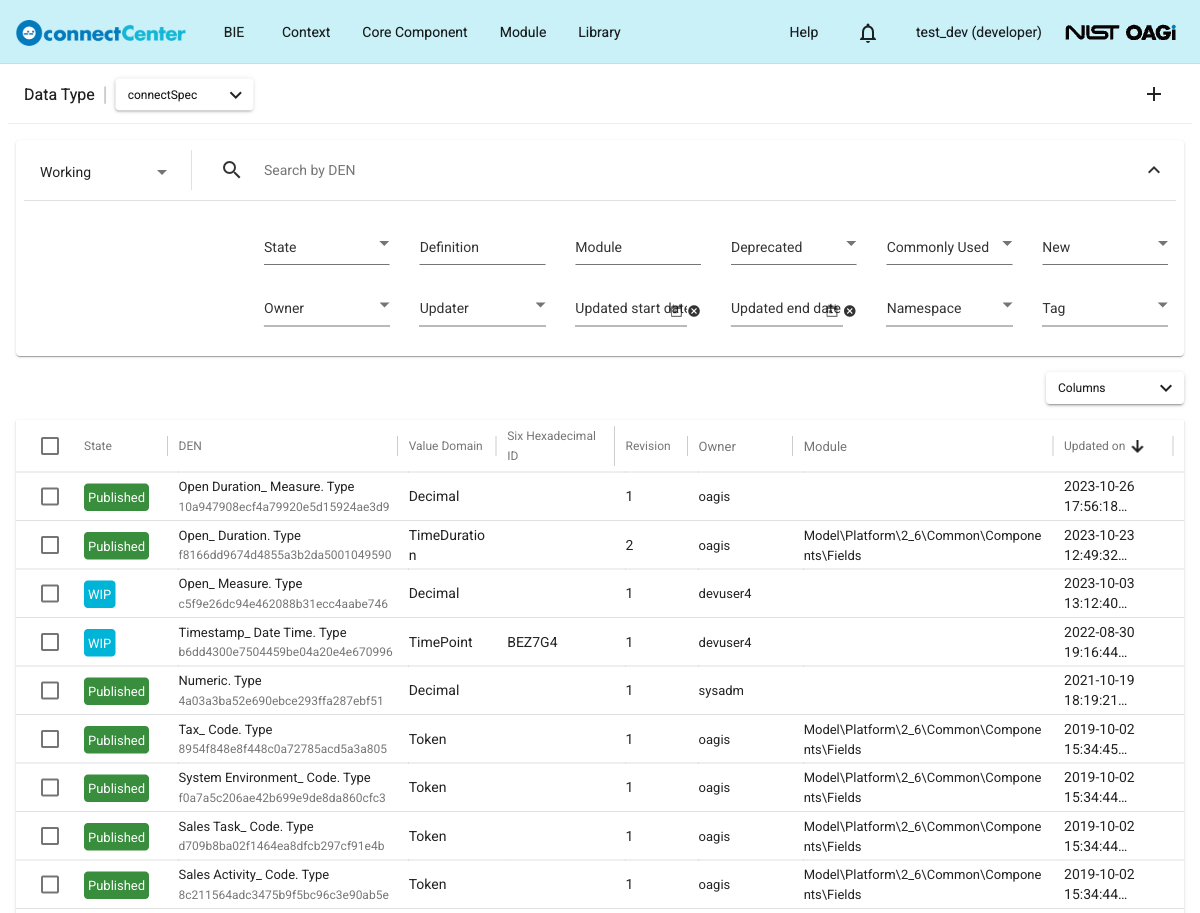
Using the DT DEN pattern that is "Data Type Term. Type" along with the double quotes can help filter the result down to mostly data types. For example, type "Amount. Type" (double quotes should be included) in the "Search by DEN" field.
View detail of a DT
To view DT detail:
-
Click on the DEN of the DT to open the DT detail page.
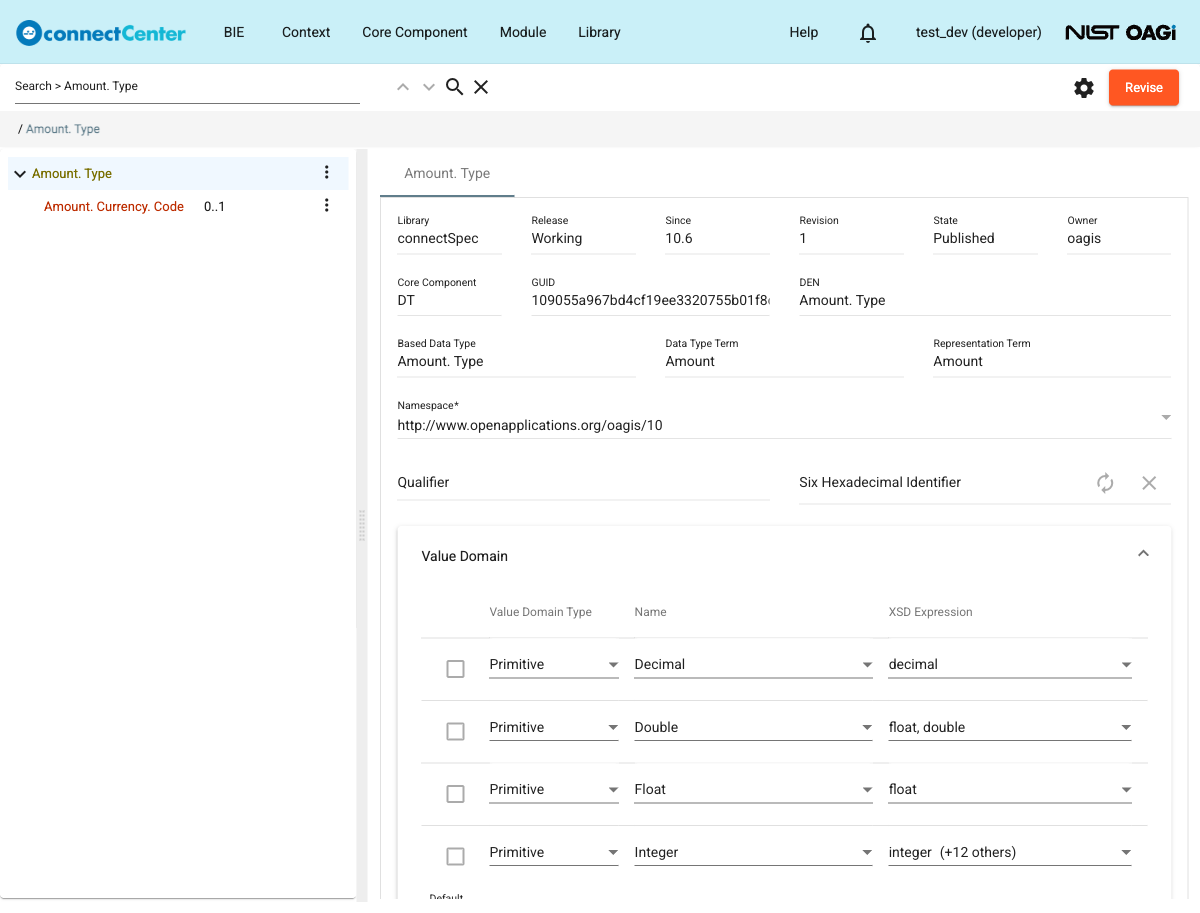
Create a new DT
Only BDT creation is supported. The user cannot create a Core Data Type (CDT). A BDT has to be based on either a CDT or another BDT.
-
If you are not already on, open the "Data Type" page by clicking the "View/Edit Data Type" menu item under the "Core Component" menu at the top of the page. For developers, the plus (+) button (tooltip "New Data Type") appears near the top-right corner only when the Working branch is selected.
-
Click the plus (+) button.
-
The "Select based DT" dialog is opened. Click the checkbox in front of the desired DT to use as the base of the new DT. You can also use the search filters in the dialog to find the desired base DT.
-
Click the "Create" button at the bottom of the dialog. If the selected base DT is deprecated, a confirmation dialog asks whether to proceed anyway.
-
A new DT is created with revision #1. Its detail page is opened with default values populated. The new DT is in the WIP state. The developer may edit the detail of the DT.
The "Select based DT" dialog is scoped by the current library and branch context. Depending on the selected branch, the list can also include imported base DTs from another library. For example, a BDT in a business library can be created from a CDT supplied by the "CCTS Data Type Catalogue v3" library.
If the selected base DT is a library base DT, the new BDT inherits its content component, supplementary components (SCs), and default value domains from that base DT. If the selected base DT is already a BDT, the new BDT inherits from that BDT instead. The current DT creation flow does not create a new CDT and does not ask the user to choose a separate CCTS-versus-ISO specification option at creation time.
Edit detail of a brand new DT
This section describes DT editing when its revision number is 1.
-
Open the DT detail page according to View detail of a DT. The DT has to be in the WIP state, and the current user has to be the owner to be editable. The fields in the details pane may be updated as follows.
-
"Qualifier". A plain text field holding the qualifier term(s) of the BDT. It is prefilled with the qualifier of the based DT, if any, and the user edits the whole string. To specify multiple qualifiers, separate the tokens with an under bar and a space according to the CCTS convention; for example, "Total_ Tax" represents the two qualifiers "Total" and "Tax". This field is required if the based DT already has a qualifier (however, it does not have to be the same or end with the existing qualifier).
-
"Six Hexadecimal Identifier". Click the renew icon to generate an identifier for this DT, or the clear icon to remove it. This field is optional. If specified, this random identifier will be suffixed to the DT when it is serialized.
-
"Namespace". Select a standard namespace from the drop-down list. See the Namespace Management section to create a standard namespace if needed or how namespaces may be used in connectCenter. "Namespace" is required; clicking "Update" without a namespace is rejected with a "Namespace is required" message.
-
"Definition Source". Specify the source of the definition. This is typically a URI but the field accepts a free form text. "Definition Source" is optional.
-
"Definition". Specify the description of the DT. "Definition" is optional but a warning is given if none is specified.
-
"Content Component Definition". Specify the definition of the DT's Content Component value. This is typically a free form text. "Content Component Definition" is optional.
-
-
Click the "Update" button at the top right to save changes.
-
The developer may want to perform these other actions on the DT:
Edit Value Domain
This section applies to value domain editing of both the DT content component and SCs. Value domains inherited from the based DT cannot be edited nor discarded.
-
On the DT detail page where the current user owns the DT, and the DT is in WIP state. Click on the root node of the DT or expand the root node on the DT tree and click on an SC node.
-
Click "Value Domain" in the detail pane on the right side to expand the "Value Domain" area. The following actions may be performed:
-
Click the "Add" button to add a value domain. Since connectCenter has all possible Primitive value domains for DT content component and SC, only Code List or Agency ID List value domain types can be added. This is allowed only when there is a Token in the primitive value domain types. After clicking the "Add" button, select either Code List or Agency ID List in the "Value Domain Type" column and then select a specific Code List or Agency ID List to use as the value domain. Finally, click the "Update" button on the top.
-
Set the default value domain by selecting it in the "Default" drop-down list below the table. A value domain which is selected as the default cannot be discarded ("'Default Value Domain' cannot be discarded."); change the default to another value domain first.
-
Discard a value domain added in this or a previous revision by clicking the checkbox in front of the desired value domain and clicking the "Discard" button.
-
-
Click the "Update" button.
Add an SC to a DT
-
On the DT detail page where the current user owns the DT and the DT is in WIP state, expand the root node on the DT tree.
-
Click on the ellipsis next to the root node and select the menu item "Add Supplementary Component". A new SC is added at the end of the DT tree. The default DEN of the SC node is in the format "[Data Type Term of the DT]. Property Term [a number]. [Representation Term]".
-
Click the SC on the tree to edit the details of the new SC.
Edit details of a brand new SC in the DT where it was added
The section describes the case of editing an SC added to the DT. The SC should have already been added in the latest revision of the DT.
-
On the DT detail page where the current user owns the DT, and the DT is in WIP state, expand the root node on the DT tree.
-
Click on an SC node of the DT. The detail of the SC is displayed in the detail pane on the right side of the page.
-
"Property Term". The property term should be unique across all SCs derived from this DT as well as within the DT itself. This field is required. By convention it should be space-separated words, each with initial letter capitalized.
-
"Representation Term". Click on this field and select the representation term of the SC in the drop-down list. Changing it resets the SC's value constraint and reloads the available primitives. This field is required.
-
"Cardinality". The cardinality of an SC can be "Optional" or "Required". To select it, click the "Cardinality" field and select the value.
-
"Value Constraint". Select "Fixed Value" or "Default Value" in the drop-down (or "None") and specify the value in the adjacent field. "Value Constraint" is optional.
-
"Value Domain". See Edit Value Domain.
-
"Definition Source". Specify the source of the definition. This is typically a URI, but the field is free form text. "Definition Source" is optional.
-
"Definition". Specify the description of the SC. This is the definition of the SC in the context of the DT. "Definition" is optional, but a warning is given if none is specified.
-
-
Click the "Update" button at the top right to accept changes.
Any changes to the SC are propagated to the corresponding SC in all DTs derived from this DT. Therefore, any restrictions put upon this SC will overwrite the restrictions in the derived DTs. However, editing an SC in a derived DT will not affect the same SC in the based DT.
Remove a newly added SC from a DT
Only a newly added SC can be removed. SCs that are inherited from the based DT cannot be removed. Removing an SC in a DT will also result in the removal of the same SC in derived DTs.
-
On the DT detail page where the current user owns the DT and the DT is in WIP state, expand the root node on the DT tree.
-
Click on the ellipsis next to any SC of the DT; if logically allowed, the "Remove" menu item is visible and active. Select the menu item.
-
Click "Remove anyway" in the "Remove supplementary component?" dialog, or "Cancel", if so desired.
Edit details of an existing SC
The section describes the case of editing an SC inherited from a based DT or carried over from a previous revision. The DT can be either a brand-new (revision #1) or revised DT (revision greater than #1).
-
On the DT detail page where the current user owns the DT, and the DT is in WIP state, expand the root node on the DT tree.
-
Click on an SC node of the DT. The detail of the SC is displayed in the detail pane on the right side of the page.
-
"Property Term". It cannot be changed when the SC is inherited from the based DT.
-
"Representation Term". It cannot be changed when the SC is inherited from the based DT.
-
"Cardinality". It can be changed when the previous value is "Optional" (or when the based SC's cardinality is "Optional"). In addition to "Optional" and "Required", an existing SC can be set to "Prohibited" to suppress it in this DT.
-
"Value Constraint". Select "Fixed Value" or "Default Value" in the drop-down (or "None") and specify the value in the adjacent field. "Value Constraint" is optional.
-
"Value Domain". See Edit Value Domain.
-
"Definition Source". Specify the source of the definition. This is typically a URI, but the field is free form text. "Definition Source" is optional.
-
"Definition". Specify the description of the SC. This is the definition of the SC in the context of the DT. "Definition" is optional, but a warning is given if none is specified.
-
-
Click the "Update" button at the top right to accept changes.
Any changes to the SC are propagated to the corresponding SC in all DTs derived from this DT. Therefore, any restrictions put upon this SC will overwrite the restrictions in the derived DTs.
Delete a newly created DT
A DT whose revision number is 1 can be (marked) deleted. The DT has to be in the WIP state and owned by the current user. See Delete a newly created CC.
Restore a deleted DT
See Restore a deleted CC.
Revise a DT
A DT in the Published state can be revised where certain changes can be made. Any developer user can revise a published DT. He/she does not have to be its owner; upon revising, the ownership is transferred to the revising developer. To do that:
-
Find a DT in the Working branch.
-
Open detail page of a DT in the Published state.
-
Click the "Revise" button at the top-right corner of the page and confirm in the "Revise this DT?" dialog. The DT goes into the WIP state and its revision number increases by 1.
-
Only the following fields in the DT detail pane on the right may be updated ("Qualifier", "Six Hexadecimal Identifier", and "Namespace" are locked during a revision).
-
"Definition Source". Specify the source of the definition. This is typically a URI but the field accepts a free form text. "Definition Source" is optional.
-
"Definition". Specify the description of the DT. "Definition" is optional, but a warning is given if none is specified.
-
"Content Component Definition". Specify the definition of the DT's Content Component value. This is typically a free form text. "Content Component Definition" is optional.
-
-
Click the "Update" button at the top right to save changes.
-
The developer may want to perform these other actions on the DT:
Cancel a DT revision
See Cancel a CC revision.
Change DT states
See Change CC states.
Transfer ownership of a DT
See Transfer ownership of a CC.