ACC Management
Find an ACC
See Search and Browse CC Library to find the ACC needed.
To find what ASCCPs already exist that are created from a particular ACC, use the ASCCP DEN pattern along with the double quotes and the "Types" filter. For example, type ". Party" in the "Search by DEN" field and make sure only ASCCP is selected in the "Types" selector; this narrows down the search to ASCCPs that use the Party ACC (the result will also include those that use an ACC whose object class term starts with "Party").
View detail of an ACC
Find an ACC. Click on the ACC DEN after the desired ACC is found to open the ACC detail page. To understand the detail of the ACC, see Quick reference to different types of CCs.
You can open an ACC detail page from within another Core Component tree. On any ACC node other than the tree's root node (bolded red font node, also noticeable with its full DEN ending with ". Details"), click on the ellipsis next to the node and select "Open in new tab".
Create a new ACC
-
If you are not already on, open the "Core Component" page by clicking the "View/Edit Core Component" menu item under the "Core Component" menu at the top of the page. Make sure the Working branch is selected.
-
Click the plus (+) button near the top-right corner of the page.
-
Select "ACC".
-
A new ACC is created immediately with revision #1 and the "Semantics" component type. Its detail page is open with default values populated ("Object Class Term" is prefilled with a placeholder). See also Edit detail of an ACC.
Edit detail of an ACC
This section describes ACC editing when its revision number is 1.
-
Open the ACC detail page according to View detail of an ACC. The ACC has to be in the WIP state, and the current user has to be the owner to be editable. The fields in the details pane may be updated as follows.
-
"Object Class Term". Name of the ACC. The value should be space-separated words, each with initial letter capitalized. This field is required.
-
"Component Type". The selectable values are "Base (Abstract)", "Semantics", "Semantic Group", "Choice", and "Attribute Group" ("Attribute Group" can be chosen only when every property of the ACC is an attribute BCC). For explanations about the Component Types, see Component Types. This field is required.
-
"Abstract". When the "Component Type" is set to "Base (Abstract)", "Abstract" is set to true and locked. The "Semantics" Component Type can be either abstract or concrete.
-
"Deprecated". Since this is a brand new ACC, the "Deprecated" field is locked.
-
"Namespace". Select a standard namespace from the drop-down list. See the Namespace Management section to create a standard namespace if needed or how namespaces may be used in connectCenter. "Namespace" is required; clicking "Update" without a namespace is rejected with a "Namespace is required" message.
-
"Definition Source". Specify the source of the definition. This is typically a URI but the field accepts a free form text. "Definition Source" is optional.
-
"Definition". Specify the description of the ACC. "Definition" is optional but a warning is given if none is specified.
-
-
Click the "Update" button at the top right to save changes.
-
The developer may want to perform these other actions on the ACC:
-
Add a property to the ACC and edit the detail of the resulting BCC or ASCC.
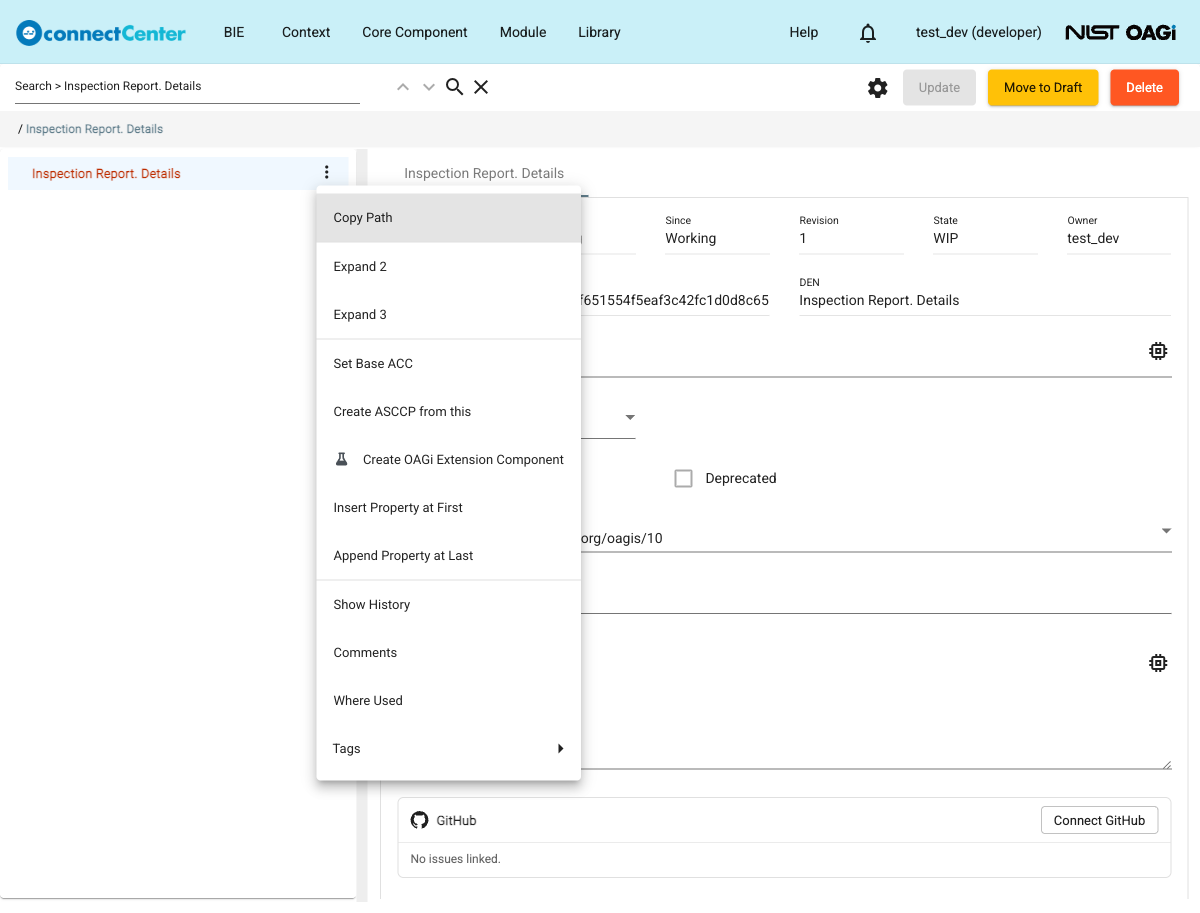
The screenshot below shows the context menu of the root node of an ACC in the WIP state owned by the current developer, where most of these actions are invoked.
Set a based ACC
-
On the ACC detail page where the current user owns the ACC and the ACC is in WIP state, click on the ellipsis next to the root node of the ACC tree (on the left pane) and select "Set Base ACC". The menu item is shown only while the ACC has no based ACC yet.
-
The "Select ACC to set a base ACC" dialog opens. Only "Semantics" and "Base (Abstract)" ACC Component Types can be selected; all other types are excluded from the list. Use the filters on the top to find the desired ACC.
-
Check the checkbox in front of the desired ACC.
-
Click the "Apply" button. If the ACC would end up with two properties with the same property term through the base chain, a warning dialog about the duplicate property term appears first.
connectSpec design pattern typically establishes the base/inheritance relationship between ACCs whose Component Type is Base until an extension point is needed. For example, "Personnel Base. Details" is based on "Employee Base. Details", which in turn is based on "Person Base. Details". See also Create OAGi Extension point for an ACC.
Remove the based ACC
-
On the ACC detail page where the current user owns the ACC and the ACC is in WIP state, expand the root node on the ACC tree.
-
If the ACC has a based ACC, the child node of the root node is the based ACC. Click on the ellipsis next to that node and select "Delete".
-
Confirm (or cancel) the based ACC removal in the "Delete based ACC?" dialog.
Add a property to an ACC
-
On the ACC detail page where the current user owns the ACC and the ACC is in WIP state, expand the root node on the ACC tree.
-
Click on the ellipsis next to the root node and select one of the following menu items – "Insert Property at First", "Append Property at Last". Alternatively, click on the ellipsis next to a child property node of the ACC and select the "Insert Property Before" or "Insert Property After" menu item. A property node has to be a direct child of the root ACC node. A child property node may be an ASCCP in bolded blue font or may be a BCCP in regular green font. "Insert Property Before"/"Insert Property After" are not offered on BCC nodes whose "Entity Type" is "Attribute" (the italicized-grey nodes at the top of the tree).
-
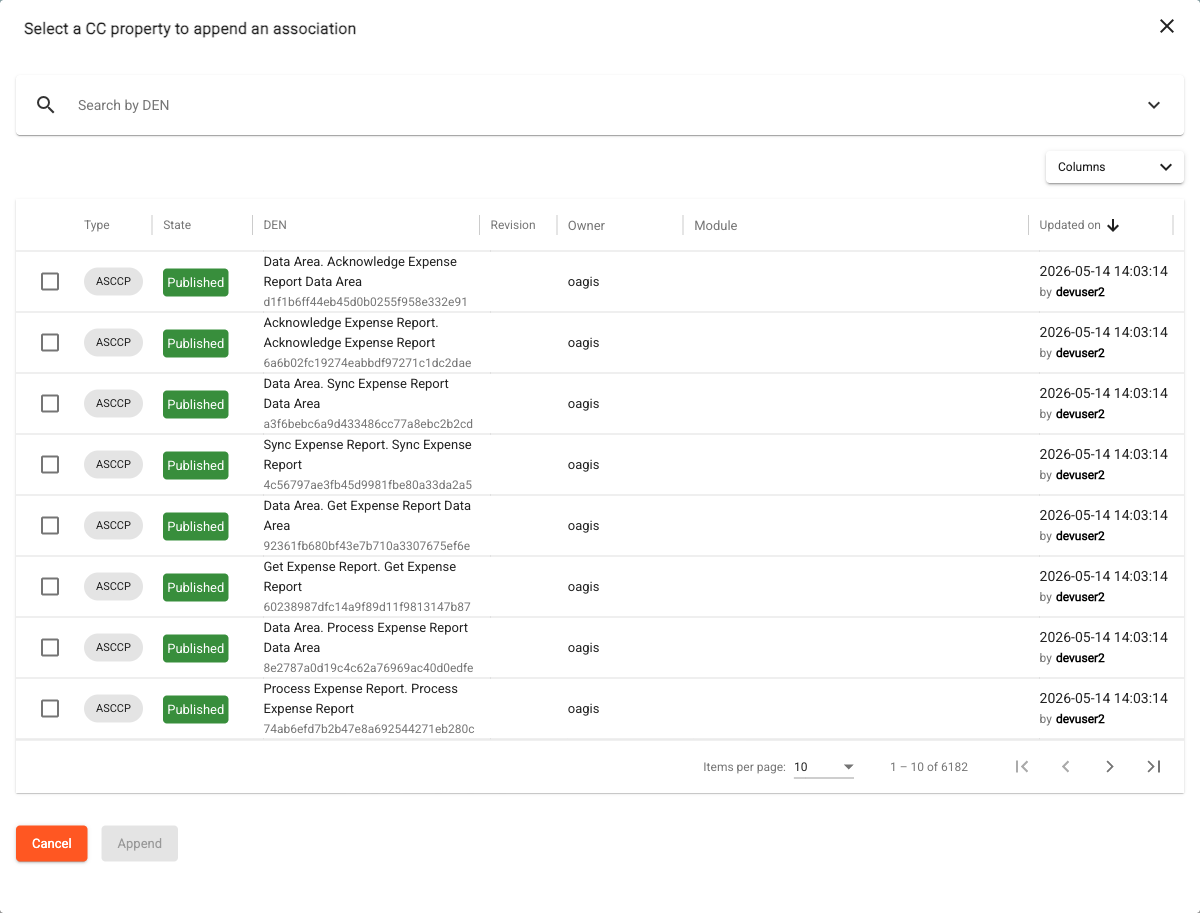
The "Select a CC property to append an association" (or "... to insert an association") dialog opens, where the user can select a BCCP or ASCCP. Use the filters on the top to find the desired BCCP or ASCCP.
-
Check the checkbox in front of the desired BCCP or ASCCP.
-
Click the "Append" (or "Insert") button. If the selected component is deprecated, a confirmation dialog asks whether to proceed anyway; if the ACC already has a property with the same property term, a duplicate-property-term warning appears.
-
If a BCCP was selected, a new BCC is created that associates the ACC with the BCCP. The user may edit detail of the new BCC. If an ASCCP was selected, an ASCC is created that associates the ACC with the ASCCP. The user may edit detail of the new ASCC.
Remove a property from an ACC
Only a property whose ASCC or BCC was added in the current revision can be removed.
-
On the ACC detail page where the current user owns the ACC and the ACC is in WIP state, expand the root node on the ACC tree.
-
Click on the ellipsis next to a child property node of the ACC and select the "Remove" menu item. A property node has to be a direct child of the root ACC node. A child property node may be an ASCCP or a BCCP node. An ASCCP node is noticeable by bolded-blue font, while a BCCP node is in regular-green font. The "Remove" item is not offered on BCC nodes whose "Entity Type" is "Attribute".
-
Confirm with "Remove anyway" (or cancel) in the "Remove association?" dialog.
Edit details of a new ASCC
The section describes the case where the revision number of the ASCC is 1.
-
On the ACC detail page where the current user owns the ACC, and the ACC is in WIP state, expand the root node on the ACC tree.
-
Click on a child node of the ACC with the bolded-blue font. The node encapsulates both ASCC and ASCCP information. Detail of the ASCC is displayed in the detail pane on the right side. When the ASCC revision number is 1, its detail can be updated as follows.
-
"Cardinality Min". The value shall be a non-negative number that is less than or equal to "Cardinality Max". "Cardinality Min" is required.
-
"Cardinality Max". The field is labeled "Cardinality Max (-1 for unbounded)". The value shall be a non-negative number that is equal or more than "Cardinality Min"; entering -1 means "unbounded". It should be noted that if the value 0 is entered, the application shows a hint asking for the "Definition" field to explain why it is 0. "Cardinality Max" is required.
-
"Deprecated". This field is locked to false. It cannot be changed because it is a brand new ASCC that shouldn't be deprecated right away.
-
"Definition Source". Specify the source of the definition. This is typically a URI, but the field is free form text. "Definition Source" is optional.
-
"Definition". Specify the description of the ASCC. This is the definition of the ASCCP in the context of the ACC. "Definition" is optional but a warning is given if none is specified.
-
-
Click the "Update" button at the top right to accept changes.
Ungroup Properties
This function is about changing a content model of some properties of an ACC. This function is available on an association to a group ASCCP (i.e., an ASCCP which uses a Semantic Group type ACC). Ungrouping the association to the ASCCP means refactoring to create associations from the owner ACC directly to properties within the group. To do so,
-
On the ACC detail page where the current user owns the ACC, and the ACC is in WIP state, expand the root node on the ACC tree.
-
Locate the association to the group ASCCP in the ACC tree.
-
Click on the ellipsis next to the ASCC node and select "Refactor" and then the "Ungroup" menu item.
-
In the returned "Ungroup ASCC?" dialog, confirm the intention with "Ungroup anyway".
It should be noted that ungrouping should be done with careful consideration as in certain circumstances it could lead to backward incompatibility change in certain syntaxes.
Edit details of a new BCC
The section describes the case where the revision number of the BCC is 1.
-
On the ACC detail page where the current user owns the ACC, and the ACC is in WIP state, expand the root node on the ACC tree.
-
Click on a child node of the ACC with the regular-green font or italicized-grey font. The node encapsulates both BCC and BCCP information. Detail of the BCC is displayed in the detail pane on the right side. When the BCC revision number is 1, its detail can be updated as follows.
-
"Entity Type". Possible values are "Element" or "Attribute", but the field is active only if the BCCP has no Supplementary Component (SC). Otherwise, it is locked to the value "Element". The "Attribute" option is to support the notion of attribute in XML Schema. Changing the entity type from "Attribute" to "Element" clears any value constraint of the BCC after a confirmation, and changing it to "Attribute" resets a cardinality outside 0..1. This field is required.
-
"Cardinality Min". The value shall be a non-negative number that is less than or equal to "Cardinality Max". However, the value can only be 0 or 1 if "Attribute" is selected in the "Entity Type". This field is required.
-
"Cardinality Max". The field is labeled "Cardinality Max (-1 for unbounded)". The value shall be a non-negative number that is equal or more than "Cardinality Min"; entering -1 means "unbounded". However, the value can only be 0 or 1 if "Attribute" is selected in "Entity Type". It should be noted that if the value 0 is entered, the application shows a hint asking for the "Definition" field to explain why it is 0. This field is required.
-
"Deprecated". This field is defaulted and locked to false. It cannot be changed because it is a brand-new BCC that shouldn't be deprecated right away.
-
"Value Constraint". This field is activated only when "Attribute" is selected in the "Entity Type". It allows for the value constraint in the BCCP to be overridden by the value specified here. Select the "Fixed Value" or "Default Value" option and specify the desired value in the adjacent field. This field is optional.
-
"Definition Source". Specify the source of the definition. This is typically a URI, but the field accepts a free form text. "Definition Source" is optional.
-
"Definition". Specify the description of the BCC. "Definition" is optional but a warning is given if none is specified.
-
-
Click the "Update" button at the top right to accept changes. It should be noted that if "Entity Type" is "Attribute", the node will be moved to the top. On the contrary, if "Entity Type" is changed to "Element", the node will be moved to the bottom.
Order the properties/associations
-
On the ACC detail page where the current user owns the ACC, and the ACC is in WIP state, expand the root node on the ACC tree.
-
To move a child node of the ACC up or down the tree, click and hold the handle icon (=) of the node and drag it up or down the tree. You may notice that some child nodes at the top of the tree have no handle and cannot be moved. It is because they are BCC whose "Entity Type" is "Attribute".
This reorders the actual sequence of the properties and affects generated schemas and expressions. It is different from the view-only order weights available on the browser-style pages (see Order sibling components in the tree).
Delete a newly created ACC
An ACC whose revision number is 1 can be (marked) deleted. The ACC has to be in the WIP state and owned by the current user. See Delete a newly created CC.
Restore a deleted ACC
See Restore a deleted CC.
Revise an ACC
An ACC in the Published state can be revised where certain changes can be made. Any developer user can revise a published ACC. He/she does not have to be its owner; upon revising, the ownership is transferred to the revising developer. To do that:
-
Find an ACC in the Working branch.
-
Open detail page of an ACC in the Published state.
-
Click the "Revise" button at the top-right corner of the page and confirm in the "Revise this ACC?" dialog. The ACC goes into the WIP state and its revision number increases by 1.
-
The following fields in the ACC detail pane on the right may be updated ("Component Type" and "Namespace" are locked during a revision).
-
"Object Class Term". The name of the ACC can still be changed.
-
"Abstract". It can be unchecked when the previous revision was abstract.
-
"Deprecated". This can only be updated from false (unchecked) to true (checked). In other words, if the ACC was deprecated in the previous revision, it cannot be un-deprecated.
-
"Definition Source". Specify the source of the definition. This is typically a URI, but the field accepts a free form text. "Definition Source" is optional.
-
"Definition". Specify the description of the ACC. "Definition" is optional but a warning is given if none is specified.
-
-
Click the "Update" button at the top right to save changes.
-
The developer may want to perform these other actions on the ACC:
-
Add a property to the ACC and edit the detail of the resulting BCC or ASCC.
-
Remove a property from an ACC. Only the ASCCs and BCCs added during the current revision can be removed.
Refactor a property in an ACC
A property (i.e., ASCCP or BCCP) of an ACC in the WIP state can be moved up to a based ACC. Moving a property down to a derived ACC is not supported. To do so,
-
On the ACC detail page where the current user owns the ACC and the ACC is in WIP state, expand the root node on the ACC tree.
-
Note down the based ACC, to which you want to move the desired property.
-
Click on the ellipsis next to the property node of the ACC you want to refactor, select "Refactor" and then the "Refactor to Base" menu item. A dialog for refactoring the selected property is returned.
-
At the top table of the dialog select the based ACC in which you want to move the selected property.
-
Click the "Analyze" button.
-
At the "Analysis result and required action." section, all the ACCs that will be affected by this refactoring are listed. Depending on the case, the following user actions might be needed in order to refactor the property.
-
An affected ACC is not in WIP state but it is owned by the current user. In this case, click on the DEN of the affected ACC to open it in a new tab and move it to the WIP state.
-
An affected ACC is in Published state. In this case, click on the DEN of the affected ACC to open it in a new tab and revise it by clicking the "Revise" button at the top-right of the page.
-
An affected ACC is owned by another user and is not in WIP state. In this case, the user either asks the other user to move it to WIP state or to transfer the ACC ownership.
-
-
-
Once all the required actions are performed, click the "Analyze" button again. The message "Ready to refactor." should appear next to all the affected ACCs.
-
Click the "Refactor" button.
The figure below shows an example where the user has refactored Property1 from ACC4 up to ACC1. Both ACC4 and ACC2 are affected as Property1 has to also be removed from ACC2.
 |  |
The refactored property is inserted at the bottom of the property sequence in the target ACC. In the above example, Property1 is inserted as the last property of ACC1.
Cancel an ACC revision
See Cancel a CC revision.
Change ACC states
See Change CC states.
Transfer ownership of an ACC
See Transfer ownership of a CC.
View history of changes to an ACC
See View Change History of a CC.
Create OAGi Extension point for an ACC
This is a feature specific to connectSpec design pattern. Each connectSpec component typically has an extension point. The connectSpec extension design pattern is as follows. First, create an ACC whose "Component Type" is set to "Base (Abstract)"; its object class term should end with "Base", e.g., "Party Base". This is the ACC where all properties reside. Then, create another ACC whose "Component Type" is set to "Semantics" and it is based on the first ACC. The object class term of this ACC should be the same as that of the first ACC but without the word "Base", e.g., "Party". For connectSpec, the Semantics ACC is where the extension point should be created. connectCenter provides a macro to do that. Necessary entities are created with correct names and properties. To do that:
-
Make sure the ACC detail page is open, the ACC is in the WIP state with no unsaved changes, its "Component Type" is "Semantics", its "Object Class Term" and "Namespace" are set, and it is owned by the current user (who must be a developer). The ACC must not already have a property named "Extension".
-
Click on the ellipsis next to the root node of the ACC and select "Create OAGi Extension Component". This menu item is not visible if the ACC already has a property named "Extension".
-
A dialog appears asking for confirmation or cancellation.
-
If confirmed, the ACC will be inserted with the "Extension" property at the bottom. It should be noted that if the user removes the property and invoke this macro again, it will result in duplicated extension components created. The user can simply add the existing property extension ASCCP instead of invoking the macro. For connectSpec, the proper extension ASCCP for an ACC is the one with this DEN pattern "Extension. [Object Class Term] Extension". For example, for "Party. Details" ACC, a proper extension ASCCP is "Extension. Party Extension". If duplicated extension CCs were created, the user should delete them. The extraneous components would include the extension ASCCP and ACC with DENs such as "Extension. Party Extension" and "Party Extension. Details". They would have older update timestamps.