Manage OpenAPI Document
OpenAPI document management functionality allows end users to generate and merge multiple OpenAPI YML files into one file. This functionality creates an OpenAPI 3.x persistence layer in the connectCenter database and provides UI to support API Specification Management.
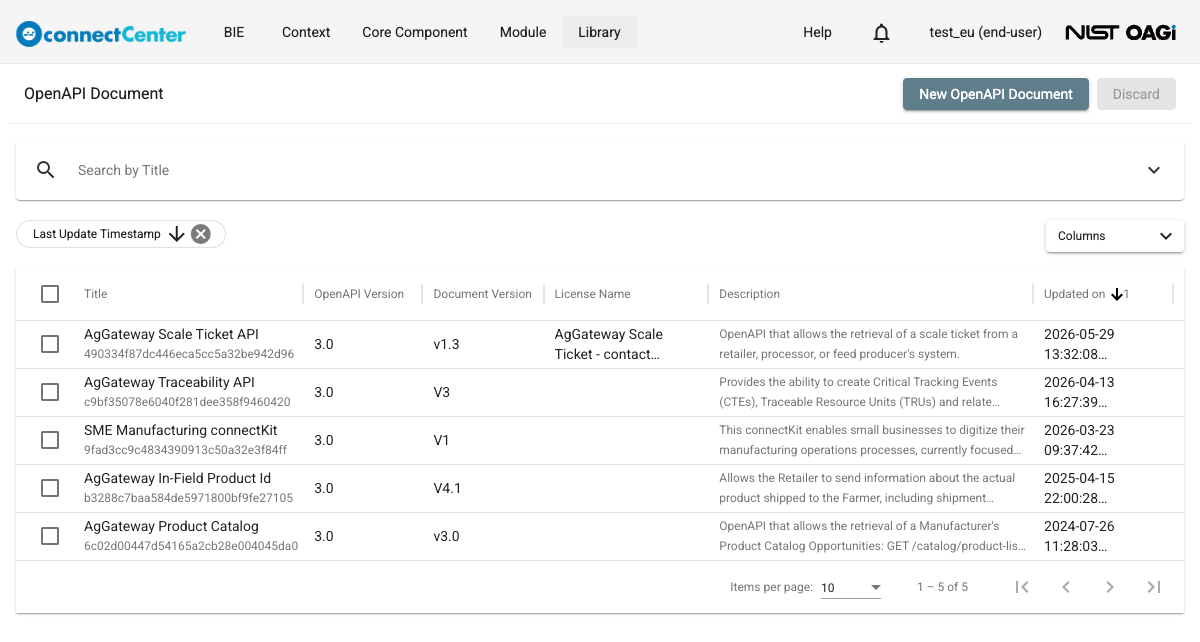
The OpenAPI Document functionality is aimed at end users: the "OpenAPI Document" menu item under the "BIE" menu is not shown when logged in as a developer. End users can view, create, edit or discard OpenAPI Documents through this menu item. The "OpenAPI Document" page lists the existing documents with the Title, OpenAPI Version, Document Version, License Name, Description and Updated on columns and a "Search by Title" box.
Create an OpenAPI Document
To create an OpenAPI document:
-
On the top menu of the page, click "BIE".
-
Choose "OpenAPI Document" from the drop-down list.
-
On the returned "OpenAPI Document" page, click "New OpenAPI Document" located at the top-right of the page.
-
On the returned "Create OpenAPI Document" page, fill out the following fields:
- OpenAPI Version (Mandatory) Note, "3.1" is selected as default. You select the minor version ("3.0" or "3.1"); the generated document declares the corresponding canonical patch release ("3.0.4" for "3.0" and "3.1.2" for "3.1").
- Title (Mandatory)
- Document Version (Mandatory)
- Terms of Service A URI to the terms of service for the API
- Contact Name
- Contact URL
- Contact Email
- License Name
- License URL
- Description
-
Click the "Create" button.
Edit an OpenAPI Document
To edit an OpenAPI document:
-
On the top menu of the page, click "BIE".
-
Click "OpenAPI Document" menu item.
-
Use the "Search by Title" box or the Description filter to find the desired OpenAPI Document. Open its "Edit OpenAPI Document" page by clicking the OpenAPI document title in the Title column. See also How to use the Search field in general.
-
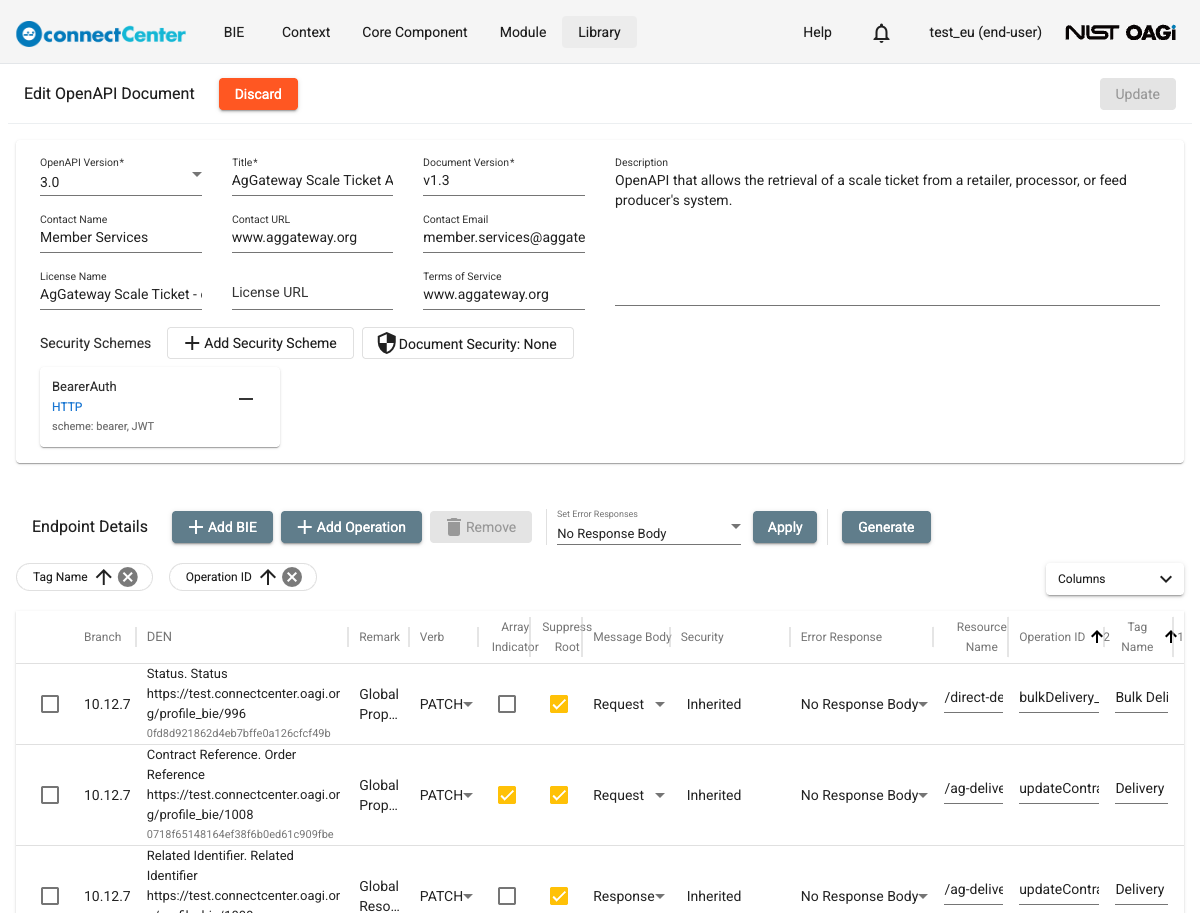
You can change every document field: the OpenAPI Version (a required "3.0"/"3.1" select at the top-left), Title, Document Version, Contact Name, Contact URL, Contact Email, License Name, License URL, Terms of Service and Description.
-
Click the "Update" button (pressing Ctrl+S, or Cmd+S on macOS, does the same). Update checks the document for uniqueness: if another OpenAPI Document has the same Title, OpenAPI Version, Document Version and License Name, an "Invalid parameters" dialog reports "Another OpenAPI Doc with the same title, OpenAPI Version, Doc Version and License Name already exists!" and the changes are not saved.
Discard an OpenAPI Document
There are two methods for discarding an OpenAPI Document. The first one is:
-
On the top menu of the page, click "BIE".
-
Choose "OpenAPI Document" from the drop-down list.
-
Locate the OpenAPI document you want to discard. Use the "Search by Title" box or the Description, Updater, Updated start date, or Updated end date search filters to help locate the desired OpenAPI document. (see How to use Search Filters). Click on the checkbox right before the desired OpenAPI document.
-
Click the "Discard" button at the top-right of the page.
-
A dialog is open where you can confirm or cancel the request.
The second method is:
-
On the top menu of the page, click "BIE".
-
Choose "OpenAPI Document" from the drop-down list.
-
Locate the OpenAPI Document you want to discard and click on its title to open the "Edit OpenAPI Document" page.
-
Click the "Discard" button.
-
The "Discard OpenAPI Doc?" dialog is open, warning "The OpenAPI Doc will be permanently removed."; confirm or cancel the request.
Add BIEs to OpenAPI Document
To add BIEs to an OpenAPI Document:
-
On the top menu of the page, click "BIE".
-
Choose "OpenAPI Document" from the drop-down list.
-
Locate the desired OpenAPI Document and click on its title to open the "Edit OpenAPI Document" page.
-
In the Endpoint Details section, click the "Add BIE" button. (A sibling "Add Operation" button adds an operation without a BIE — see Add Operations without a BIE.)
-
On the newly opened "Add BIE For OpenAPI Document" dialog, locate the desired top-level BIE. Use the DEN, Business Context, Branch, State, Owner, Updater, Updated start date, or Updated end date search filters to help locate the desired BIE. (see How to use Search Filters).
-
Select the desired BIE node. You can select several BIEs and add them in one batch. Select the required Verb option and the required Message Body (
RequestorResponse) option from the dropdown list. ARequestbody is not available for aGET(aGETnever carries a request body); it is available for every other verb, includingDELETE(see DELETE operations with a request body). If the target endpoint already carries a body in that slot, the "Add" button is disabled with "This endpoint already has a Request/Response body." (see View/Edit Endpoint Details of an OpenAPI Document). -
Check the Array Indicator box if needed. When you add the BIE, an Operation ID is generated automatically in the form
<verb><BIEName>(for examplecreateItemInstance) using the selected Verb; checking the Array Indicator box appends aListsuffix (for examplecreateItemInstanceList). You can change the Operation ID later in the Endpoint Details panel. -
Click the "Add" button. Each added operation's Tag Name defaults to the BIE's property term.
Configure Security Schemes
The "Edit OpenAPI Document" page provides a Security Schemes section between the document information fields and the "Endpoint Details" table. Here you can declare the security schemes that the generated OpenAPI document offers and choose how they apply to the document and to individual operations. When no scheme is configured, a hint reads "No scheme configured — the default OAuth 2.0 scheme will be used." and the generated output keeps the default OAuth 2.0 scheme.
To add a security scheme:
-
Open the desired OpenAPI Document's "Edit OpenAPI Document" page.
-
In the Security Schemes section, click the "Add Security Scheme" button.
-
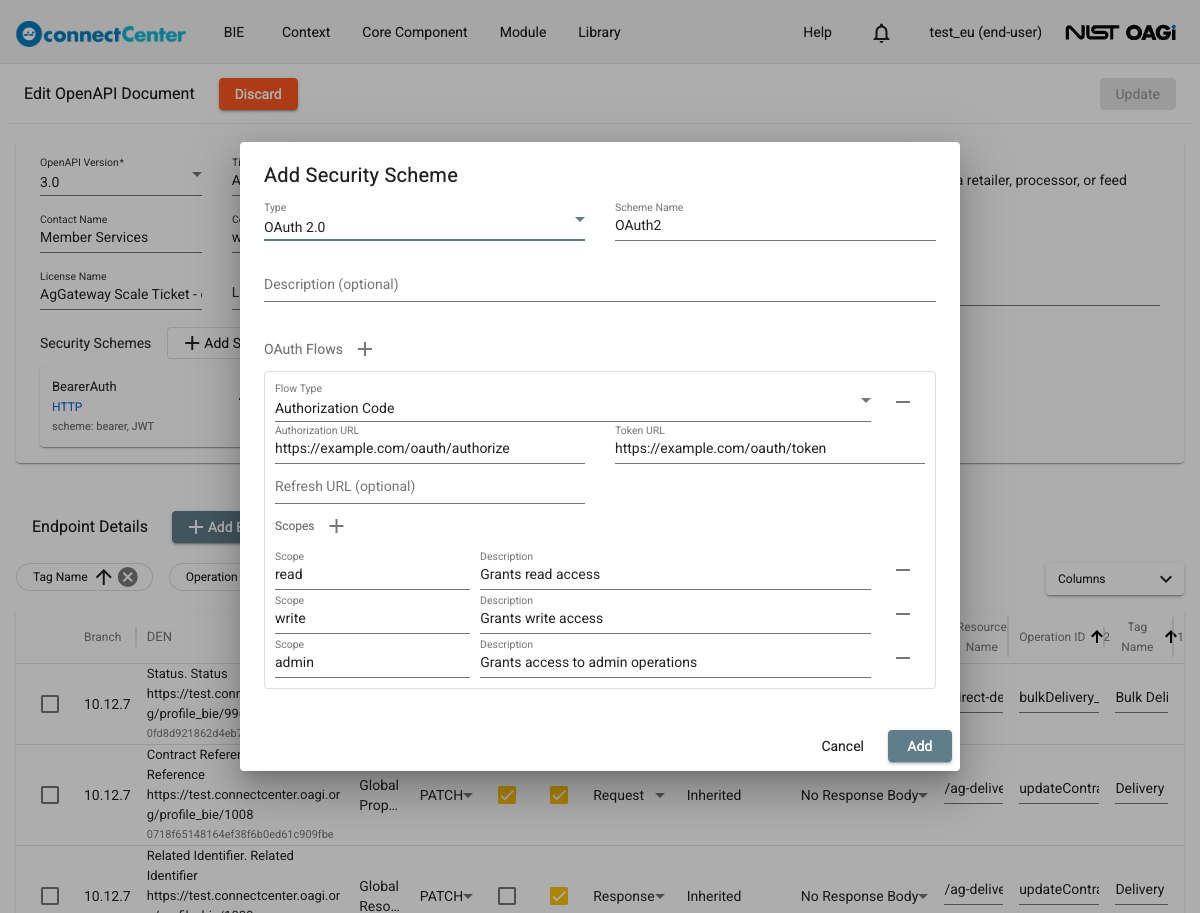
On the returned "Add Security Scheme" dialog, select a Type and fill out the type-specific fields:
- Type (Mandatory). One of API Key, HTTP, OAuth 2.0, or OpenID Connect.
- Scheme Name. The name used to reference this scheme in security requirements. A default name is filled in per type (ApiKeyAuth, BasicAuth, BearerAuth, OpenID, or OAuth2, numbered when needed to stay unique).
- Description (optional).
- For API Key: In (Query, Header, or Cookie) and Name. The dialog opens with this type pre-selected and In = Header, Name =
X-API-Key. - For HTTP: Scheme (Basic or Bearer); when Bearer is selected, an optional Bearer Format (for example, JWT) field appears.
- For OpenID Connect: OpenID Connect URL.
- For OAuth 2.0: an OAuth Flows editor. Click the add icon next to OAuth Flows to add a flow, choose its Flow Type, fill the applicable Authorization URL, Token URL and optional Refresh URL, and add one or more Scopes (each with a Scope name and Description). A new OAuth 2.0 scheme starts with a pre-filled Authorization Code flow carrying example URLs and
read/write/adminscopes that you can adapt.
-
Click the "Add" button. It stays disabled until the scheme is complete and its name is unique.
Each saved scheme appears as a card in the Security Schemes section. Click a card to re-open the dialog (now titled "Edit Security Scheme", with a "Save" button), or click the minus icon on the card to remove the scheme. Removing a scheme also removes it from the document-level requirement and from every operation's requirement (an operation override that loses all its schemes reverts to Inherited, while a Public override stays Public); renaming a scheme carries the new name into all requirements. While any scheme is incomplete, or a requirement still references a removed scheme, the "Update" and "Generate" buttons are disabled.
To set the document-level security requirement:
-
In the Security Schemes section, click the "Document Security" button. Its label shows a summary of the current requirement (or "None"). The button is disabled until at least one security scheme (or an existing security requirement) exists.
-
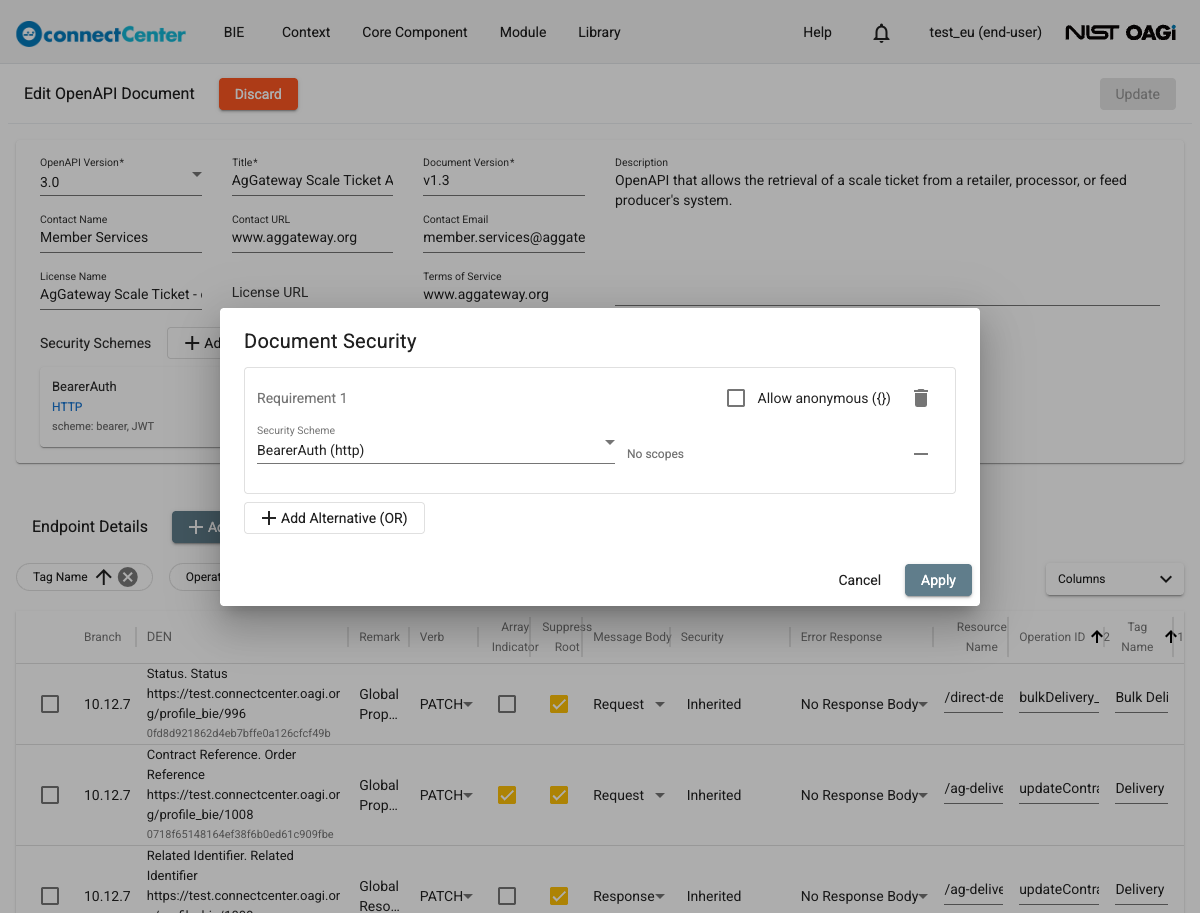
On the returned "Document Security" dialog, build the requirement:
- Within a requirement block (for example, "Requirement 1"), pick the Security Scheme of each row and click "Add scheme (AND)" to require more than one scheme together. For an OAuth 2.0 scheme a Scopes multi-select offers the scheme's declared scopes; for an OpenID Connect scheme you type scope names into a Scopes (comma-separated) field; other scheme types show "No scopes".
- Click "Add Alternative (OR)" to add an alternative requirement.
- Check "Allow anonymous ({})" to allow access without authentication.
-
Click the "Apply" button.
-
Click the "Update" button on the "Edit OpenAPI Document" page to save the changes.
Set Operation Security
The "Endpoint Details" table includes a Security column that lets you control the security of each operation. When no security scheme is configured, the column shows a dash (—) with the tooltip "Add a Security Scheme to configure operation security"; otherwise it shows Inherited, Public, or a summary of the operation's own requirement.
To set the security of an operation:
-
In the "Endpoint Details" table, click the Security cell of the desired operation.
-
On the returned "Operation Security" dialog, choose one of:
- Use document security — the operation inherits the document-level requirement.
- No security for this operation — the operation is public.
- Override with selected schemes — build a custom requirement (the same "Add scheme (AND)", "Add Alternative (OR)" and "Allow anonymous ({})" controls as the Document Security dialog).
-
Click the "Apply" button.
-
Click the "Update" button on the "Edit OpenAPI Document" page to save the changes.
Configure Error Responses
In addition to its success response, every operation that connectCenter generates is given a default set of 4xx/5xx error responses. By default these error responses are description only — a status code and a human-readable description with no response body. You can attach a structured error body to an operation through the Error Response column of the Endpoint Details table.
The set of default error codes generated for an operation depends on its Verb, its Array Indicator, and the document's OpenAPI Version:
401,403,500,502,503and504are generated for every operation.400(Bad Request) is generated forPOST,PUTandPATCH, and for aGETthat returns a collection (Array Indicator checked).404(Not Found) is generated forPUT,PATCHandDELETE, and for aGETthat returns a single item (Array Indicator unchecked).409(Conflict) is generated forPOST,PUT,PATCHandDELETE.415(Unsupported Media Type) and422(Unprocessable Content) are generated for the body-bearing verbsPOST,PUTandPATCH— and forDELETEonly when the document is OpenAPI 3.1, because aDELETEcarries a request body only in 3.1 (see DELETE operations with a request body).
The Error Response column of each operation offers three body types:
- No Response Body (the default) — the generated error responses carry only the status code and a description, with no body. Existing documents keep this behavior until you opt in.
- IETF Problem Details — each generated error response carries an
application/problem+jsonbody that references a shared RFC 9457ProblemDetailsschema (withstatus,titleanddetailrequired, andtypeandinstanceoptional) together with an illustrative example for the status. - OAGi Confirm Message — each generated error response carries an
application/jsonbody that references a Confirm Message BIE that you pick. Once picked, the cell shows a Selected Confirm Message link that opens the chosen BIE in a new tab.
To set the Error Response body type of a single operation:
-
Open the desired OpenAPI Document's "Edit OpenAPI Document" page.
-
In the Endpoint Details table, open the Error Response selector of the desired operation and choose No Response Body, IETF Problem Details or OAGi Confirm Message.
-
Choosing OAGi Confirm Message immediately opens the "Select Confirm Message BIE" dialog: pick the Confirm Message BIE and click the "Select" button. If you cancel without picking one, the selector reverts to its previous value. To swap the BIE later, click the edit (pencil) icon in the cell to re-open the picker. For an operation with no message body in a document that spans several releases, the picker's Branch becomes a selector over the document's releases; otherwise it is locked to the operation's release.
-
Click the "Update" button.
To apply one Error Response body type to every operation at once, use the Set Error Responses control above the Endpoint Details table:
-
Above the Endpoint Details table, choose a body type in the Set Error Responses selector.
-
Click the "Apply" button. Any unsaved inline edits are saved first, and the chosen body type is applied immediately — no further "Update" click is needed. A notification confirms with 'Applied "<body type>" to all operations.'
- No Response Body and IETF Problem Details are applied to every operation.
- OAGi Confirm Message first prompts you to select a Branch (one of the releases present in the document) and a Confirm Message BIE, then applies it to that release's operations together with any operation that carries no message body.
A newly added operation inherits the document's prevailing Error Response setting: when every existing operation uses the same body type — all IETF Problem Details, or all OAGi Confirm Message with a single Confirm Message BIE that is unambiguous for the new operation's release — the new operation adopts it; otherwise the new operation defaults to No Response Body.
Add Operations without a BIE
Some API operations, such as DELETE and PATCH, do not need to reference a BIE because they carry no message body. You can add such operations directly to an OpenAPI Document.
To add an operation that does not reference a BIE:
-
On the top menu of the page, click "BIE".
-
Choose "OpenAPI Document" from the drop-down list.
-
Locate the desired OpenAPI Document and click on its title to open the "Edit OpenAPI Document" page.
-
In the Endpoint Details panel, click the "Add Operation" button.
-
On the returned "Add Operation" dialog, fill out the following fields:
- Verb (Mandatory) Choose
DELETEorPATCH. - Resource Name (Path) (Mandatory) The endpoint path, for example
/production-order/{id}. As the hint says, "Path segments wrapped in {...} become path parameters." - Operation ID (Mandatory) "Auto-generated from the verb and path; you can override it." — for example,
PATCH /production-order/{id}becomesupdateProductionOrder. - Tag (Optional)
- Summary (Optional)
- Verb (Mandatory) Choose
-
Click the "Add" button.
The new operation is listed in the Endpoint Details panel with an empty DEN cell. Because the operation does not reference a BIE, its Array Indicator, Suppress Root, and Message Body controls are disabled. You can still edit its Verb, Resource Name, Operation ID, and Tag Name, and remove it like any other row.
When you generate the OpenAPI YML file, the operation is produced with no request body and a status-only response derived from the verb: DELETE produces 202 Accepted and PATCH produces 204 No Content.
DELETE operations with a request body
A DELETE operation backed by a BIE can carry a Message Body:
-
Response— the generatedDELETEoperation returns the BIE in a200response, like the other body-bearing verbs. -
Request— the generatedDELETEoperation carries the BIE as a request body. Whether the request body is kept depends on the document's OpenAPI Version:- In OpenAPI 3.1, a request body on
DELETEis honored: the generated operation includes arequestBodypaired with a status-only202(Accepted) success response. - In OpenAPI 3.0, the specification does not permit a request body on
DELETE, so it is dropped during generation: the generated operation has norequestBody(and leaves no orphan request schema behind), keeping only the status-only202(Accepted) success response.
- In OpenAPI 3.1, a request body on
When a 3.0 document contains a DELETE operation with a Request message body, an amber warning banner appears above the Endpoint Details table:
A Request Body on a DELETE operation is ignored in OpenAPI 3.0. Change the OpenAPI Version to 3.1 to include it in the generated document.
To keep the request body, change the document's OpenAPI Version to 3.1 and click the "Update" button. (You can change the OpenAPI Version at the top of the "Edit OpenAPI Document" page.)
View/Edit Endpoint Details of an OpenAPI Document
To view / edit all the operations currently assigned to an OpenAPI document:
-
On the top menu of the page, click "BIE".
-
Choose "OpenAPI Document" from the drop-down list.
-
Locate the desired OpenAPI Document and click on its title to open the "Edit OpenAPI Document" page.
-
In the Endpoint Details panel, select the desired row. The Resource Name, Operation ID and Tag Name cells can be edited directly, and the Verb cell is an inline dropdown; for an operation backed by a BIE, the Message Body cell is an inline dropdown as well, and the Security and Error Response cells open their own controls (see Set Operation Security and Configure Error Responses). Changing the Verb to
GETautomatically flips aRequestmessage body toResponse. -
Check or uncheck the Array Indicator or Suppress Root option.
-
Click the "Update" button.
Each endpoint — that is, each (Resource Name, Verb) pair — can carry at most one Request and one Response body. When an edit would create a duplicate, the Message Body select turns red with "Duplicate Request/Response body on this endpoint.", the Resource Name cell shows "Each (Resource Name, Verb) can have only one Request and one Response body.", and clicking "Update" is blocked with the same message until the conflict is resolved.
Operation ID naming and validation
In the Endpoint Details panel of an OpenAPI Document, each operation has an Operation ID. connectCenter generates it automatically in the form <verb><BIEName> and keeps it in sync as you edit the row:
-
The leading verb word comes from the selected Verb:
GETbecomes query,POSTbecomes create,PUTbecomes replace,PATCHbecomes update, andDELETEbecomes delete. For the BIE Item Instance, for example, the GET operation isqueryItemInstanceand the POST operation iscreateItemInstance. -
When you change the Verb of an operation backed by a BIE, the Operation ID is rebuilt from the new verb word and the BIE's name — so a custom name you typed is replaced (for example,
queryMyCustomNamebecomescreateItemInstancewhen you switchGETtoPOST). Only for a bodyless operation (added through "Add Operation", with no BIE) is your typed name kept, with just the leading verb word swapped. -
When the Array Indicator is checked, a
Listsuffix is added to the Operation ID (for examplequeryItemInstanceList) and a-listmarker is added to the last path segment of the Resource Name (for example/item-instance-list); unchecking it removes both. -
You can override the generated value at any time by typing directly in the Operation ID column.
The Operation ID is required and must be unique within the document:
-
If the Operation ID is left empty, the cell shows "Operation ID is required." and clicking the "Update" button is blocked.
-
If two operations in the same document have the same Operation ID, the affected cells show "Operation ID must be unique within the document."
Remove BIEs from an OpenAPI Document
To remove BIEs from an OpenAPI Document:
-
On the top menu of the page, click "BIE".
-
Choose "OpenAPI Document" from the drop-down list.
-
Locate the desired OpenAPI Document and click on its title to open the "Edit OpenAPI Document" page.
-
In the Endpoint Details panel, select the desired BIE node and click the "Remove" button. (The button is shown only while the table has rows.)
-
Confirm the "Remove selected BIE from the OpenAPI Doc?" dialog by clicking "Remove".
OpenAPI YML Expression generation
The end user uses OpenAPI document to represent the selected BIEs into OpenAPI 3.0 or 3.1 syntax. The OpenAPI Version chosen on the document determines the syntax of the generated file:
- 3.1 (the default) generates JSON Schema 2020-12 shapes — for example, nullability is expressed with a type union or an
anyOfnull branch rather than the OpenAPI 3.0-onlynullable: truekeyword — and honors a request body on aDELETEoperation. - 3.0 generates OpenAPI 3.0 shapes and drops any request body on a
DELETEoperation (see DELETE operations with a request body).
You choose the minor version; the generated file's root openapi field declares the corresponding canonical patch release — 3.1.2 for 3.1 and 3.0.4 for 3.0 (these are errata-only patch releases of the OpenAPI Specification). Documents saved with an older patch version such as 3.0.3 or 3.1.1 are shown as their minor family (3.0 or 3.1) when reopened.
To generate an OpenAPI YML file:
-
On the top menu of the page, click "BIE".
-
Choose "OpenAPI Document" from the drop-down list.
-
Locate the desired OpenAPI Document and click on its title to open the "Edit OpenAPI Document" page.
-
Click the "Generate" button. The button is disabled while the document has no operations. The document is generated from its saved state, so if there are unsaved changes the action is blocked with the notice "There are unsaved changes. Please click Update before generating the document." In that case, click the "Update" button first and then click "Generate" again.
-
A YML file with the filename format: title-version-timestamp.yml will be saved to the local drive. The generated file includes the configured security schemes under
components.securitySchemestogether with the document-level and per-operationsecurityrequirements. If no security scheme is configured, the default OAuth 2.0 scheme is used and each operation additionally carries<BieName>Read/<BieName>Writescopes on that default scheme, matching the pre-security-scheme output.