Manage Context
A business context is required to create a BIE. Therefore, the user should understand the context management before the BIE management. All context pages are reached from the "Context" top menu, which has three items: "View/Edit Context Category", "View/Edit Context Scheme", and "View/Edit Business Context". (In tenant-enabled deployments the "Context" menu is visible only to administrators.)
Understanding Context
There are three main concepts related to context management, namely, Context Category, Context Scheme and Business Context. The dependency between these three concepts and the BIE is that in order for a BIE to be created, a Business Context is needed, but a Business Context requires a Context Scheme, and a Context Scheme requires a Context Category. Hence, from the user’s perspective it is easier for him to understand these concepts if they are described in sequence starting with Business Context first, then Context Scheme, and finally Context Category.
The intent of a Business Context is to define the situation in which a BIE should be used. Therefore, a Business Context must be specified in order to create a BIE (as a BIE is a usage of a CC in a particular Business Context). A Business Context is specified by a combination of Context Scheme values.
As the name suggests, Context Scheme values within a Business Context are provided from one or more Context Schemes, each typically from different Context Categories. For example, a Context Scheme may be a standard industry classification scheme; and hence, its Context Category is Industry Context Category.
A Context Category indicates what a Context Scheme is about. Another example of Context Category can be Application Context Category or Business Process Context Category. Similar Context Schemes maintained by different standard agencies or different versions of the same standard schemes, may be used in specifying a Business Context. Context Category provides a way to indicate that these Context Schemes are intending to specify the same dimension about the Business Context.
It should be noted that for connectCenter, all the values within a Business Context are always interpreted conjunctively. For example, if the Business Context consists of [Automotive, Electronics] context values for the Industry context category, [Electronic Component Purchasing] for the Business Process, [Outbound B2B] for the Integration Type, it means that the BIE, to which the Business Context is assigned, is applicable when the transaction is an Outbound B2B transaction, within the Electronic Component Purchasing business process, AND Automotive and Electronics industries. The business context suggests that the BIE should be used in a business process involving Automotive Manufacturer/Vendor buying parts from an Electronics Manufacturer/Vendor. If the industry context were to have only Automotive context value, it would mean the BIE is for transacting within the Automotive industry.
Create a Context Category
To create a Context Category:
-
On the top menu of the page, click "Context".
-
Choose "View/Edit Context Category" from the drop-down list.
-
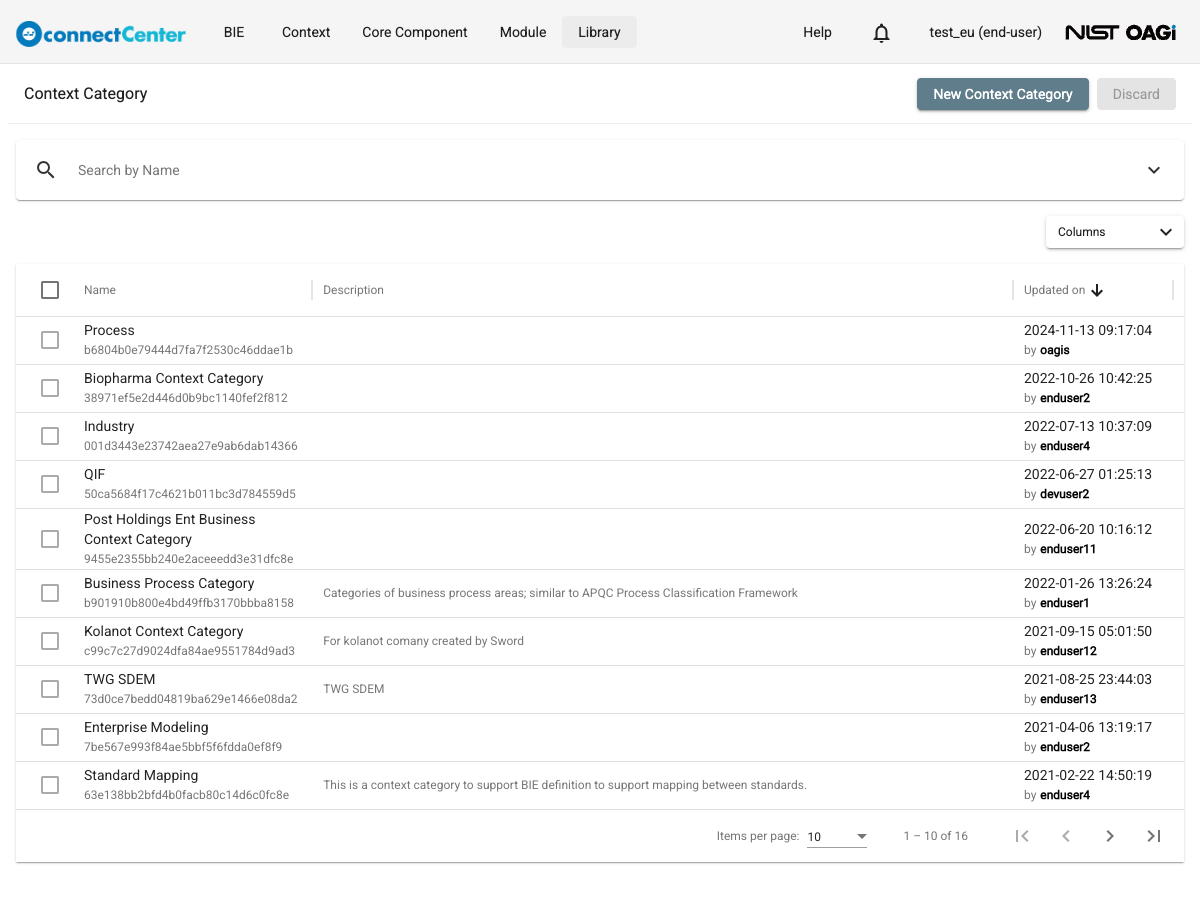
The "Context Category" page listing existing Context Categories is returned. The list shows the Name (with the GUID underneath), Description, and Updated on columns. The user is encouraged to search using the "Search by Name" bar or the Description, Updater, Updated start date, and Updated end date advanced filters, and reuse an existing Context Category first before creating a new one (see How to use the Search field in general and How to use Search Filters).
-
If the desired Context Category does not exist, click the "New Context Category" button located at the top-right of the page.
-
On the "Create Context Category" page, fill out the Name (Mandatory, up to 45 characters) and Description (Optional) fields. Note that there is no standard format for the Context Category name. However, it is recommended that a space-separated with uppercase initials is used, e.g., "Business Process Context Category".
-
Click the "Create" button. The application returns to the "Context Category" page with a "Created" message.
Create a Context Scheme
A Context Category must exist in order to create a Context Scheme (see Create a Context Category).
To create a Context Scheme:
-
On the top menu of the page, click "Context".
-
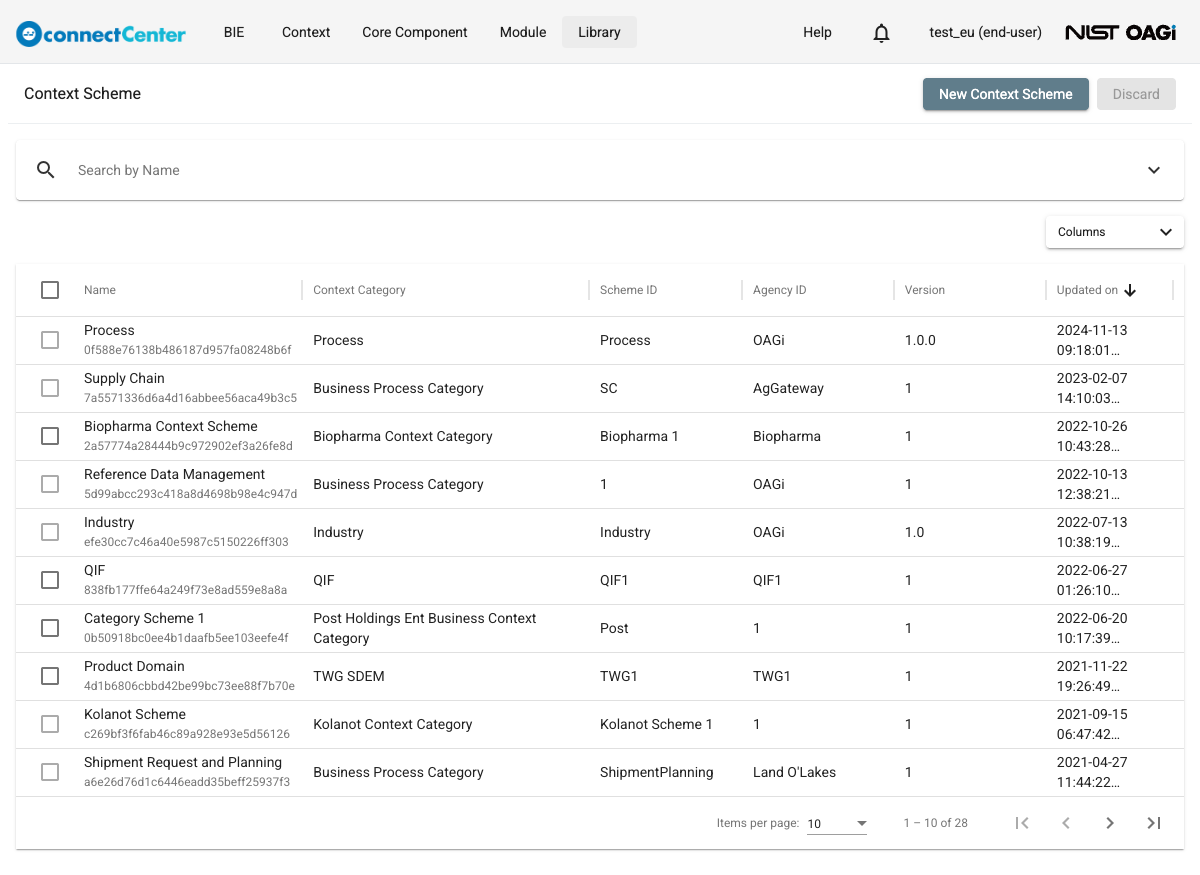
Choose "View/Edit Context Scheme" from the drop-down list. The "Context Scheme" page is returned. The list shows the Name (with the GUID underneath), Context Category (a link that opens the category in a new tab), Scheme ID, Agency ID, Version, and Updated on columns; when a scheme was loaded from a code list, the Scheme ID cell also links to that code list. It is recommended that the user search and try to reuse existing Context Schemes first. He can do that using the "Search by Name" bar (see How to use the Search field in general) or the Updater, Updated start date, and Updated end date advanced filters (see How to use Search Filters).
-
If the desired context scheme does not exist, click "New Context Scheme" located at the top-right of the page.
-
On the "Create Context Scheme" page, fill out the following fields:
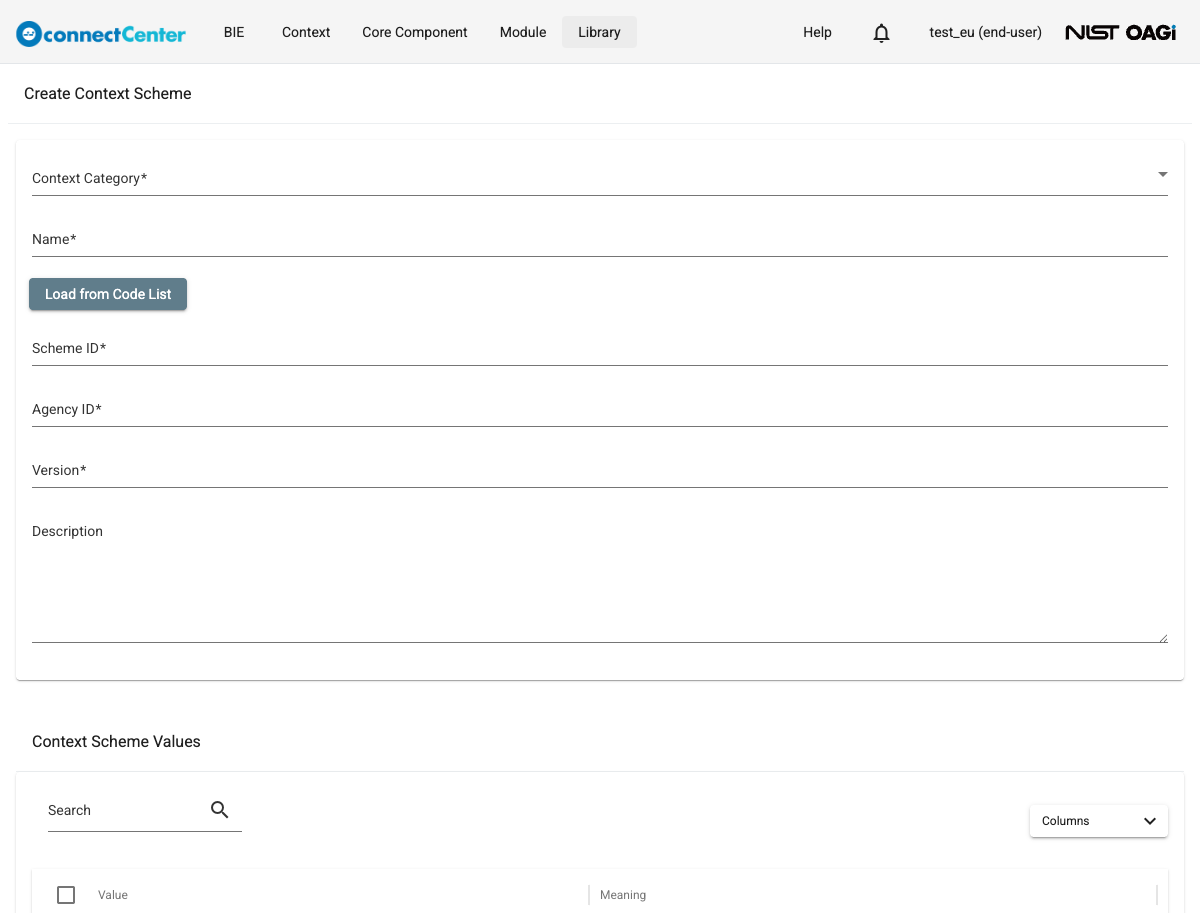
Field Description Context Category (Mandatory) Choose from existing ones in the drop-down list. The user can type in the field to narrow down the list. Name (Mandatory) Up to 255 characters. It is recommended that the format of the name be space-separated uppercase initials, such as "NAIC Industry Classification Scheme". This will enhance the human readability. Scheme ID (Mandatory) A free-form text field (up to 45 characters) for specifying the unique identifier of the context scheme – may be assigned by the organization maintaining the context scheme. Agency ID (Mandatory) A free-form text field (up to 45 characters) for specifying the unique identifier of the organization maintaining the context scheme. Version (Mandatory) A free-form text field (up to 45 characters) for specifying the version of the context scheme. Description (Optional) A free-form text field for documenting what the context scheme is, its purposes, etc. Instead of typing the Scheme ID, Agency ID, and Version by hand, the "Load from Code List" button (between the Name and Scheme ID fields) can fill them out along with the Context Scheme values from an existing code list. The loaded values can still be changed. For more details please see the Load from a Code List subsection.
It should be noted that the combination of the Scheme ID, Agency ID, and Version must be unique. The application rejects an attempt to create or update a Context Scheme that would duplicate an existing combination with the error "Another context scheme with the triplet (schemeID, AgencyID, Version) already exist!".
In addition, a Context Scheme that has the same Scheme ID and Agency ID as an existing one but a different Version must also keep the same Name. Otherwise, a warning dialog "The context scheme already has a variable with the same properties" appears; its "Create anyway" (or "Update anyway") button does not bypass the check — the server still rejects the request. To proceed, either reuse the Name of the existing scheme (a new version of the same scheme) or use a different Scheme ID/Agency ID.
-
Add a Context Scheme value (Optional). The "Context Scheme Values" table at the bottom of the page has its own Search box that filters values by Value or Meaning. See details about adding a value and other Context Scheme value manipulations in the Update a Context Scheme section.
-
Click the "Create" button. The application returns to the "Context Scheme" page with a "Created" message.
Load from a Code List
The "Load from Code List" button is used to automatically fill out the Scheme ID, Agency ID, and Version fields and the Context Scheme values with information from a Code List. The button is always available on the "Create Context Scheme" page. On the "Edit Context Scheme" page it appears only while neither the scheme nor any of its values is used by a Business Context; for an in-use scheme, the button is not shown.
If the Scheme ID, Agency ID, or Version fields or the values table are already filled in, clicking the button first opens a "Confirmation" dialog warning "All existing values will be removed and replaced with values from the code list."; click "Continue" to proceed or "Cancel" to keep the current content.
The "Code List" dialog is a full code-list browser: it has a "Branch" (release) selector on the left, a "Search by Name" bar, and advanced filters; its State filter is fixed to Published and Production, so only code lists in those states can be loaded. Check the checkbox of exactly one code list — the "Select" button stays disabled otherwise — and click "Select" (or "Cancel" to abort).
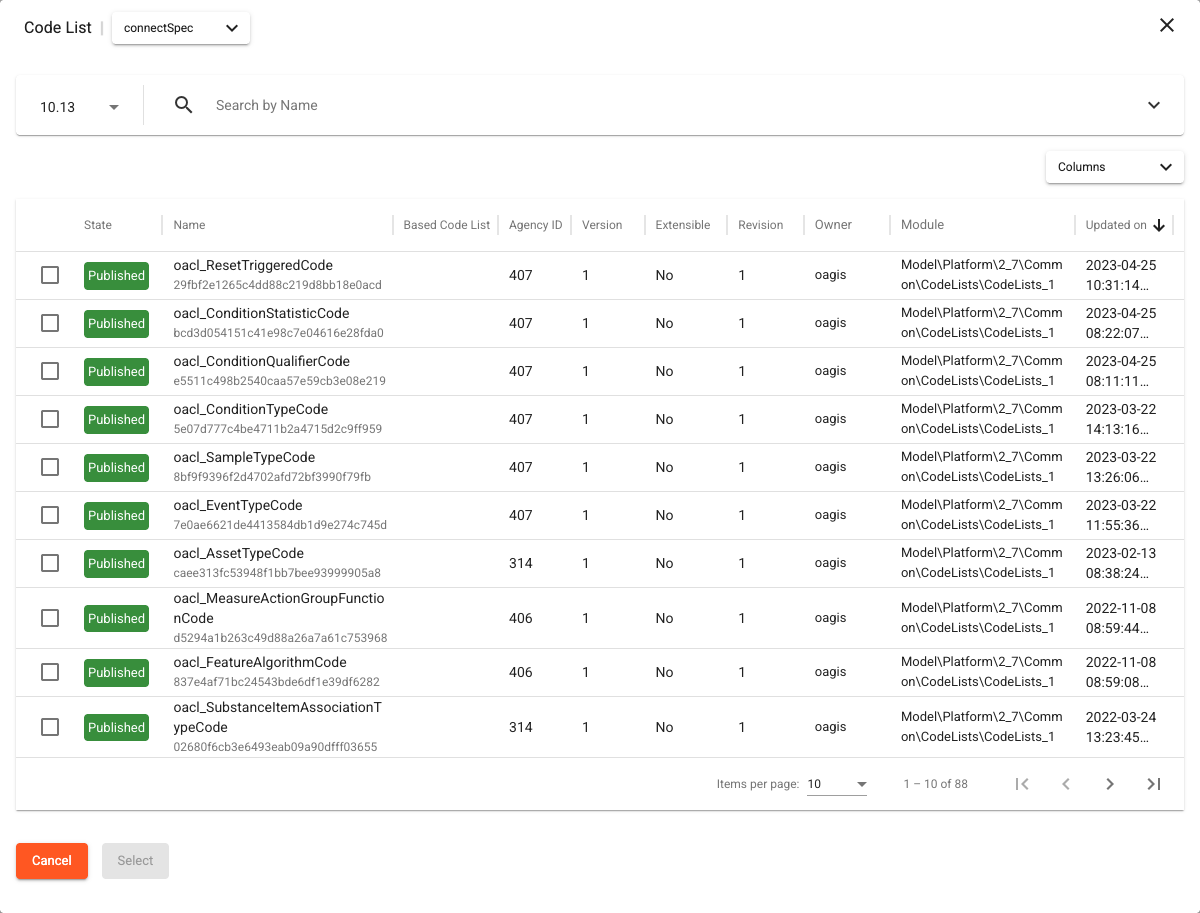
Once a Code List is selected, its values are copied into the Context Scheme. They can be still changed though. The Context Scheme values loaded from the code list can be changed or removed, and new values can be added (see Update a Context Scheme).
Create a Business Context
A Context Scheme must be available to create a Business Context. See Create a Context Scheme.
To create a Business Context:
-
On the top menu of the page, click "Context".
-
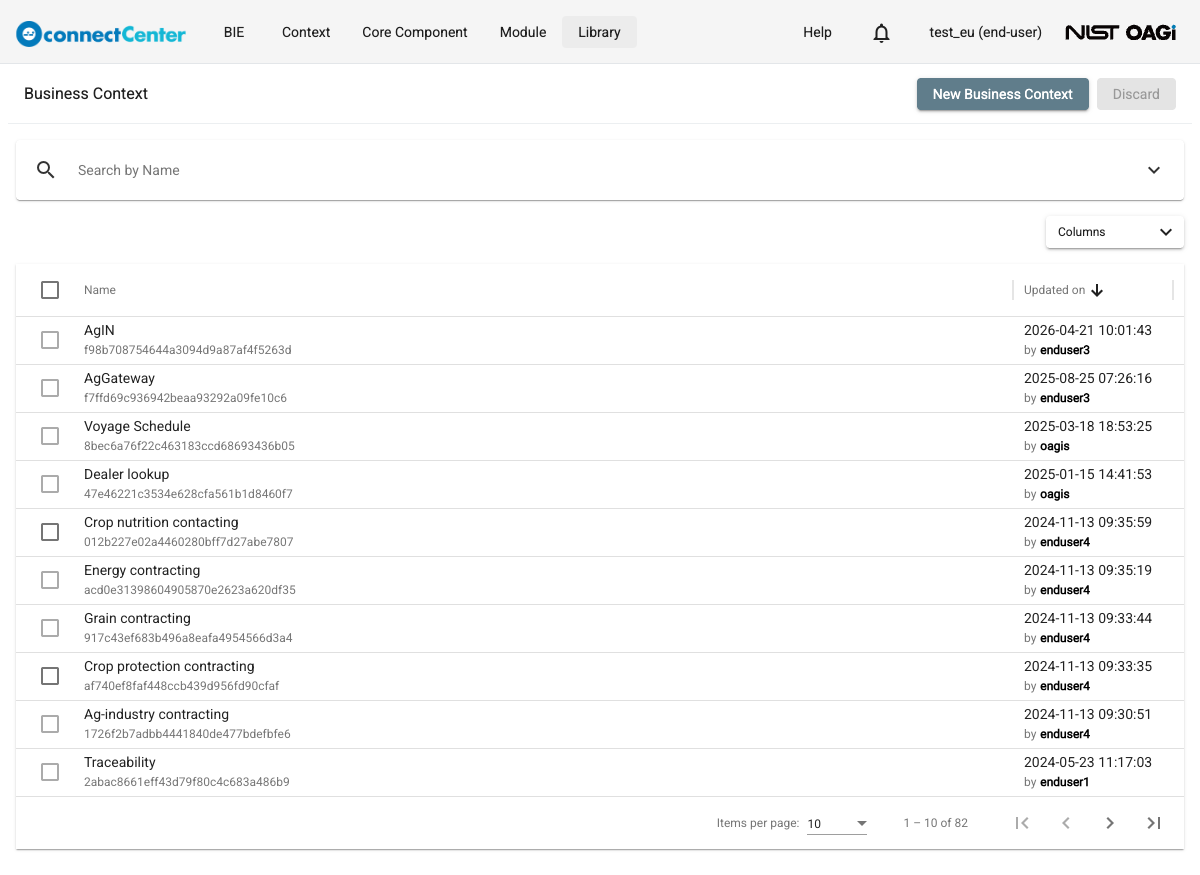
Choose "View/Edit Business Context" from the drop-down list. The "Business Context" page is returned showing the available Business Contexts (Name with the GUID underneath, and Updated on). The user is encouraged to reuse a Business Context. On this page, the user can browse and search for an existing Business Context that can meet his/her need using the "Search by Name" bar or the Updater, Updated start date and Updated end date advanced filters (see How to use Search Filters).
-
If existing Business Contexts do not meet your needs, click the "New Business Context" button at the top-right of the page to create a new one.
-
Fill out the Name (Mandatory, up to 100 characters) of the Business Context in the "Create Business Context" page. It is recommended that the format of the name be space-separated uppercase initials, such as "B2B Lab Management Inspection Order". This will enhance the human readability.
-
Click the "Add" button in the "Business Context Values" table to add one or more Business Context Values, although this is optional. See Update a Business Context for details of the "Add Business Context Value" dialog.
-
Once finished with the business context values, click the "Create" button at the bottom of the page. The application returns to the "Business Context" page with a "Created" message.
Update a Context Category
To update a Context Category:
-
On the top menu of the page, click "Context".
-
Click "View/Edit Context Category" menu item.
-
Use the "Search by Name" bar or the Description, Updater, and updated-date filters to find the desired Context Category. Open its "Edit Context Category" page by clicking the Name (the GUID shown underneath is plain text, not a link; clicking elsewhere on the row toggles the row's selection checkbox). See also How to use the Search field in general.
-
You can change the Name and the Description fields of the Context Category.
-
Click the "Update" button. On all three edit pages the "Update" button stays disabled until something is actually changed, and Ctrl/Cmd+S also submits the update.
Update a Context Scheme
To update a Context Scheme:
-
On the top menu of the page, click "Context".
-
Choose "View/Edit Context Scheme" from the drop-down list.
-
Locate the Context Scheme you want to update. You may search by using the "Search by Name" bar (see How to use the Search field in general) or the Updater, Updated start date, or Updated end date advanced filters (see How to use Search Filters). Click on the Name of the Context Scheme to open its editing page (the GUID underneath is not a link).
-
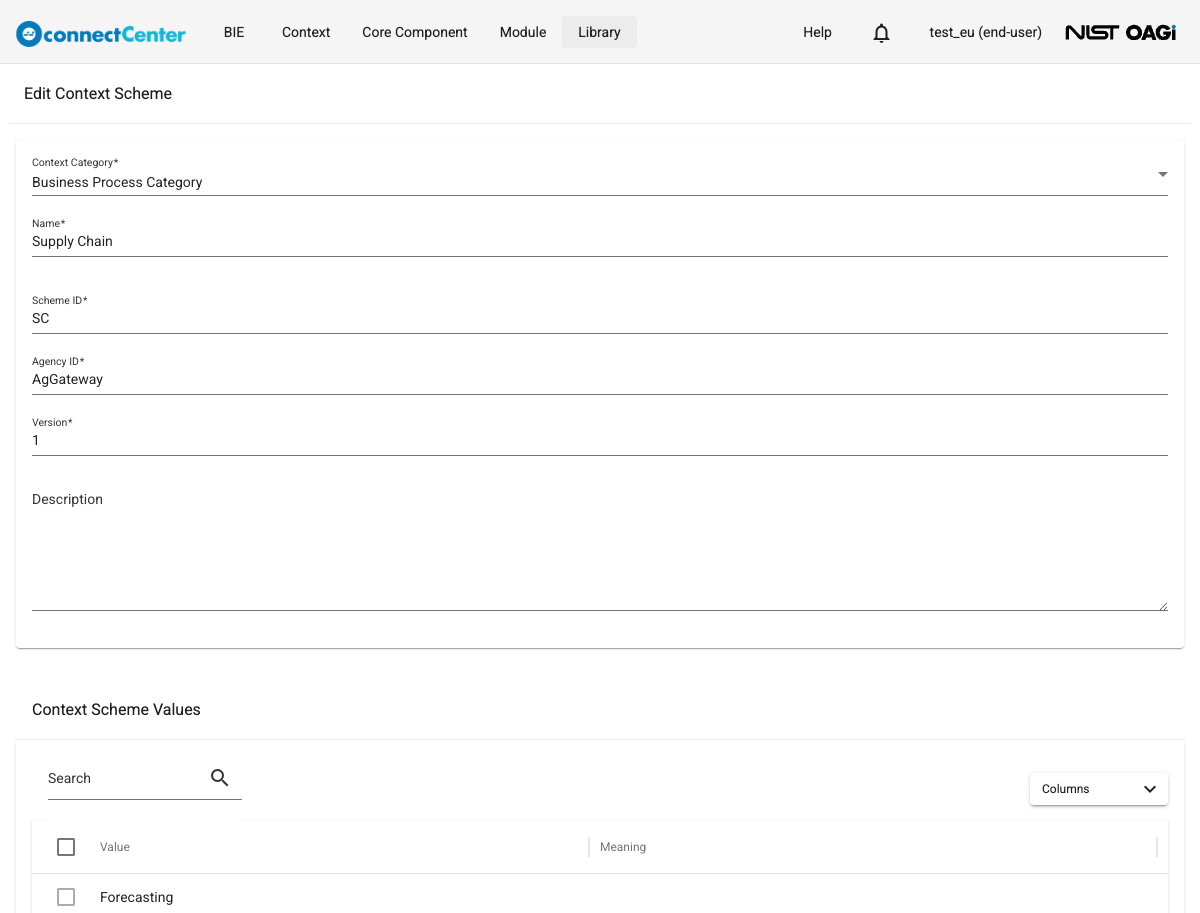
On the returned "Edit Context Scheme" page, the following actions may be performed:
-
Change Context Category, Name, Scheme ID, Agency ID, Version, Description. See Create a Context Scheme for required fields and the uniqueness constraint. While the scheme is not in use, the "Load from Code List" button may be used to re-initialize these fields and the Context Scheme Values; note, however, that all existing values will be removed and replaced (see Load from a Code List).
-
Add a Context Scheme Value.
-
Click the "Add" button located below the "Context Scheme Values" table.
-
In the "Add Context Scheme Value" dialog, fill in the following fields:
-
Value (Mandatory, up to 45 characters)
-
Meaning (Optional)
-
-
Click the "Add" button. A Value that duplicates another value in the same scheme is rejected with the message "<value> already exist".
-
To cancel the addition, use the Esc key or click outside the dialog.
-
-
Remove a Context Scheme Value by clicking the checkbox in front of the row of the Context Scheme Value you want to remove, clicking the "Remove" button, and confirming in the "Remove Context Scheme Value?" dialog. Note that a Context Scheme Value that is in use by a Business Context cannot be removed: its checkbox is disabled with the tooltip "It is currently in use by another component." Update the referencing Business Contexts first.
-
Update a Context Scheme Value by clicking anywhere on its row. The "Edit Context Scheme Value" dialog opens where you can edit the Value (Mandatory) and Meaning (Optional). Click "Save" to save changes. Alternatively, hit Esc key or click outside of the dialog to discard changes.
-
-
Click the "Update" button. No change is recorded to the database unless this update request is submitted.
Update a Business Context
To update a Business Context:
-
On the top menu of the page, click "Context".
-
Choose "View/Edit Business Context" from the drop-down list.
-
Locate the Business Context you want to update. Use the "Search by Name" bar (How to use the Search field in general) or the Updater, Updated start date, or Updated end date advanced filters to help locate the desired business context (see How to use Search Filters). Click on its Name to open its "Edit Business Context" page (the GUID underneath is not a link).
-
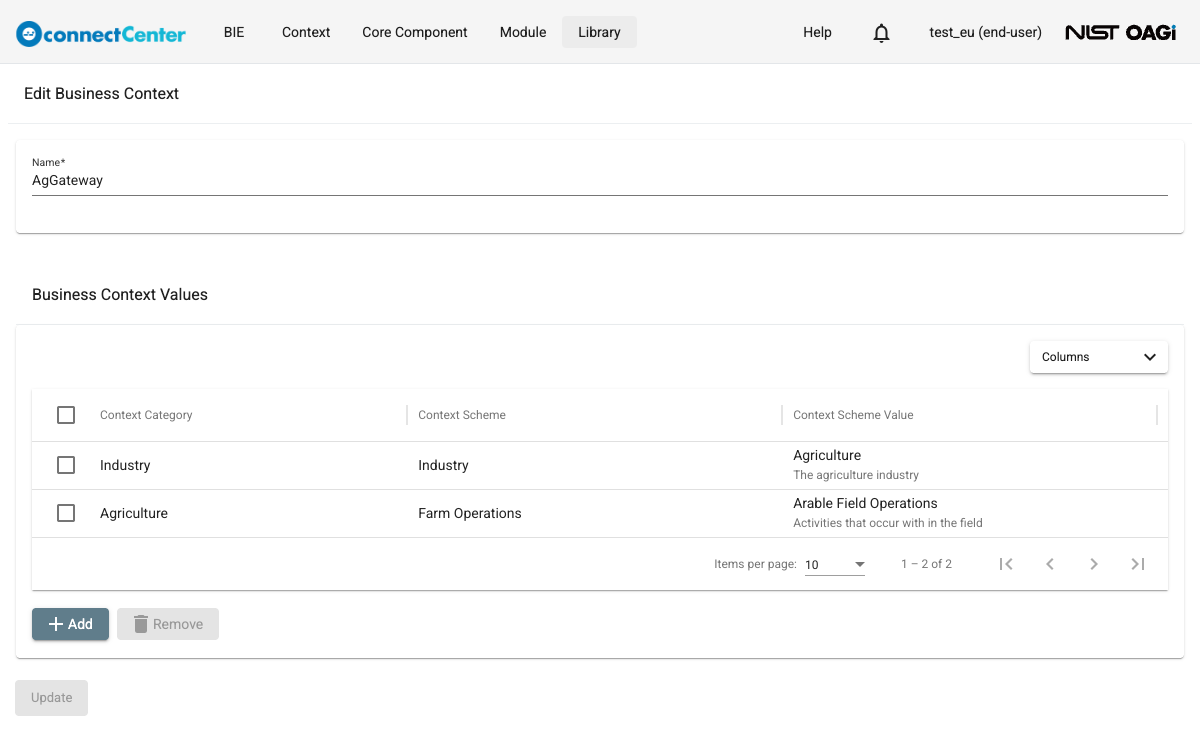
The "Edit Business Context" page is returned where the following actions can be performed:
-
Change the Name of the Business Context.
-
Add a Business Context Value.
-
Click the "Add" button below the "Business Context Values" table.
-
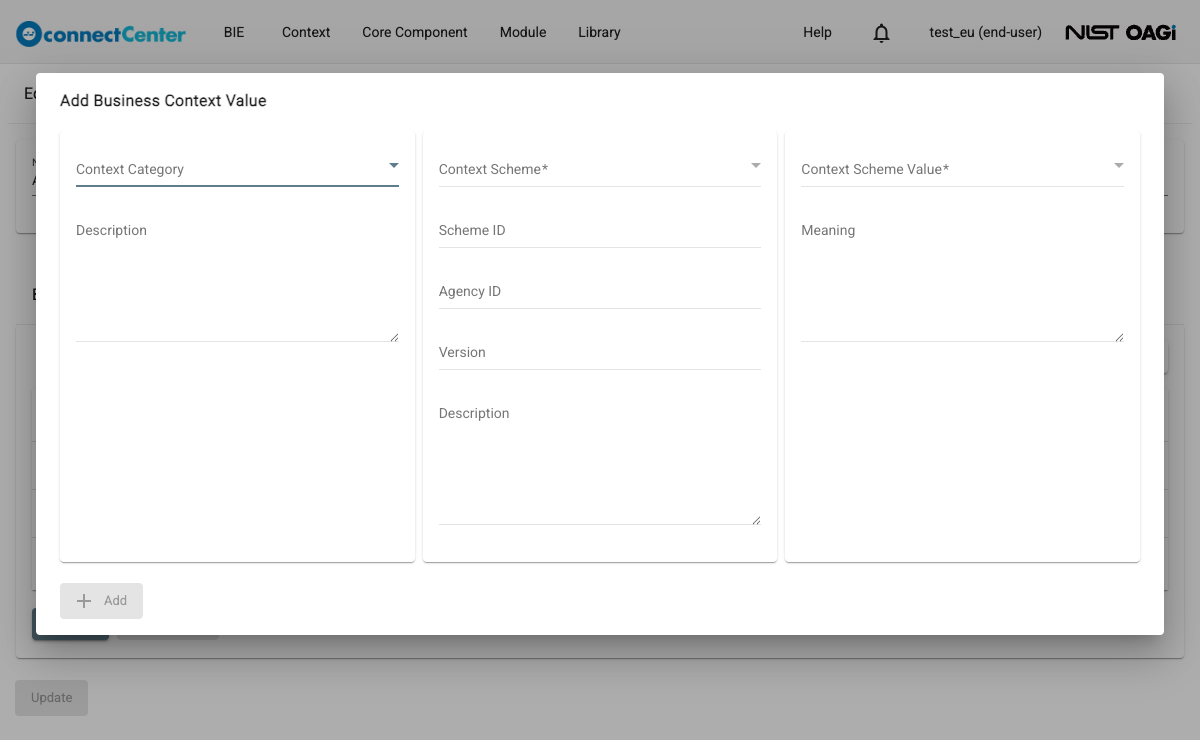
In the "Add Business Context Value" dialog, select the Context Category, then the Context Scheme, and then the Context Scheme Value (the selections have to be made in this order; changing the Category resets the Scheme and Value selections). Read-only companion fields show details of each selection: the Description of the category; the Scheme ID, Agency ID, Version, and Description of the scheme; and the Meaning of the value.
-
Click the "Add" button (it is enabled once a value is selected). To add another Business Context Value follow the same steps again. All the values are always interpreted conjunctively as described earlier (see Understanding Context). To cancel this addition, use the Esc key or click outside the dialog.
-
-
Remove a Business Context Value by clicking on the checkbox located in front of the row of the Business Context Value you want to remove, clicking the "Remove" button, and confirming in the "Remove Business Context?" dialog.
-
Update a Business Context Value by clicking on the row you want to change. The "Edit Business Context Value" dialog opens with the same selections as when adding a value. Click "Save" to save the change; the button stays disabled until the selection actually changes.
-
-
Click the "Update" button to save changes. No change is recorded to the database unless this update request is submitted.
Discard a Business Context
Note that a business context can only be discarded if there is no BIE using it. Since a BIE must always keep at least one business context, the last business context of a BIE cannot simply be unassigned — assign another business context to that BIE first (or discard the BIE).
There are two methods for discarding a Business Context. The first one is discarding a Business Context individually:
-
On the top menu of the page, click "Context".
-
Choose "View/Edit Business Context" from the drop-down list.
-
Locate the Business Context you want to discard. Use the "Search by Name" bar (How to use the Search field in general) or the Updater, Updated start date, or Updated end date advanced filters to help locate the desired Business Context (see How to use Search Filters). Click on the Name to open its "Edit Business Context" page.
-
Click the "Discard" button. Note that the "Discard" button is shown only when the Business Context is not used by any BIE. If it is in use, unassign it from those BIEs first (from the BIE editor).
-
The "Discard Business Context?" dialog is open where you can confirm ("Discard") or cancel the request. The server also rejects any attempt to discard a Business Context that is still assigned to a BIE.
The second method can discard multiple Business Contexts simultaneously:
-
On the top menu of the page, click "Context".
-
Choose "View/Edit Business Context" from the drop-down list.
-
Click the checkbox in front of the Business Contexts you want to discard. The checkbox of an in-use Business Context is disabled with the tooltip "It is currently in use by another component.".
-
Click the "Discard" button at the top-right of the page (it is disabled until at least one row is selected).
-
Confirm your intention in the "Discard Business Contexts?" dialog as described in #5 of the first method.
Discard a Context Scheme
Note that a Context Scheme can only be discarded if there is no Business Context using it.
There are two methods for discarding a Context Scheme. The first discards a Context Scheme individually:
-
On the top menu of the page, click "Context".
-
Choose "View/Edit Context Scheme" from the drop-down list.
-
Locate the Context Scheme you want to discard. Use the "Search by Name" bar (How to use the Search field in general) or the Updater, Updated start date, and Updated end date advanced filters (see How to use Search Filters) to help locate the desired Context Scheme. Click on its Name to open its "Edit Context Scheme" page.
-
Click the "Discard" button. Note that the "Discard" button is shown only when no Business Context uses the Context Scheme. Otherwise, update or remove the referencing Business Contexts first.
-
The "Discard Context Scheme?" dialog is open where you can confirm ("Discard") or cancel the request. The server also rejects any attempt to discard a Context Scheme that is still referenced by a Business Context.
The second method can discard multiple Context Schemes simultaneously:
-
On the top menu of the page, click "Context".
-
Choose "View/Edit Context Scheme" from the drop-down list.
-
Click the checkbox in front of the Context Schemes you want to discard. The checkbox of an in-use Context Scheme is disabled with the tooltip "It is currently in use by another component.".
-
Click the "Discard" button at the top-right of the page.
-
Confirm your intention in the "Discard Context Schemes?" dialog as described in #5 of the first method.
Discard a Context Category
Note that a Context Category can only be discarded if there is no Context Scheme using it.
There are two methods for discarding a Context Category. The first one discards a Context Category individually:
-
On the top menu of the page, click "Context".
-
Choose "View/Edit Context Category" from the drop-down list.
-
Locate the Context Category you want to discard. Use the "Search by Name" bar (How to use the Search field in general) or the Description, Updater, Updated start date, and Updated end date advanced filters (see How to use Search Filters) to help locate the desired Context Category. Click on its Name to open its "Edit Context Category" page.
-
Click the "Discard" button. The application first checks whether any Context Scheme uses the Context Category. If there are, no confirmation dialog appears; instead an error dialog "The context category cannot be deleted!" opens stating "The context schemes with the following IDs depend on it. They need to be deleted first.", followed by the GUIDs of those Context Schemes. They have to be discarded first.
-
Otherwise, the "Discard Context Category?" dialog is open where you can confirm ("Discard") or cancel the request.
The second method can discard multiple Context Categories simultaneously:
-
On the top menu of the page, click "Context".
-
Choose "View/Edit Context Category" from the drop-down list.
-
Click the checkbox in front of the Context Categories you want to discard. The checkbox of an in-use Context Category is disabled with the tooltip "It is currently in use by another component.".
-
Click the "Discard" button at the top-right of the page.
-
Confirm your intention in the "Discard Context Categories?" dialog.
Search and view Context Category detail
To view detail of a Context Category:
-
On the top menu of the page, click "Context".
-
Choose "View/Edit Context Category" from the drop-down list. The "Context Category" page is returned.
-
Scroll down to find the desired Context Category or use the "Search by Name" bar or the Description, Updater, and updated-date filters. When the desired Context Category is found, click its Name to open the "Edit Context Category" page where its detail can be viewed (the GUID underneath the Name is not a link). See How to use the Search field in general for help with the search.
Search and view Context Scheme detail
To retrieve a Context Scheme:
-
On the top menu of the page, click "Context".
-
Choose "View/Edit Context Scheme" from the drop-down list.
-
Locate the desired Context Scheme using the pagination at the bottom, the "Search by Name" bar (see also How to use the Search field in general), or the Updater, Updated start date, and Updated end date advanced filters (see How to use Search Filters). Click on the Name of the Context Scheme to open the "Edit Context Scheme" page where its detail can be viewed (the GUID underneath the Name is not a link).
Search and view Business Context detail
To retrieve a Business Context:
-
On the top menu of the page, click "Context".
-
Choose "View/Edit Business Context" from the drop-down list.
-
Locate the desired Business Context using the pagination at the bottom, the "Search by Name" bar (How to use the Search field in general), or the Updater, Updated start date, and Updated end date advanced filters (see How to use Search Filters). Click on the Name of the Business Context to open the "Edit Business Context" page where its detail can be viewed (the GUID underneath the Name is not a link).