Manage Business Terms
Business term management allows end users to create or import business terms from other data dictionary applications, such as an enterprise data dictionary, and assign those business terms to data elements in the data exchange standard. connectCenter is not intended to be a data dictionary management application itself. This is the reason each business term entity in connectCenter has only a few fields, mainly for representing the identity of the business term.
connectCenter provides the business term functionality to end users only; developers do not see it after logging in. The business term function is an instance-wide setting that an administrator enables on the Application Settings page, and it cannot be enabled while multi-tenant mode is on. End users can view, create, edit, or discard business terms through the "View/Edit Business Term" menu item under the "BIE" menu. Business terms can also be imported in bulk from an external file through the "Upload Business Terms" dialog on the same page (see Load Business Terms from external source).
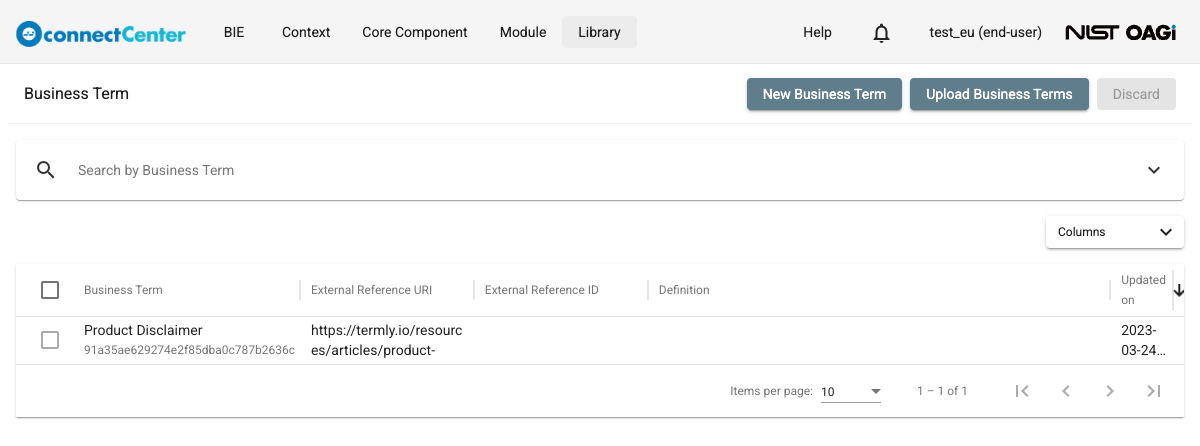
The "Business Term" page lists each term with its Business Term, External Reference URI, External Reference ID, Definition, and Updated on columns; it is sorted by Updated on by default, and the "Columns" selector above the table shows or hides columns.
Business terms are assigned to BIEs directly in the BIE editor. On the Details pane of an ASBIE or BBIE node, the assigned business terms appear as chips in the Business Terms field, next to the Remark field. A chip is added through a multi-select "Assign Business Term" dialog opened from that field, and each chip offers in-place actions (preview, set/unset preferred, edit its Type Code, and unassign). Business term assignment is not supported on the root (top-level) BIE node, on BBIE_SC (supplementary component) nodes, or on a reused ASBIE node; those nodes — and any user without the function, such as developers — see the free-text Legacy Business Term field instead. Business terms are assigned/associated to two BIE types, ASBIE and BBIE, from the data standpoint, to allow for the most precise contextual assignment. In other words, it means that the business terms are applicable to the ASBIEP and ABIE underneath the ASBIE within the context of the ABIE owner for the ASBIE and applicable to the BBIEP underneath the BBIE within the context of the ABIE owner of the BBIE. Consequently, all business terms assigned to the ASBIEs or BBIEs that reference the same ASCC and BCC can be inferred as business terms of the ASCCP and ACC and the BCCP under the ASCC and BCC as well.
Create a Business Term
To create a business term:
-
On the top menu of the page, click "BIE".
-
Choose "View/Edit Business Term" from the drop-down list.
-
On the returned "Business Term" page, click "New Business Term" located at the top-right of the page.
-
On the returned "Create Business Term" page, fill out the following fields:
Field Description Business Term (Mandatory) The main name of the business term. Up to 255 characters. External Reference URI (Mandatory) This URI should uniquely identify each business term. It must be a valid URI; up to 65535 characters are allowed. External Reference ID (Optional) An identifier of the business term in its source application. Up to 100 characters. Comment (Optional) A free-form text field for adding information about the business term in the context of the connectCenter tool. An example comment may be "This business term is not from the enterprise data dictionary." 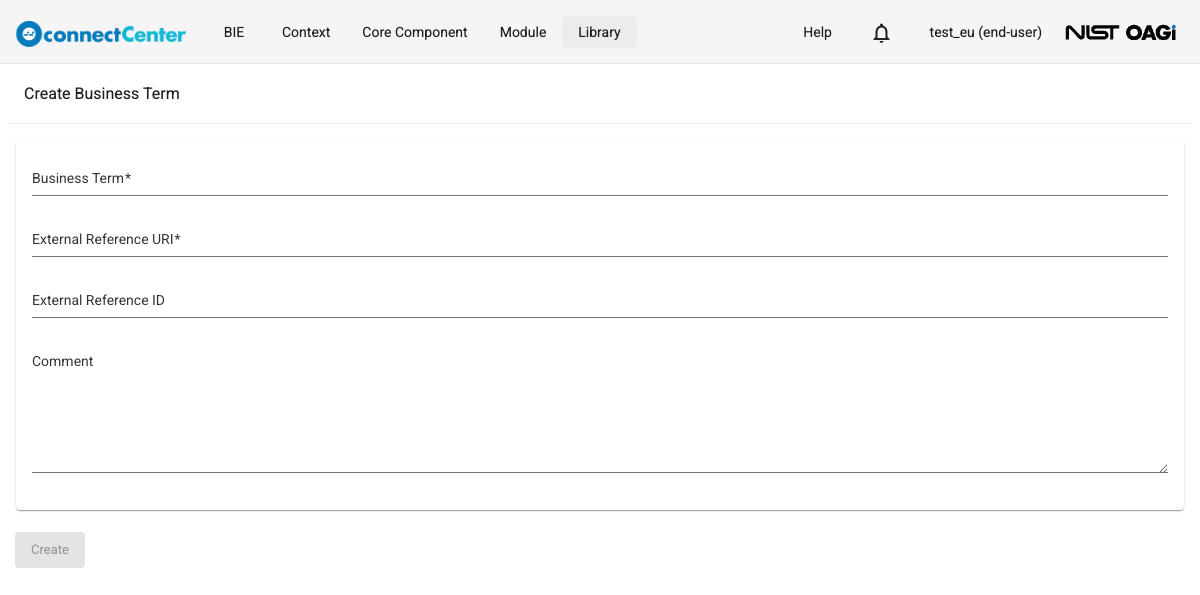
-
Click the "Create" button.
connectCenter does not let you create or save a business term when another business term already has the same Business Term + External Reference URI pair — the save is rejected with an "Invalid parameters" dialog reading "Another business term with the same business term and external reference URI already exists!". Two business terms may share the same name as long as their External Reference URI values differ.
Edit a Business Term
To edit a business term:
-
On the top menu of the page, click "BIE".
-
Click "View/Edit Business Term" menu item.
-
Use the "Search by Business Term" box or the External Reference URI filter to find the desired business term. Open its "Edit Business Term" page by clicking the business term name in the Business Term column. See also How to use the Search field in general.
-
You can change the Business Term, External Reference URI, External Reference ID, and Comment fields. The link icon next to the External Reference URI field (tooltip "Open the external reference URI in a new tab") opens the URI in a new browser tab.
-
You cannot change the Definition field; it is disabled and only updated through upload from an external file.
-
Click the "Update" button.
The same uniqueness rule applies when saving edits: the Business Term + External Reference URI pair must not duplicate another business term. Reusing an existing name with a different External Reference URI is allowed.
Discard a Business Term
Note that a business term can only be discarded if it is not assigned to any BIE. Otherwise, you have to discard the assignment first (see Discard the assignment of a business term from a BIE).
There are two methods for discarding a Business Term. The first one is:
-
On the top menu of the page, click "BIE".
-
Choose "View/Edit Business Term" from the drop-down list.
-
Locate the Business Term you want to discard. Use the "Search by Business Term" box or the Updater, Updated start date, Updated end date, External Reference URI, External Reference ID, or Definition search filters to help locate the desired Business Term (see How to use Search Filters). Click on the checkbox right before the desired business term name. The checkbox of a business term that is assigned to a BIE is disabled — its tooltip reads "It is currently in use by another component." — so an in-use term cannot be selected for discarding.
-
Click the "Discard" button at the top-right of the page. The button stays disabled while no business term is selected.
-
Confirm or cancel the request in the "Discard business term?" dialog ("Discard business terms?" when several are selected). The confirming button is "Discard".
The second method is:
-
On the top menu of the page, click "BIE".
-
Choose "View/Edit Business Term" from the drop-down list.
-
Locate the Business Term you want to discard, as described above, and click on the business term name to open its "Edit Business Term" page.
-
Click the "Discard" button at the top-right of the page. The button is shown only when the business term is not assigned to any BIE.
-
Confirm or cancel the request in the "Discard business term?" dialog.
Assign business terms to BIEs
Business terms are assigned to a BIE node in place, on the Details pane of the BIE editor. The Business Terms field (showing the assigned terms as chips) is displayed for end users on ASBIE and BBIE nodes, except reused ASBIE nodes; when the node is not Used, the field is disabled.
To assign a business term to a BIE:
-
On the top menu of the page, click "BIE".
-
Choose "View/Edit BIE" from the drop-down list.
-
Locate the desired top-level BIE. Use the "Search by DEN" box or the advanced search filters to help locate it (see How to use Search Filters). Click on the BIE DEN to open its "Edit BIE" page.
-
Expand the tree structure until reaching the desired ASBIE or BBIE node in the left navigation panel.
-
Select the desired BIE node. The detail for that node is displayed in the right panel. Check the Used checkbox if it is unchecked and click the "Update" button at the top-right of the page. The "+" (add) button next to the Business Terms field (tooltip "Assign a Business Term") is enabled only after the node is saved — until then its tooltip reads "Save the BIE to assign business terms".
-
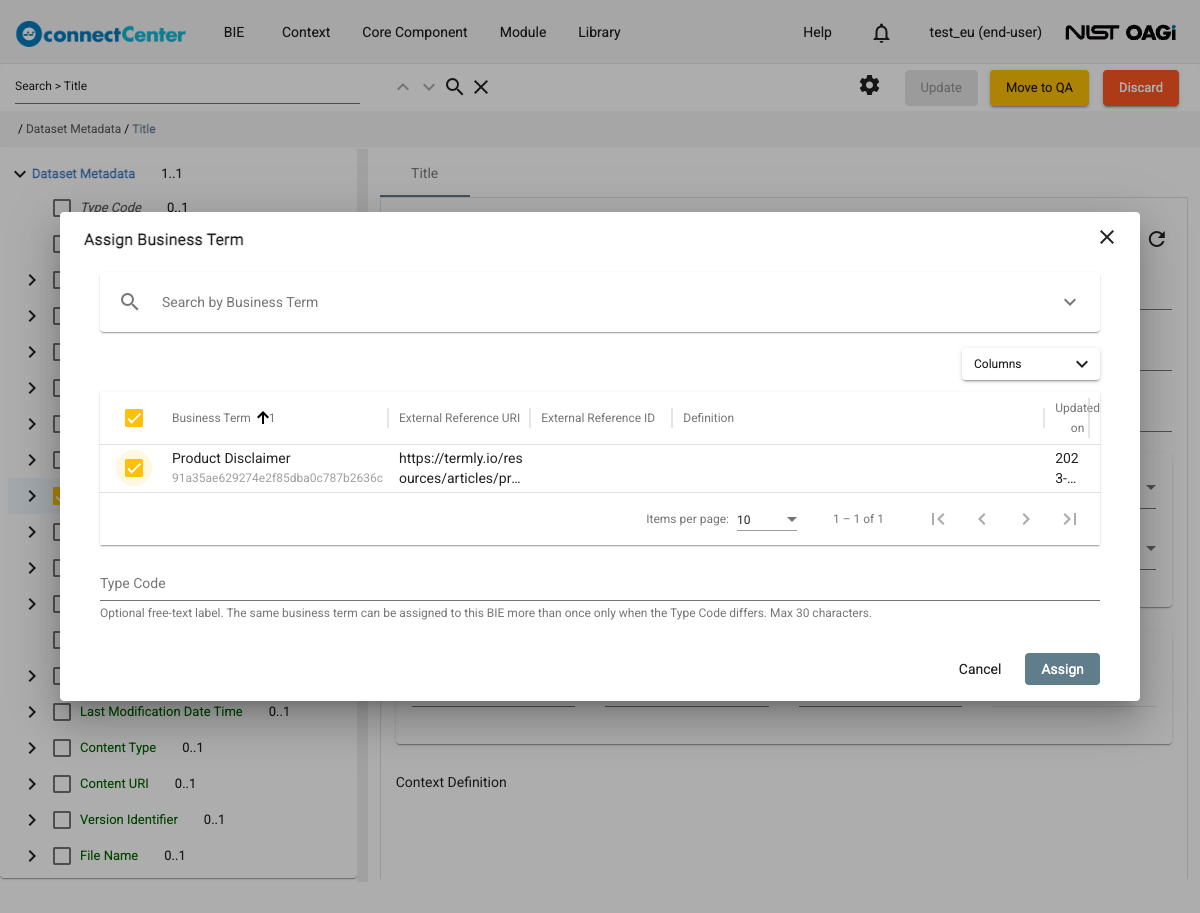
Click the "+" button next to the Business Terms field to open the "Assign Business Term" dialog.
-
In the dialog, locate the business term(s) to be assigned. Use the "Search by Business Term" box or the advanced filters (Updater, Updated start date, Updated end date, External Reference URI, External Reference ID, and Definition) to narrow the list.
-
Select one or more business terms by clicking their checkboxes. A business term that is already assigned elsewhere can still be selected and reused.
-
Optionally fill out the Type Code field. As its helper text explains: "Optional free-text label. The same business term can be assigned to this BIE more than once only when the Type Code differs. Max 30 characters."
-
Click the "Assign" button; when more than one term is selected the button shows the count, e.g. "Assign (3)". All selected terms are assigned to the BIE node in one action, and only that node's Business Terms field is refreshed. If any selected term would duplicate an existing assignment for the same BIE and Type Code, the assignment is blocked and an "Invalid parameters" dialog reports "One or more selected business term assignments for the same BIE and type code already exist!".
Business term assignments are saved immediately through their own requests — clicking the "Update" button is not required for them, unlike other Details pane edits. They can also be added, edited, or removed on QA and Production BIEs, not only WIP ones; for a WIP BIE, only its owner (or an administrator) may change them.
Set a preferred business term. Each chip has a star. Click the empty star (tooltip "Set as preferred") to mark that term as the preferred (primary) business term for the BIE, or click the filled star (tooltip "Unset preferred") to clear it. Only one business term can be preferred per BIE; setting one as preferred clears any previously preferred term on the same BIE. Chips are ordered with the preferred term first, then by the order in which they were assigned.
Edit a Type Code in place. Click a chip to turn its Type Code into an inline text box (up to 30 characters), then press Enter or click the check icon (tooltip "Save Type Code") to save; press Escape or click away to cancel. Saving a value longer than 30 characters is blocked with the message "Type Code must be 30 characters or fewer.", and saving an unchanged value simply closes the editor. If the new Type Code would duplicate another assignment for the same BIE and Type Code, an inline error appears on the field reading "Another business term assignment for the same BIE and type code already exists!" and the input stays focused so you can correct it. The duplicate check ignores the assignment you are editing.
View Business Term Assignments of a BIE
The business terms assigned to a BIE node are shown as chips in the Business Terms field on the Details pane, next to the Remark field.
To view the business terms currently assigned to a BIE:
-
On the top menu of the page, click "BIE".
-
Choose "View/Edit BIE" from the drop-down list.
-
Locate the desired top-level BIE. Use the "Search by DEN" box or the advanced search filters to help locate it (see How to use Search Filters). Click on the BIE DEN to open its "Edit BIE" page.
-
Expand the tree structure until reaching the desired BIE node in the left navigation panel.
-
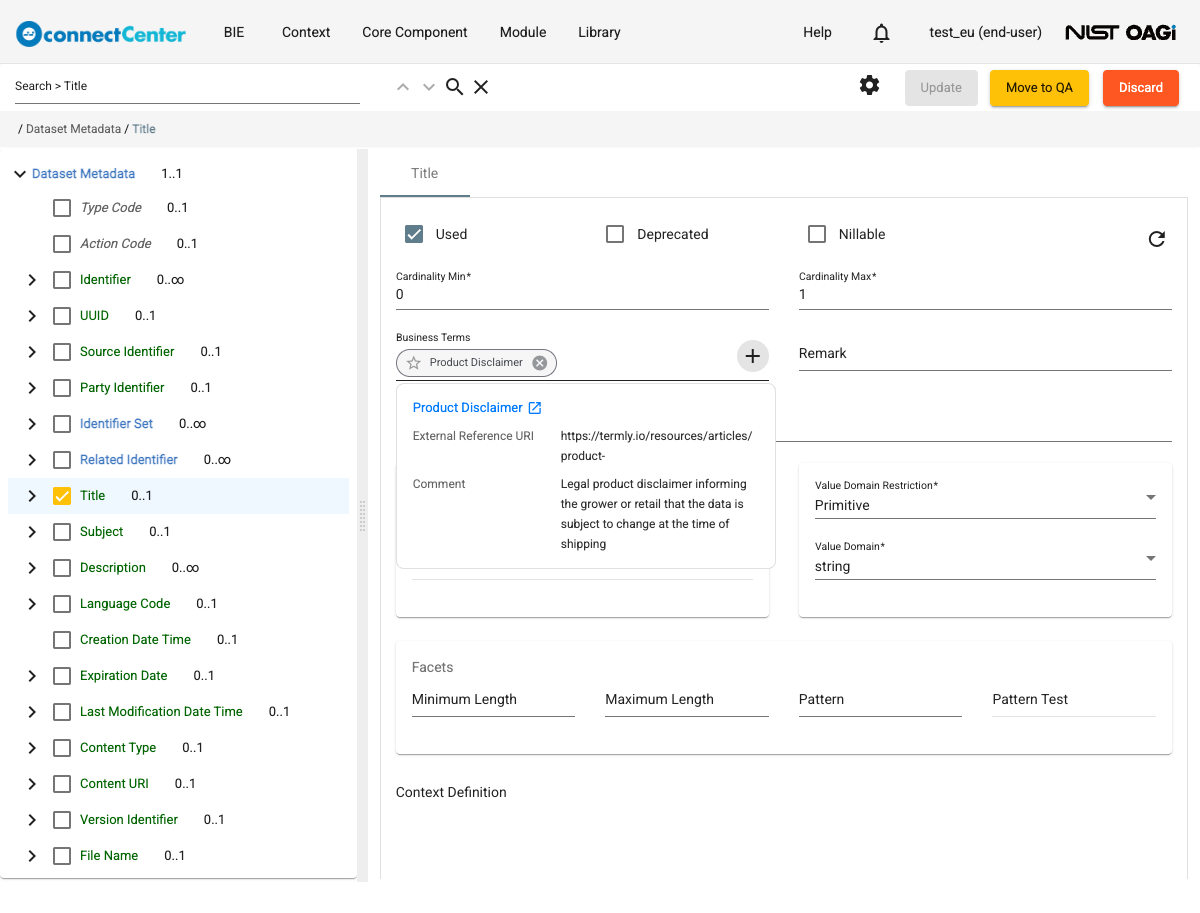
Select the desired BIE node, and the detail for that BIE node is displayed in the right panel. The Business Terms field lists each assigned business term as a chip. A chip shows the business term name and, when set, its Type Code as a smaller sub-label. The preferred business term is marked with a filled star. The field appears on ASBIE and BBIE nodes whether or not they are Used (it is disabled, with its chips read-only, when the node is not Used), but it is not shown for a reused ASBIE node.
-
Hover over a chip for a moment to open a preview card that shows, when present, the External Reference URI, External Reference ID, Definition, and Comment of the term. The card header is the business term name; clicking it opens the full business term detail page in a new browser tab. The card stays open while the pointer is over it.
-
For an inherited BIE node, open the Inherits from ... tab to see the business terms carried from the base BIE. On this tab the Business Terms field is read-only: no add, remove, or Type Code editing is offered, and the star of the preferred term only shows the tooltip "Preferred business term".
Discard a business term from a BIE
Discarding the assignment of a business term from a BIE removes the association of the business term from the given BIE. The prerequisite for permanently removing a business term from connectCenter is to discard all the assignments for that business term first.
To discard the assignment of a business term from a BIE:
-
On the top menu of the page, click "BIE".
-
Choose "View/Edit BIE" from the drop-down list.
-
Locate the desired top-level BIE. Use the "Search by DEN" box or the advanced search filters to help locate it (see How to use Search Filters). Click on the BIE DEN to open its "Edit BIE" page.
-
Expand the tree to find the desired BIE node in the left navigation panel.
-
Select the desired BIE node, and the detail for that node is displayed in the right panel. The assigned business terms are listed as chips in the Business Terms field. The chips can be edited only while the node is Used (the field is disabled otherwise) and only on the node's own tab (the Inherits from ... tab is read-only).
-
On the chip of the business term to be unassigned, click the "x" (cancel) icon (tooltip "Unassign").
-
A confirmation dialog headed "Remove this business term assignment?" asks you to confirm that the business term will be unassigned from this BIE. Click "Remove" to confirm, or cancel to keep it. Only the assignment for this BIE node is removed; the business term itself remains in connectCenter and can still be assigned elsewhere.
Load Business Terms from external source
This is the preferred way for the end users to create business terms in connectCenter. This method allows the end users to bulk import business terms from an external file through the "Upload Business Terms" import dialog. The dialog accepts CSV, TSV, and Excel (.xlsx) files up to 10 MB. When a file exported from another Business Glossary application (for example Collibra, Alation, Microsoft Purview, Informatica, IBM, erwin, Atlan, data.world, SAP, or Google Dataplex) is uploaded, the dialog recognizes the export format and pre-fills the column mapping accordingly, which you then verify or adjust. The External Reference URI remains the key for each business term: if the URI already exists in connectCenter, that business term is updated; otherwise a new one is created.
To import from an external file:
-
On the top menu of the page, click "BIE".
-
Choose "View/Edit Business Term" from the drop-down list.
-
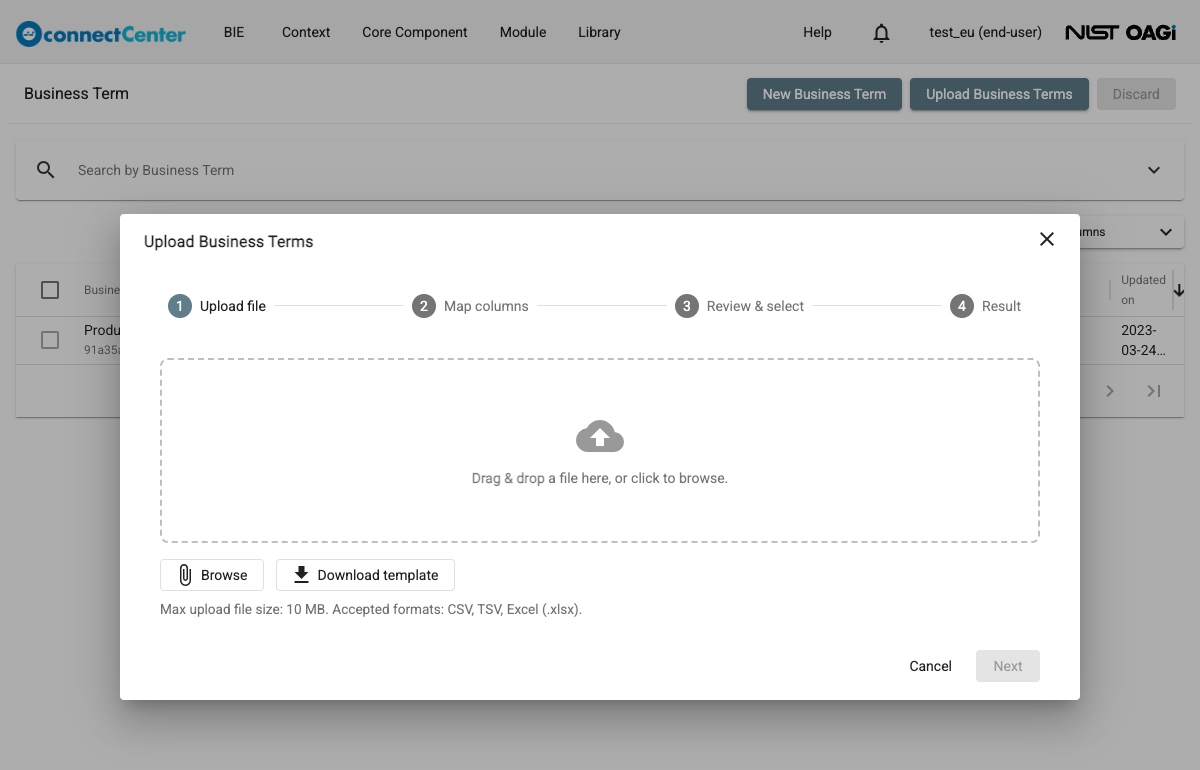
On the returned "Business Term" page, click the "Upload Business Terms" button at the top-right of the page. The "Upload Business Terms" dialog opens as a four-step wizard: Upload file, Map columns, Review & select, and Result. You can leave the wizard at any step before the import runs with the "Cancel" button in the footer or the "x" (close) icon at the top-right of the dialog.
-
On the Upload file step, drag and drop a file onto the drop zone ("Drag & drop a file here, or click to browse."), or click it (or the "Browse" button) to pick a file. To start from the native template, click "Download template" to save "businessTermTemplateWithExample.csv" and fill it in. The hint under the buttons reads "Max upload file size: 10 MB. Accepted formats: CSV, TSV, Excel (.xlsx)."; a file of another type, or one exceeding 10 MB, is rejected, and when a replacement pick is rejected the previously accepted file stays selected. Use the "x" on the file tile (tooltip "Remove file") to remove the file.
-
After the file is read, an information line reports how many rows and columns were found. For an Excel workbook with more than one worksheet, choose the sheet from the "Worksheet" drop-down; the wizard preselects the first worksheet that contains data, skipping cover tabs such as "Overview" or "Version" that vendor exports often lead with (changing the worksheet or removing the file cancels any read still in progress). A file with a single worksheet advances to the Map columns step automatically; otherwise, pick the worksheet and click "Next".
-
On the Map columns step, verify the mapping. An amber notice reads "Review the column mapping below before continuing. Confirm that each source column maps to the correct Business Term field." Map the source columns to Business Term (required), External Reference ID, Definition, and Comment, and provide the External Reference URI (required) either by selecting "Map a column" and choosing the "URI column", or by selecting "Build from base URL + ID" and entering a "Base URL" plus an "ID column". Click "Next" when a column is mapped to Business Term and the External Reference URI is provided.
-
On the Review & select step, review the rows. Summary chips show how many rows are ready, how many need review, and how many are selected; every row that passes validation is pre-selected automatically. Each cell is editable; valid rows show a green check, and invalid rows show a warning with a tooltip listing the problems ("Fix the highlighted issues to import this row.") and cannot be selected until fixed. A row whose External Reference URI repeats another row of the same import is flagged with "Duplicate external reference URI in this import." Select the rows to import (a row's Business Term and External Reference URI are required), then click "Import N selected".
-
On the Result step, the outcome is shown per row: summary chips report how many terms were created, updated, and failed, and the table lists each row's Business Term, External Reference URI, Outcome (CREATED, UPDATED, or FAILED), and a Detail message for failed rows. The import is applied row by row, so failed rows do not roll back the rows that succeeded. Click "Close" to return to the "Business Term" page, which reloads when at least one term was created or updated.
When an import row updates an existing business term (same External Reference URI), blank optional cells (External Reference ID, Definition, Comment) do not clear the stored values — only non-blank cells overwrite them. To clear the External Reference ID or Comment, use the "Edit Business Term" page; the Definition can only be replaced by a later import with a non-blank value. A single import can contain up to 50,000 rows.
You can then locate the imported business terms on the "Business Term" page using the "Search by Business Term" box or the search filters: Updater, Updated start date, Updated end date, External Reference URI, External Reference ID, or Definition.