Manage BIE
It is recommended that the user reads first the BIE in brief section (BIE in brief).
BIE States
A BIE can be in WIP, QA or Production state. WIP state means that the BIE is still being changed or in fluid condition. QA generally means that the BIE is ready to be reviewed or tested. Finally, Production means that the BIE is already in use in a deployment.
The figure below shows life cycle states of BIEs. When a BIE is created for the first time, it is placed in the WIP state. Allowed transitions are from WIP to QA, from QA back to WIP and from QA to Production state. A BIE can be discarded (i.e., permanently removed from the database) when it is in WIP state. (A top-level BIE that is still being copied, inherited, or made reusable briefly shows a transient Initiating state in the BIE list before it becomes WIP.)
The creator of a BIE is its first owner. The ownership can be transferred while the BIE is in the WIP state. Only the current BIE owner is authorized to change its detail and state. All other users can view the details of a BIE in any state (WIP, QA, or Production), read-only.
The table below summarizes the actions and authorizations in each BIE state.
| State | Current Owner | Other Users |
|---|---|---|
| WIP | Restrict the BIE. Change its state to QA. Copy the BIE. Express it. Extend it if the owner is an end user. Reuse other BIEs under it. Make a descendant node reusable. Transfer ownership. Discard it. | View its details (read-only). |
| QA | View its details. Change its state back to WIP or advance to Production. | View its details (read-only). Copy the BIE. Express it. Uplift it. |
| Production | View its details. Deprecate it. | View its details (read-only). Copy the BIE. Express it. Uplift it. Reuse it under another BIE (an end user can reuse a developer-owned or an end-user-owned BIE; a developer can reuse developer-owned BIEs only). |
The owner can, of course, also copy, express, and uplift the BIE in every state. Administrators additionally can discard a BIE and transfer its ownership in any state.
A BIE state change can also depend on reuse and inheritance relationships. When a BIE reuses other BIEs (or is reused or inherited by them), or when it uses end-user code lists, the state-change confirmation dialog lists these "Associated BIEs" and "Assigned Code Lists" so that they can be moved to compatible states together; the change is blocked until the conflicts are resolved.
A Note About the BIE Visibility
In the BIE page, users can view the list of all the BIEs that have been created so far by any user. Any BIE can be opened to view its details, regardless of its state or owner; what a user may change depends on the state and ownership as described in the table of the BIE States section. (The only exception is a BIE that is still in the Initiating state — its name is not clickable and its tooltip says "This profile BIE is in progress.")
Note that the BIE state conveys the maturity of a BIE, not the freshness of what you are viewing. When you open a BIE that you do not own — especially a WIP or QA BIE — its owner may still be editing it, so the details you see are a point-in-time snapshot and may change, or the BIE may later be discarded. connectCenter does not currently refresh an open BIE automatically when its owner makes a change.
Create a BIE
To create a BIE:
-
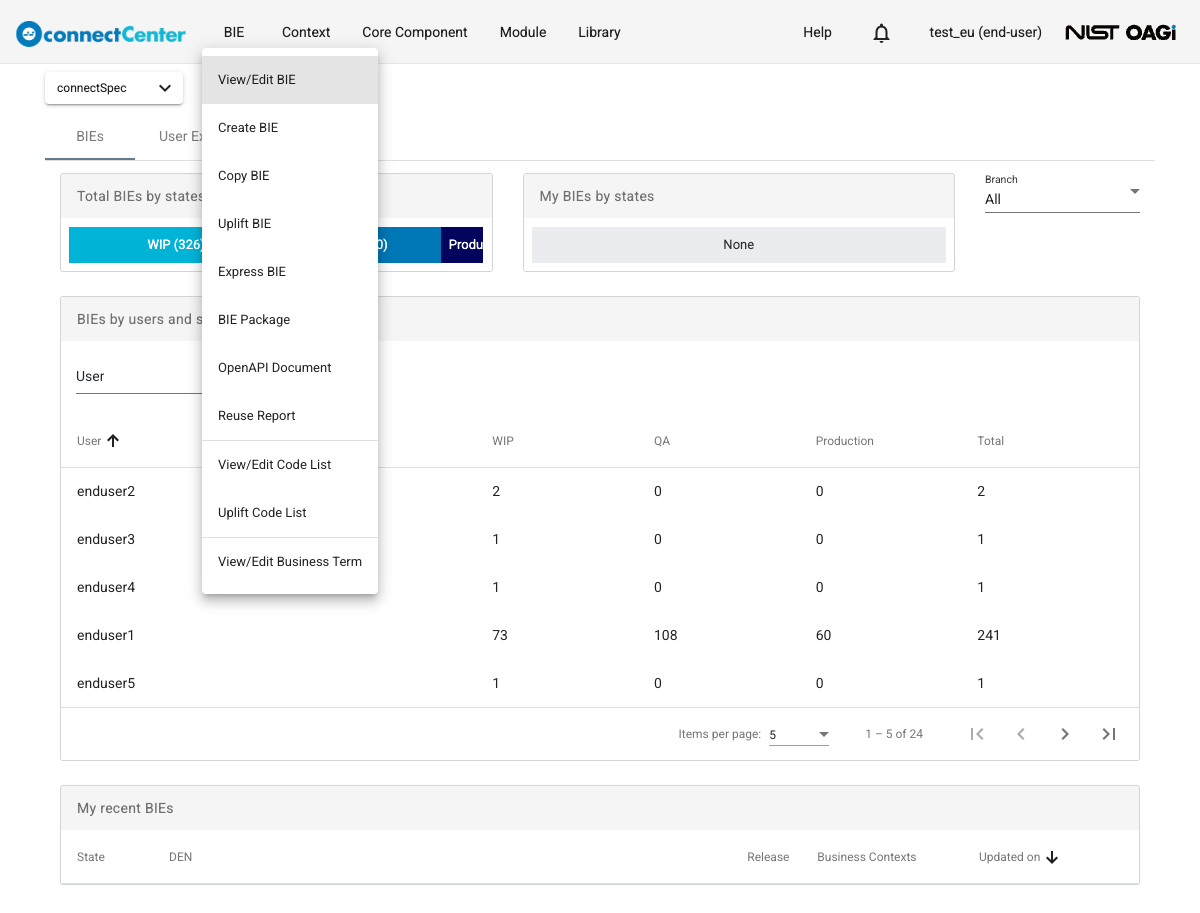
On the top menu of the page, click "BIE".
-
Choose "Create BIE" from the drop-down list. (The "+" button with the "New BIE" tooltip at the top-right of the "BIE" list page is an alternative entry to the same flow. The menu item appears once a library is selected; the library selector next to the page title determines the library the new BIE will belong to.)
-
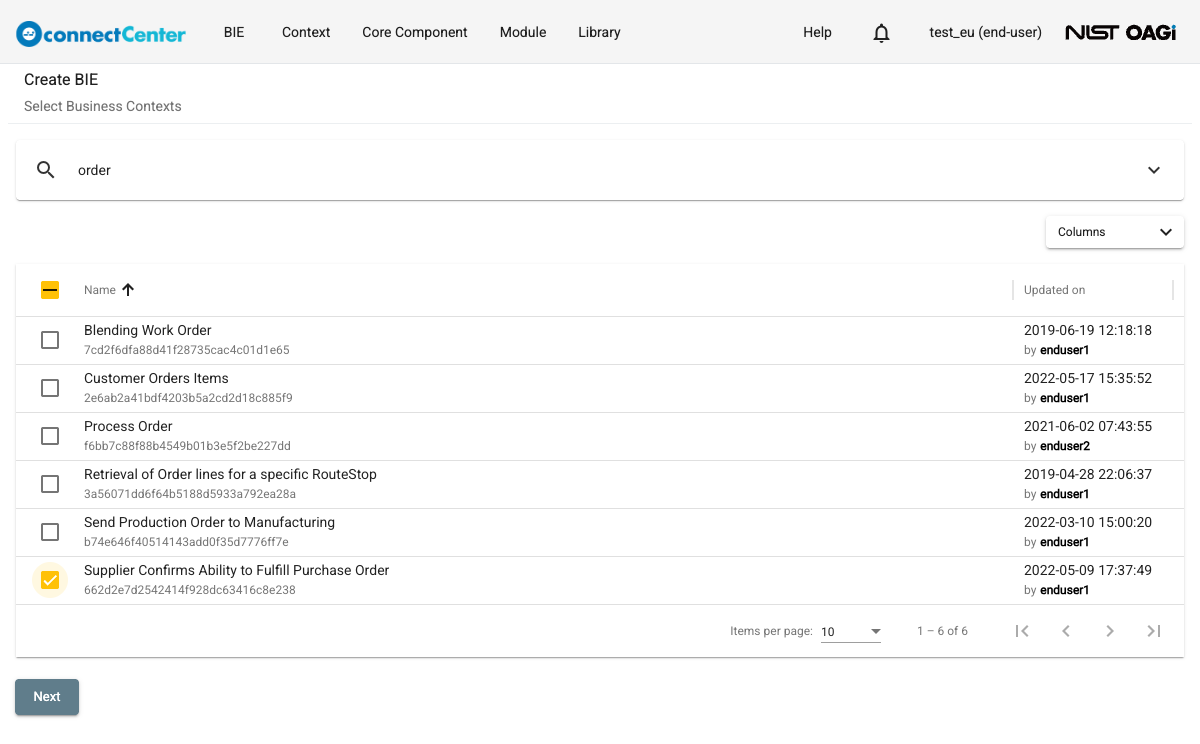
On the returned "Create BIE" page, subtitled "Select Business Contexts", choose one or multiple Business Contexts to associate with the BIE by clicking the corresponding checkboxes. Use the "Search by Name" bar or the Updater and updated-date filters to locate a Business Context, and click a Business Context's name to view its detail in a new browser tab. The logic that is applied between different Business Contexts is defined by the logical operator "OR". That is, a BIE can be meaningful and used in any of the assigned business contexts. If the desired Business Context does not exist, create a Business Context first — for example in another browser tab; the browser refresh button on the "Create BIE" page will then make the new Business Context show up for selection.
-
Click the "Next" button. It stays disabled until at least one Business Context is checked.
-
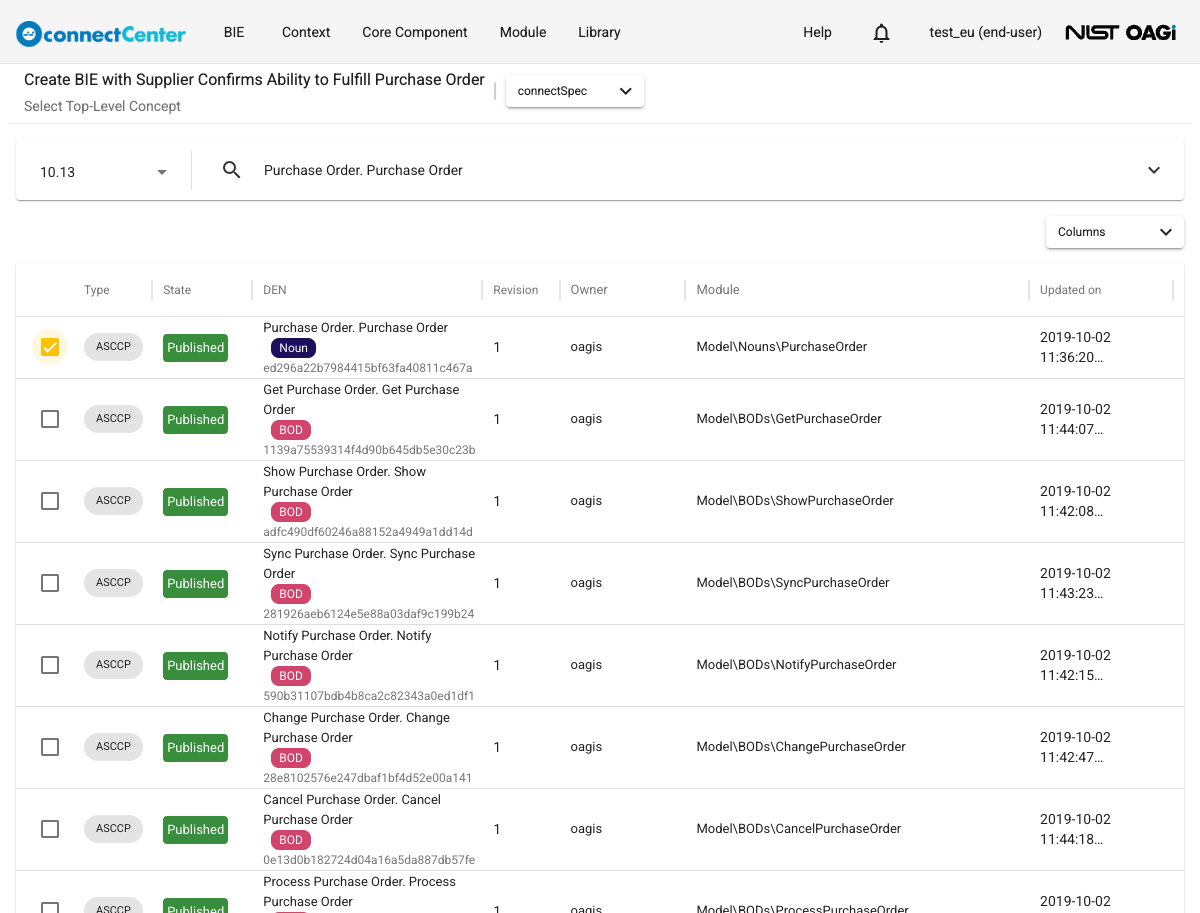
On the returned page, subtitled "Select Top-Level Concept", select the release on which you want to base your BIE in the Branch drop-down list at the top-left of the page, next to the "Search by DEN" field.
-
Select the ASCCP from which the BIE is derived to become the root node (aka, root element) of the BIE. The list offers Published developer ASCCPs and, for end users, also end-user ASCCPs in the Production state; for a developer the checkbox of an end-user ASCCP row is disabled with the tooltip "Creating BIE based on end-user CC is not allowed to developer." The table shows the Type, State, DEN, Revision, Owner, Module, and Updated on columns; connectSpec BODs are tagged "BOD" and nouns "Noun" under their DEN. You can find the ASCCP via:
-
The pagination bar at the bottom.
-
Sorting the results by clicking on a column, such as the "DEN" or "Updated on" columns. Clicking the column name multiple times will toggle between the ascending and descending sorting.
-
The "Search by DEN" field, and the Definition and Module filters in the advanced search area. The Module is a physical file that the ASCCP has been or will be serialized to in that particular release. When the Module is specified, only ASCCPs whose Module path matches the specified string will be returned. For example, a user using the connectSpec standard may wish to search only ASCCPs serialized in the Components.xsd. In such a case, the user can simply enter "Component" in the Module field (despite the longer actual module path). The user should not enter a file extension (because of the syntax-independent purpose within connectCenter, the file extension is not kept but depends on what syntax to serialize to). As a second example, the user may enter "Noun" in the Module field. In this case, connectCenter will look for an ASCCP that is a connectSpec noun (because all connectSpec noun files have "Noun" in their module path). See also the How to Search and Filter for a Core Component section which describes how the CC search works. These search fields have the same behavior as the corresponding CC search fields. The advanced search area also offers State, Deprecated, and Tag filters.
-
For the Owner, Updater, Updated start date and Updated end date search filters, see How to use Search Filters.
-
Tips: For the user who may have the knowledge of XML Schema and wonder what is and why he/she has to select an ASCCP, ASCCP corresponds to xsd:element in XML Schema, which is the only construct that can be instantiated. In an actual integration, a BIE is going to be instantiated; hence, we need an ASCCP at the root and the ASCCP Property Term is the name of the element.
Tips: Clicking on the DEN of an ASCCP row opens its Core Component detail in a new browser tab.
-
Select the ASCCP via clicking its corresponding checkbox.
-
Click "Create". (The "Back" button returns to the Business Context selection.)
-
The BIE is created in the WIP State; and the page where you can edit the BIE is returned. At this stage the user can Restrict the BIE or Extend the BIE.
Restrict a BIE
To restrict a BIE, it has to be in the WIP State and owned by you. If you are not already on the page where you can edit a BIE, you need to first Search and retrieve a BIE.
The BIE edit page is divided into the two panes: the left one depicting the BIE tree, namely the Tree pane, and the right one showing the details of the selected node of the BIE, namely the Details pane. The toolbar at the top holds the tree search, a settings (gear) icon, and the action buttons — "Update", "Move to QA", and "Discard" for a WIP BIE you own ("Back to WIP" and "Move to Production" on a QA BIE). A breadcrumb under the toolbar shows the path of the node the Details pane is focused on; clicking a breadcrumb segment scrolls the tree to that ancestor node.
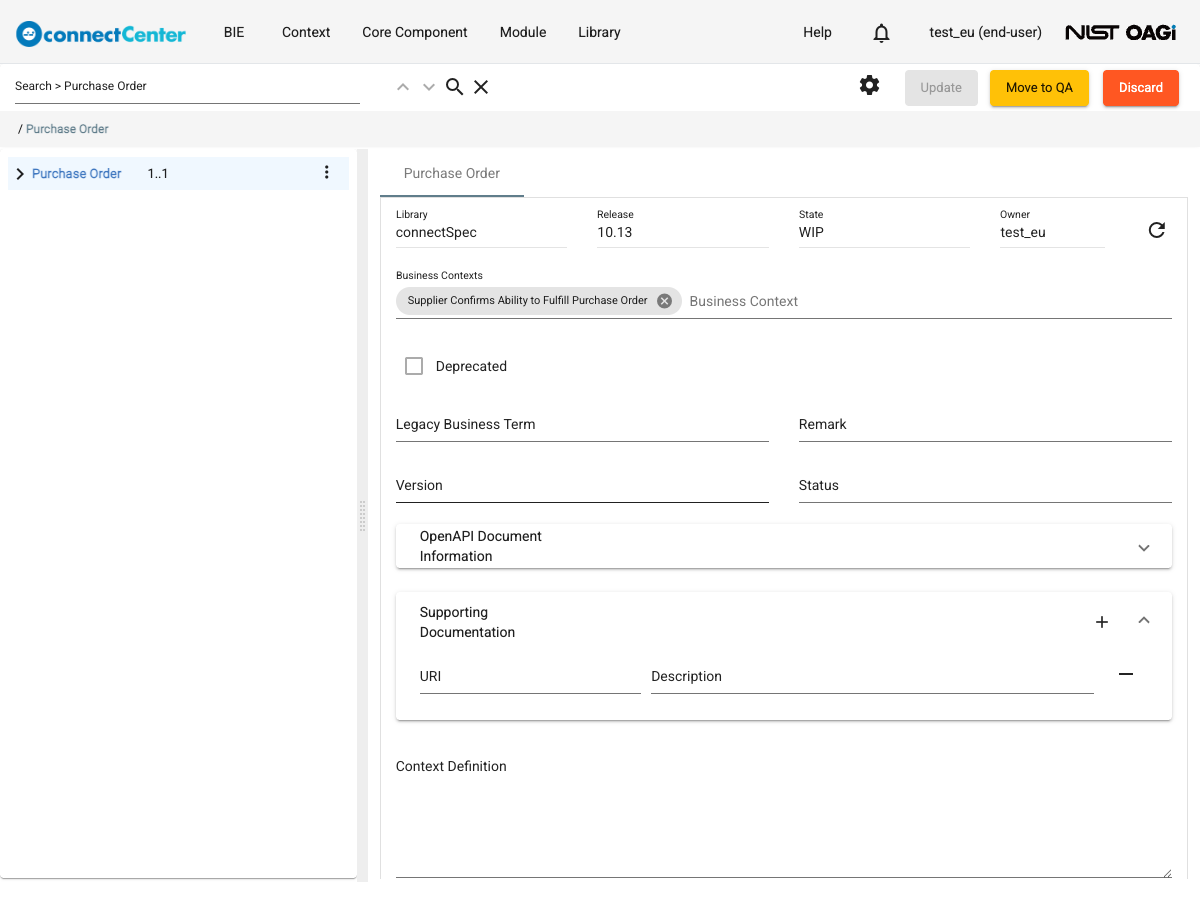
A BIE tree is a data structure in which different types of BIEs are organized hierarchically. Each node in the BIE tree shows its name, its cardinality (e.g., "0..1", "0..∞"), a checkbox (except on the root node), and an ellipsis (three-dot) icon that opens the node's context menu. The node names are displayed in a few different font formats corresponding to the different types of the BIEs: aggregate nodes (which contain other nodes) are bold blue, element value nodes are dark green, attribute value nodes are grey italic, supplementary-component nodes are red, and a node whose underlying CC is deprecated is struck through on a grey background with a "Deprecated" tooltip. We will not go into the detail of different BIE types, because the user should not have to, i.e., the connectCenter aim is for BIE to serve business analysts and they should have minimal concerns about modeling constructs.
For the BIE editing purpose, what matters is only two different kinds of nodes, one that is a container of other nodes and cannot directly have a value and the other that can have a value. The latter is apparent with the fields on the right, Details pane. It has extra fields to provide the value restriction (aka, value domain), such as a fixed value, primitive type, or code list allowed in the instance. Except for the root node, before you can customize the fields in its Details pane, the node NEEDS TO be enabled either by using the checkbox in the BIE tree or by selecting the node on the BIE tree and checking the Used checkbox at the top of the Details pane. Some nodes are enabled by default and cannot be disabled because they are mandatory — their checkbox is locked with the tooltip "This component is required." Enabling a node automatically enables all its ancestor nodes, as well as its own required children.
Tips: The settings (gear) icon at the top of the page opens a small menu with two toggles: "Hide unused", which hides or displays the unused nodes of the BIE, and "Hide cardinality", which hides or displays the cardinalities shown next to the node names. Both settings are remembered for your account.
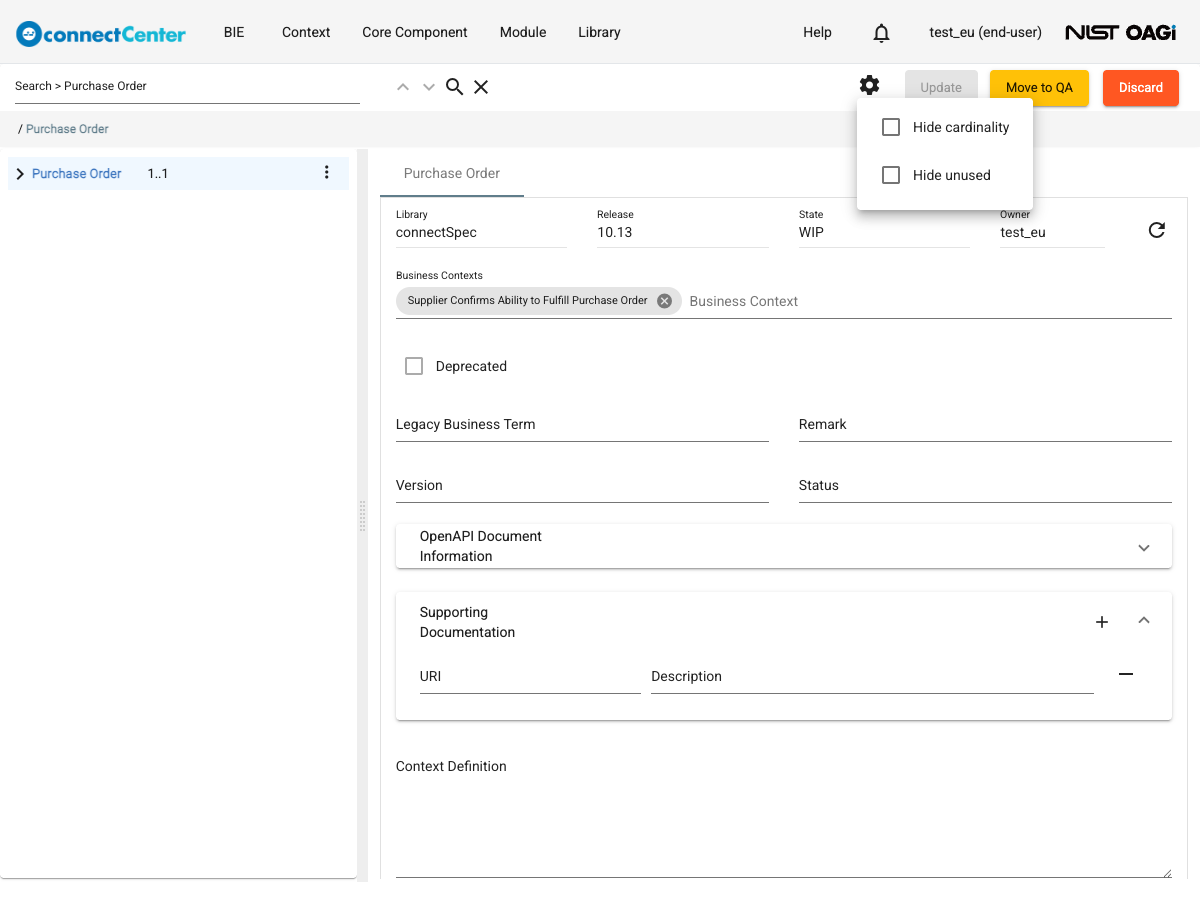
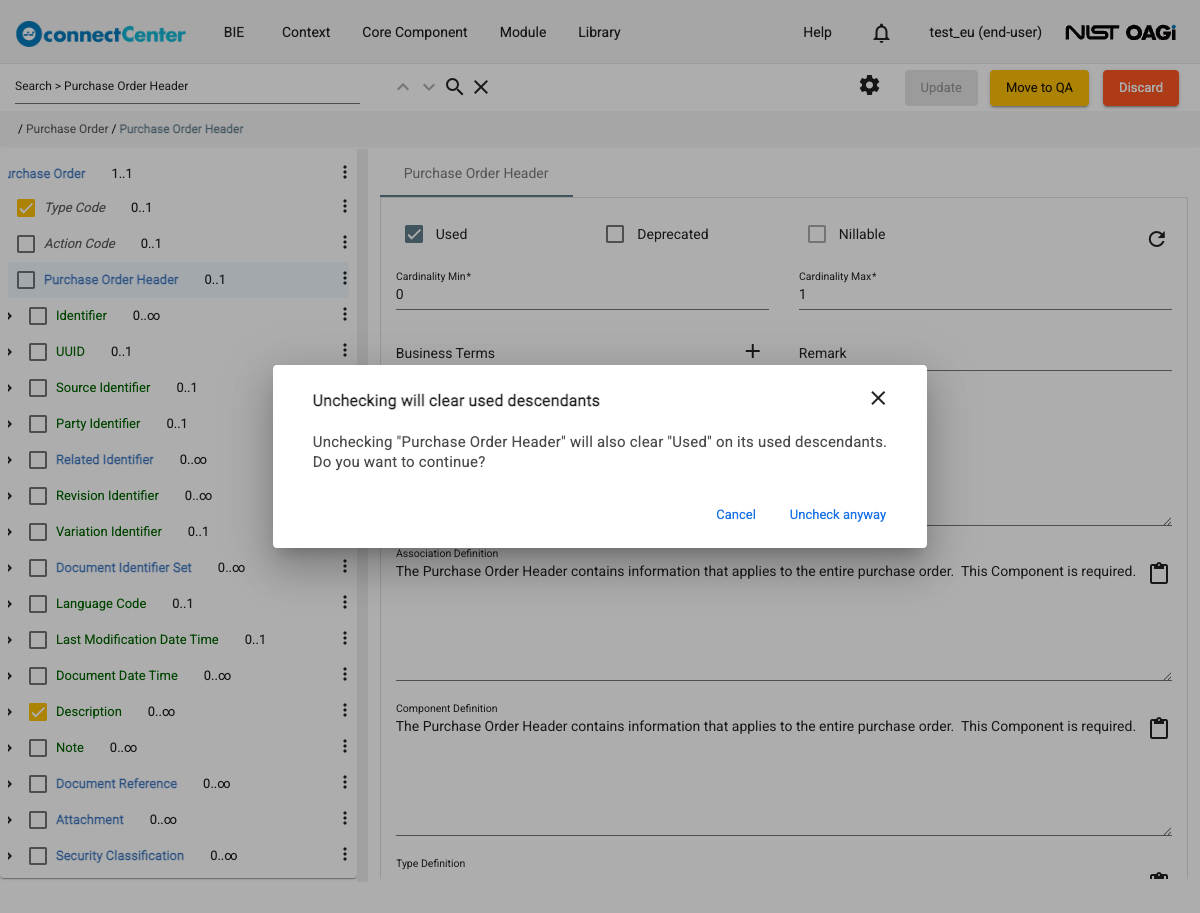
Note: Because the Used checkbox sits right next to the expand/collapse triangle, it is easy to click the checkbox by mistake when you only meant to expand or collapse a node. Un-checking (disabling) a node also clears Used on every enabled node beneath it, and if the node was collapsed you may not notice. To prevent accidental loss, connectCenter shows a confirmation dialog titled "Unchecking will clear used descendants" before you un-check a node that has used descendants; it reads 'Unchecking "<node>" will also clear "Used" on its used descendants. Do you want to continue?'. Click "Cancel" to leave the tree unchanged (the node stays enabled), or "Uncheck anyway" to proceed. Un-checking a node with no used descendants stays silent.
Important: After the node is already enabled, BE SURE to click on the node in the BIE tree you want to customize its details. The Details pane displays details of the node highlighted in the tree. Just clicking the checkbox on a node does not bring up the details of the node on the right-side; it is still showing the details of the last node selected, be careful with that as you might end up editing the details of the previous node you selected and not the last node you enabled (Note that this behavior allows the UI to work faster. Additionally, some users prefer to browse through the tree and check/enable the nodes he/she wants and return later to edit their details).
Tips: Notice the breadcrumb on top of the tree. It shows the focus of the Details pane.
Tips: The tree can also be worked with the keyboard: the Up/Down arrows move between nodes, Left/Right collapse and expand, Space toggles the Used checkbox, Enter opens the node's details, and "o" opens the node's context menu.
Below, we explain the fields in the detail pane of the few types of nodes described earlier.
The root node:
| Field | Description |
|---|---|
| Library, Release, State, Owner (Read-only) | The library and release of the core component (e.g., connectSpec 10.13) that the BIE is based on, the state of the BIE (WIP, QA or Production), and the user that currently owns it. The name of the root node itself is shown on the tab above the pane and in the tree; it is the same as its corresponding CC and is not editable. |
| Business Contexts (Mandatory) | At least one Business Context must be assigned to a BIE, shown as chips. Multiple different business contexts can be assigned; they are joined by the logical connective OR so that the BIE can be used in multiple contexts. Add a business context by typing its name in the adjacent "Business Context" box and picking from the matching list; remove one with the x icon on its chip. Assigning and removing a business context is saved immediately (there is no need to click the "Update" button). The last remaining business context cannot be removed, since a BIE must always have at least one. |
| Deprecated (Read-only) | Whether this BIE has been deprecated (see BIE Review Process); the checkbox is informational on this pane. |
| Version (Optional) | Version number you want to assign to the root BIE. It can be in any format your organization chooses. When the Version is set and the root BIE has a used, attribute-type "Version Identifier" direct child, that child's Fixed Value constraint is automatically synchronized to the Version value (a message confirms the synchronization). The child's fixed value can still be changed afterwards — the synchronization drives it only from the root's Version field, not the opposite — and while the root Version is set, the child's Default Value option is disabled. Clearing the root Version resets the child's Value Constraint to "None". |
| Status (Optional) | This is a free text field typically used for the detailed BIE development status in addition to the built-in states described in the BIE Review Process. For example, while the BIE is in the WIP or QA state, an organization may wish to capture detailed statuses, such as Data Architect Review, Data Architect Approve, Development and Testing, Development Review, and Testing Completed. |
| Inverse Mode (Optional) | Shown only when an administrator has enabled the BIE inverse-mode feature in the application settings. In Inverse Mode, every node that has never been explicitly enabled or disabled is treated as enabled; a node you explicitly un-check stays excluded. The user could turn this mode on when the BIE needs to enable (nearly) all components in the tree. The toggle is saved immediately when clicked. |
| Legacy Business Term (Optional) | Other names of the data element commonly known in the context. For example, the user may wish to capture that a BOM BIE is commonly known as Super BOM, Engineering BOM, etc. in its context. The application supports only one field; however, the user may use a semicolon to separate multiple terms. This free-text field is distinct from the assigned business terms managed as chips on descendant nodes; see Manage Business Terms. |
| Remark (Optional) | Remark is a free-form text field that can be used to capture comments that are not a part of the semantic definition, such as a reminder or note the BIE editor would like to make. For example, the user may wish to take a note "Need to discuss this with Scott." |
| OpenAPI Document Information (Panel) | Lists and manages this BIE's OpenAPI Document bindings; see Manage OpenAPI Document bindings from the BIE root. |
| Supporting Documentation (Panel) | Rows of URI and Description pairs pointing to external documentation about the BIE; use the "+" and "−" buttons to add and remove rows. |
| Context Definition (Optional but highly recommended) | This field captures the context-specific semantic definition of the BIE in natural language. It may describe in detail how or in what situation the BIE should or should not be used. For example, "This BOM BIE is for capturing super BOM (aka Model BOM) that represents all possible options and configurations of a product". Implementation detail that should be considered by a developer can be placed here as well, including mapping details. |
| Component Definition, Type Definition (Read-only) | The canonical definitions of the CC the root BIE is derived from, for reference. A copy button next to each pastes its text into the Context Definition as a starting point. |
| Descendant nodes that cannot have a value but contain children nodes in an instance: |
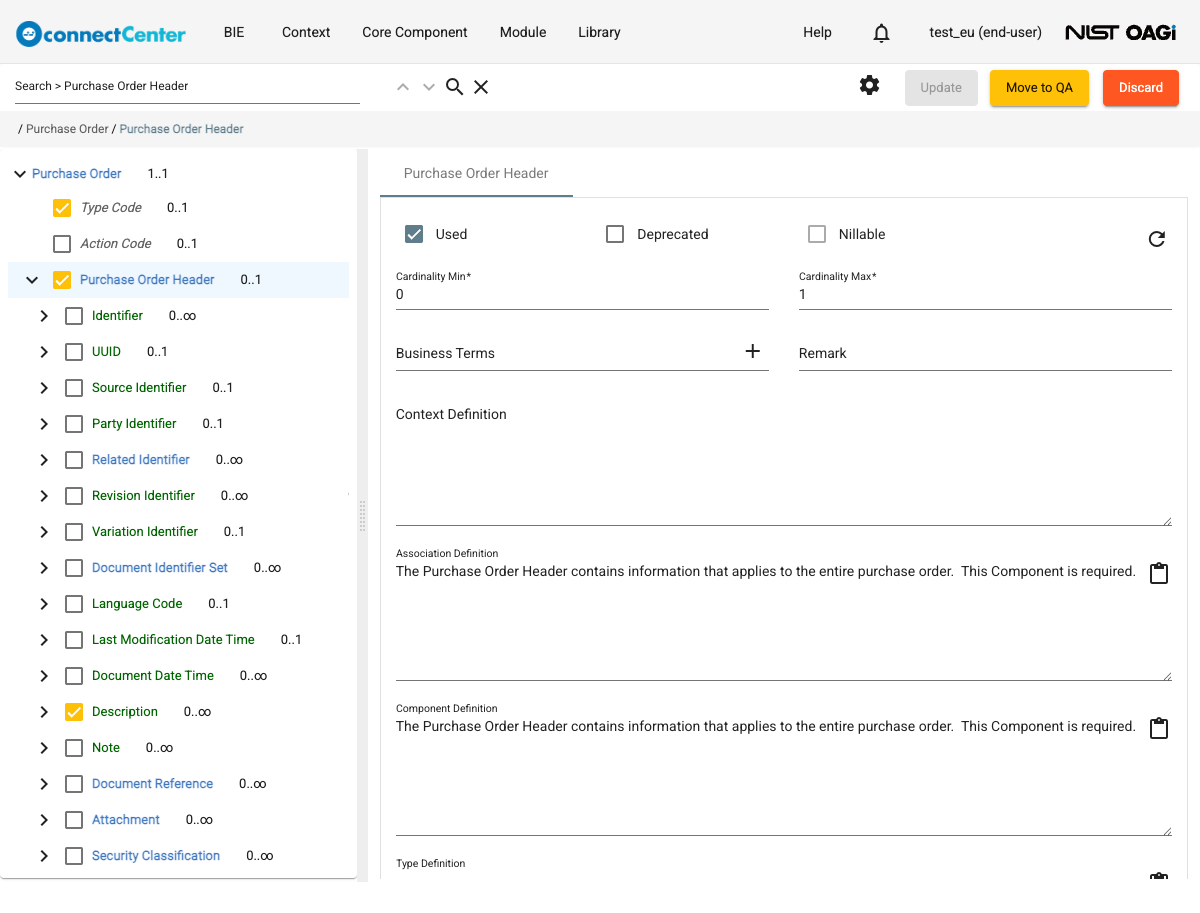
| Field | Description |
|---|---|
| Used (Required) | Checkbox indicating that the node is enabled or disabled. This is the same as the checkbox on the tree. The name of the node is displayed on the tab above the pane and is not editable. |
| Deprecated (Optional) | Marks this BIE node as deprecated. When the underlying CC itself is deprecated, the checkbox is checked and locked. |
| Nillable (Required) | Indicates whether a NULL value can be assigned to the node in the instance data. The default value of the field is the one assigned to the Core Component from which the node is derived; when that CC is not nillable the checkbox is locked with the tooltip "This property cannot change since the Core Component is not nillable." Note that in different syntax expressions nullifying a node may be expressed differently, and certain syntaxes may not support it. |
| Cardinality Min (Required) | Minimal number of allowed occurrences for the node in an instance data. This field is defaulted to the same as its corresponding CC the node is based on. The value of this field has to be within the range of the CC's Min and the current Cardinality Max. |
| Cardinality Max (Required) | Maximum number of allowed occurrences for the node in the instance data. This field is defaulted to the same as its corresponding CC (the field's hint shows the CC's standard value). Max cannot be more than the defaulted value. When the CC's own maximum is unbounded, type '-1' or 'unbounded' to specify unbounded occurrences — the field then displays "unbounded"; when the CC's maximum is finite, -1 is rejected. Setting Cardinality Max to 0 shows a hint that the Context Definition should explain why. |
| Business Terms (Optional) | The business terms assigned to this node, shown as chips; see Assign business terms to BIEs. When the business term function is not available (for a developer, or when the feature is off), a free-text Legacy Business Term field appears here instead — one field, semicolon-separable, usable for example to capture that a BOM BIE is commonly known as Super BOM or Engineering BOM in its context, or to manually capture a mapping. |
| Remark (Optional) | Remark is a free-form text field that can be used to capture comments that are not part of the semantic definition, such as a reminder or note the BIE editor would like to make. For example, the user may wish to take a note "Need to discuss this with Scott." |
| Context Definition (Optional but highly recommended) | This field should be used for capturing a context-specific semantic definition of the BIE in natural language — how or in what situation the BIE should or should not be used, as in "This BOM BIE is for capturing super BOM (aka Model BOM) that represents all possible options and configurations of the product." Implementation detail that should be considered by a developer can be placed here as well, including mapping details. |
| Association Definition, Component Definition, and Type Definition (Read-only) | These three fields are for informative purposes. They display the canonical CCs' definitions, from which the BIE node is derived (some may be blank because they were not specified). A single node in the BIE tree has three definitions because the BIE tree simplifies the view from the canonical CC model. Generally, the user should interpret them as follows. The Association Definition adds to the Component Definition additional explanation when the corresponding reusable component is used within the parent BIE node. Similarly, the Component Definition adds to the Type Definition when the corresponding reusable type is used to define the component. For example, a type can be an Address Type, and a component can be a Home Address or another component Work Address, both of which use the reusable Address Type. Both Home Address and Work Address components should have their own Component Definitions, one saying "It is the residential address" and the other saying "It is the address where businesses are conducted." Both may be associated (used) with an Employee type resulting in two associations, which have two corresponding Association Definitions — the Home Address one may say "An employee may have multiple home addresses, one of which must be designated as primary." A copy button next to each definition pastes its text into the Context Definition. |
Descendant nodes that can have a value in the instance:
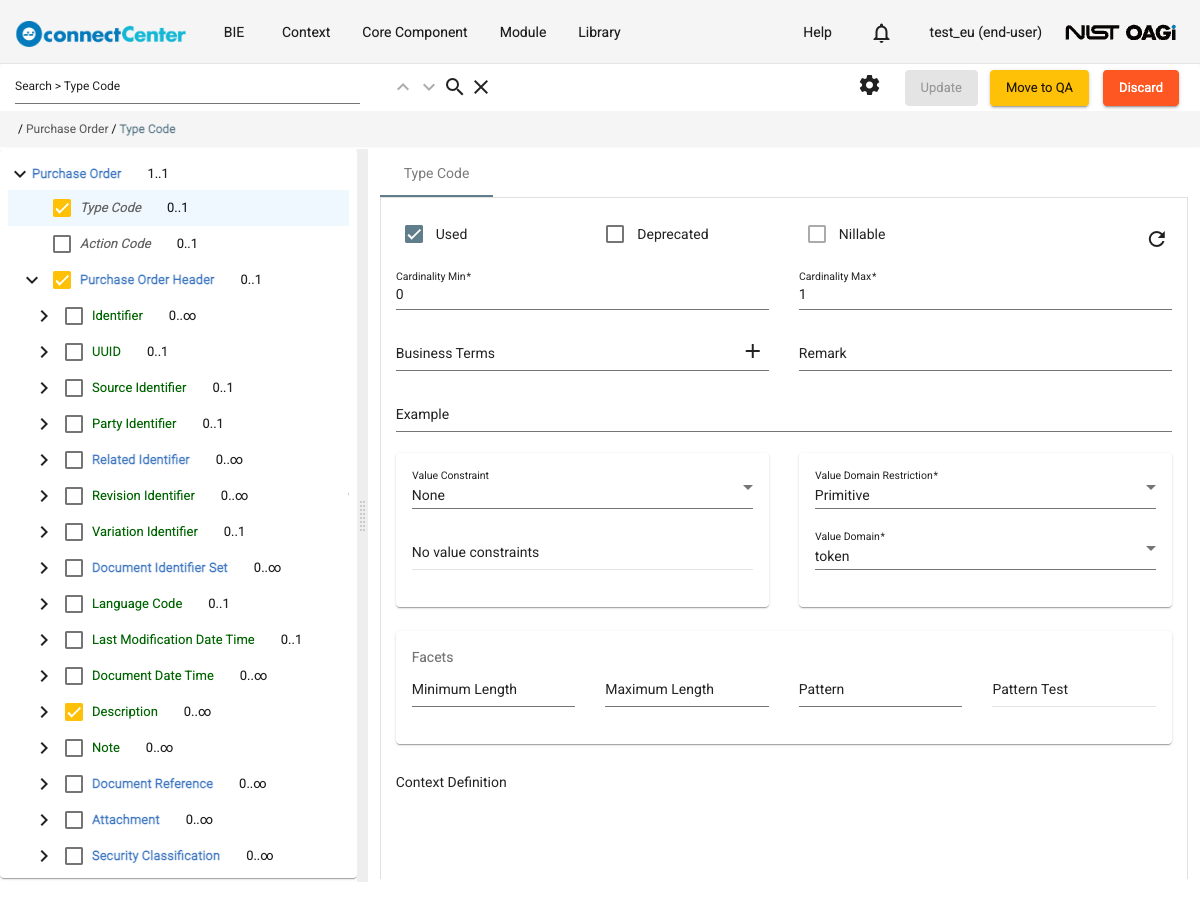
| Field | Description |
|---|---|
| Used (Required) | Checkbox indicating that the node is enabled or disabled. This is the same as the checkbox on the tree. |
| Deprecated (Optional) | Marks this BIE node as deprecated; checked and locked when the underlying CC is deprecated. |
| Nillable (Required) | Indicator whether a NULL value can be assigned to the node in the instance data, defaulted from the Core Component and locked when the CC is not nillable. It should be noted that supplementary-component nodes (the red nodes) have no Nillable checkbox at all, because they are considered meta-data of the parent node: the value in the parent node would be ambiguous without them, so they are never nullified in an exchange. |
| Cardinality Min / Cardinality Max (Required) | Same as for the container nodes above. |
| Business Terms (Optional) | Same as for the container nodes above; see Assign business terms to BIEs. For example, the user may wish to capture that an Identifier BIE of a Person BIE is also known as Social Security Number or Driver License Number in its context. |
| Remark (Optional) | Free-form text field for comments that are not part of the semantic definition. |
| Example (Optional) | A free-form text field that can be used to provide a data instance example such as a date. The user should specify only one value. It may be serialized as part of a schema or used for an example instance generation function. |
| Value Constraint (Optional) | Specifies the default or the fixed value of the selected node; the choices are "None", "Fixed Value", and "Default Value" (the two values are mutually exclusive — you can specify only one). Default Value indicates the value that should be assumed when a value is not specified in an instance of the BIE. Fixed Value restricts the valid value of the data element to one and only one fixed value. When the CC model itself declares a fixed or default value, the whole card is read-only. For the special "Version Identifier" child of the root node, see the Version row of the root-node table above. |
| Value Domain Restriction / Value Domain (Required) | Two dropdowns that restrict the node's value domain; they default to the CC's own value domain. Value Domain Restriction chooses how the value domain is restricted — "Primitive", "Code", or "Agency" — and changes the choices offered in the Value Domain dropdown (which has a built-in search box). If "Primitive" is selected, Value Domain lists the allowed primitives, e.g. integer, string, token; the available choices depend on the primitives specified in the CC model (if the CC's primitive is Integer, only restrictions of Integer are offered; a Date Time type offers the date/time primitives; primitives starting with 'xbt' are defined in connectSpec). If "Code" is selected, Value Domain lists the applicable code lists: when the CC model uses a generic code type, any code list is allowed, but when it assigns a specific code list (e.g., Language Code), only that code list, the code lists it is based on, and the code lists derived from it are offered. In the list, a deleted code list appears struck through in red, a code list that is not in a stable state appears in amber, and a deprecated one carries a ", Deprecated" suffix. When a developer (rather than an end user) edits the BIE, any end-user code list shown in the Value Domain list appears greyed out and cannot be selected; a developer can therefore see an end-user code list already assigned to the node but cannot assign or re-assign it, while developer code lists remain selectable. If "Agency" is selected, Value Domain lists the applicable agency identification lists. A used value node must have a Value Domain — the update is rejected otherwise. |
| Facets (Optional) | Additional lexical restrictions on the value: Minimum Length, Maximum Length, and a regular-expression Pattern with a Pattern Test box that checks a sample value against the pattern as you type. On an inherited BIE, the facets are read-only when the base BIE defines any facet. |
| Context Definition (Optional but highly recommended) | The context-specific semantic definition of the BIE node in natural language, based on the read-only definitions below — for example, "The Tax Amount for internet order should always be zero unless the buyer address is in Maryland. In that case, Maryland tax rate shall apply." Implementation detail can be placed here as well. |
| Association Definition and Component Definition (Read-only) | These display the canonical CCs' definitions from which the BIE node is derived; the Type Definition is not included because the tool simplifies the view of this type of BIE node even further. The Association Definition adds to the Component Definition additional explanation when the corresponding reusable component is used within the parent CC node. For example, a reusable component can be a Tax Amount, which has its own Component Definition ("Tax Amount is the amount charged by the government on top of the sales price"); associated with an Invoice Line, the Association Definition may be "Tax Amount on the invoice line item." For some nodes in this category only the Component Definition is present — this is normal; for users familiar with the CC specification, it is because these are derived from Supplementary Components that do not reuse types. |
In summary, a BIE is edited by enabling a BIE node in the BIE tree to be used and then changing its details. To do so:
-
Expand the BIE tree by clicking the triangle icon in front of the tree node.
-
Click the name of the tree node you want to change its detail.
-
Click the "Used" checkbox, either on the tree or the detail pane, in order for this component to be used.
Tips:
-
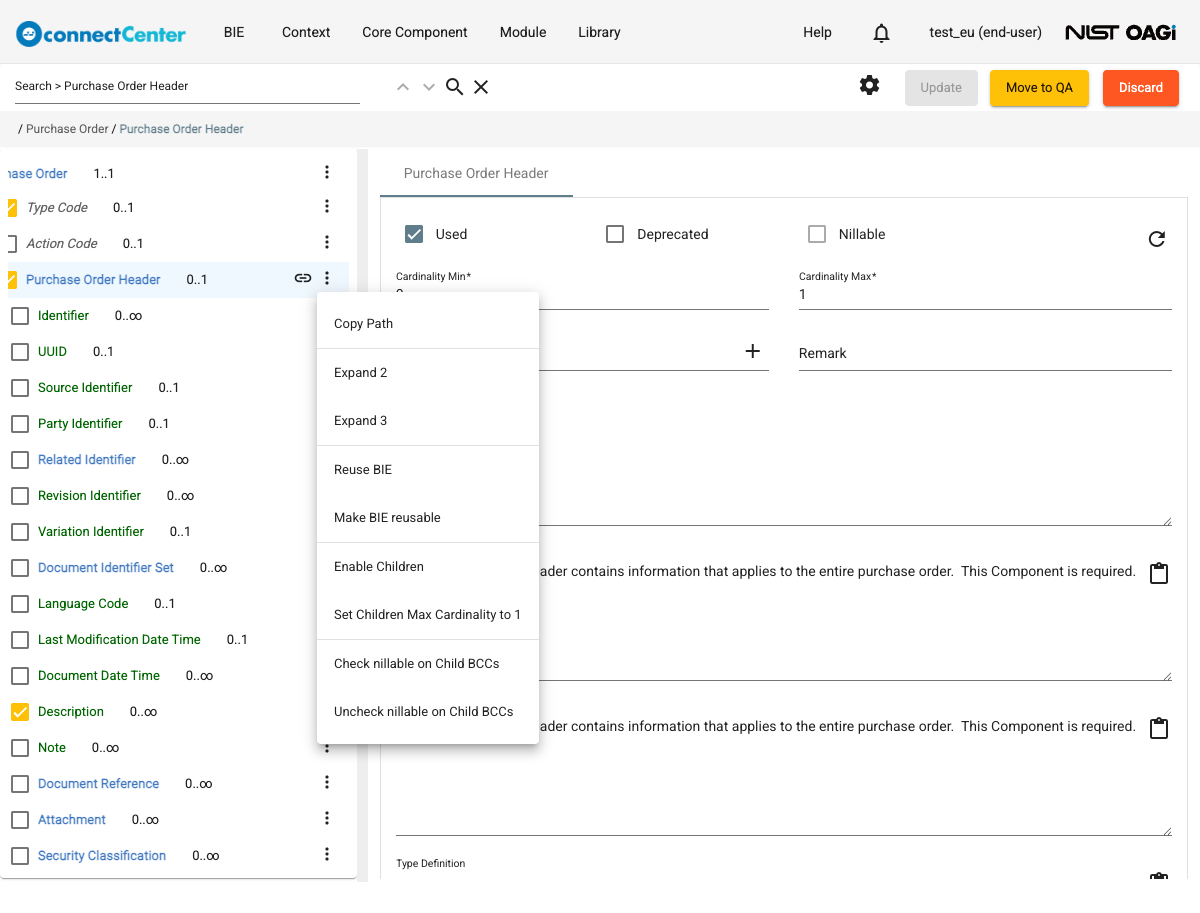
The user can keep expanding the BIE tree until the node he/she would like to enable appears and only check the particular node. All the ancestor nodes are automatically enabled. Also, a BIE tree can be very huge, containing hundreds of thousands of nodes. The Search within the BIE Tree function can be helpful. The user can click the ellipsis icon located next to a BIE node to open the node's context menu. Besides utility items ("Copy Path", which copies the node path to the clipboard, and "Expand 2"/"Expand 3", which expand the subtree two or three levels), the menu offers "Enable Children" to enable all the direct children of this node in one shot (i.e., to enable their "Used" checkbox), "Set Children Max Cardinality to 1" to set the Max Cardinality to 1 for the node's used descendants, and "Check nillable on Child BCCs"/"Uncheck nillable on Child BCCs" to toggle Nillable on the value children.
-
Scroll down the detail pane on the right side and find the field you want to change its value.
-
Enter a new value in the field.
-
Click "Update" when finished. The button carries a badge with the number of nodes that have pending changes, and the Ctrl+S (Cmd+S on macOS) keyboard shortcut saves as well.
-
To reset the values of the BIE node back to their initial ones retrieved from the corresponding Core Component, click the reset (circular-arrow) icon at the top right of the detail pane — its tooltip is "Reset detail" — and confirm in the "Reset current values to initial values." dialog.
Note that you have to click "Update" in order for the BIE to be updated and for the changes to be saved — an "Updated" confirmation message appears at the bottom of the page each time. Although it is not necessary to click "Update" for every change to the BIE node, it is recommended that the user click the "Update" button frequently. If the server response is slow either due to network tardiness or server loads, the user might want to click the "Update" button less frequently.
Note that while end users can create and restrict a BIE which is derived from an end-user ASCCP that is in Production state, its editability may change over time. This is because the ASCCP or any of its descendant CCs may be amended while the BIE is being edited. In other words, end-user CCs may change to WIP, QA or Deleted state anytime. The BIE nodes, whose underlying CC is an end-user CC not in the Production state, are shown in the BIE tree but locked — their checkbox is disabled with the tooltip "This component is not in Published or Production state." They become editable when the underlying CC is moved into the Production state again (the BIE page has to be refreshed or reopened). In case a CC node is Deprecated, the corresponding BIE node can still be edited, but it is flagged with a strikethrough on a grey background.
Extend a BIE
BIE extension fundamentals
Extension is generally a connectSpec architectural concept. The UN/CEFACT Core Component Specification (CCS) has no provision for extension. Almost all connectSpec complex components (i.e., connectSpec ACCs) have their own extension points. It is a practical design that allows standard users to add content specific or proprietary to the organization adopting the standard. For example, extension may be appropriate for adding specific fields needed in reference components such as Purchase Order Reference (possibly because the organization found that another call back to retrieve specific information about the purchase order to achieve its integration objective does not meet its performance criterion).
While in connectCenter an extension is invoked on a BIE node, the content is added to the CC. Consequently, the added content shows up on current and future BIEs that are based on the same CC. For example, if end user A had invoked BIE Extension on and added content to the Extension node of the Purchase Order Line BIE that is based on the Purchase Order Line CC in Release 10.6, another Purchase Order Line BIE created later on by end user B on the same release will also see the content added by end user A.
When the user invokes a BIE extension function for the first time, a few types of Core Components (CCs) are created behind the scenes: a User Extension Group ASCC, a User Extension Group ASCCP, and a User Extension Group ACC (UEGACC). These CCs are hidden in the CC view, except the UEGACC.
The purpose of the ASCC and the ASCCP is only to allow the UEGACC to be added to the Extension component, as illustrated below. In this illustration, the Application Area Extension ACC is the Extension component of the Application Area ACC (the Application Area ACC is not included in the illustration).
The reason connectCenter creates the Application Area User Extension Group ACC is so that revisions can be made to the extension without revising the (standard) Application Area Extension ACC. When the user edits the extension, i.e., adding/removing the data elements via BCCs or ASCCs, he/she is actually editing the UEGACC. The name of the UEGACC is derived from the extension component's name by replacing the word "Extension" with "User Extension Group" — the DEN pattern is "[Name of the BIE node parent to the extension node] User Extension Group. Details", e.g. "Application Area User Extension Group. Details" (a global extension edits "All User Extension Group. Details" — see below). The user may also open the UEGACC in the Core Component pages to make edits. See Life-cycle dependency between EUCC and BIE extension.
It should be noted that BIEs corresponding to these CCs are hidden from the user in the BIE view. Data elements added to the UEGACC will appear as if they were direct children of the Application Area Extension BIE.
Basic BIE extension
This section provides a guide to extend a BIE, when it is not being extended by another user or it has never been extended within the CC release the BIE is based on. See Advanced BIE extension for guides about these other situations.
BIE extension is accessible only by end users. Developers can neither extend a BIE nor use the associations of the extensions created by end users when they restrict a BIE — for a developer the two extension menu items are permanently disabled with the tooltip "Developer cannot create ABIE Extension", and connectCenter does not even show end-user extension content in the BIE tree to developers. Developers can view a BIE extension's UEGACC read-only through the Core Component pages (see How to Search and Filter for a Core Component). In order for a BIE to be extended, it has to be in the WIP state and owned by you. In addition, a BIE node can be extended only if it has an Extension child node. A BIE node has an Extension child if its corresponding CC has the Extension child component (as designed by the standard architect). (In multi-tenant deployments the extension menu items are disabled for everyone.)
To start, if the top-level BIE you would like to extend is not already opened, see Search and retrieve a BIE to open it.
On the page where you can edit a BIE, expand the BIE tree until you see the desired Extension point (a node with the name Extension) of a BIE node you would like to extend. Click on the ellipsis icon located next to the Extension node. The context menu contains two options related to BIE Extension: "Create ABIE Extension Locally" and "Create ABIE Extension Globally".
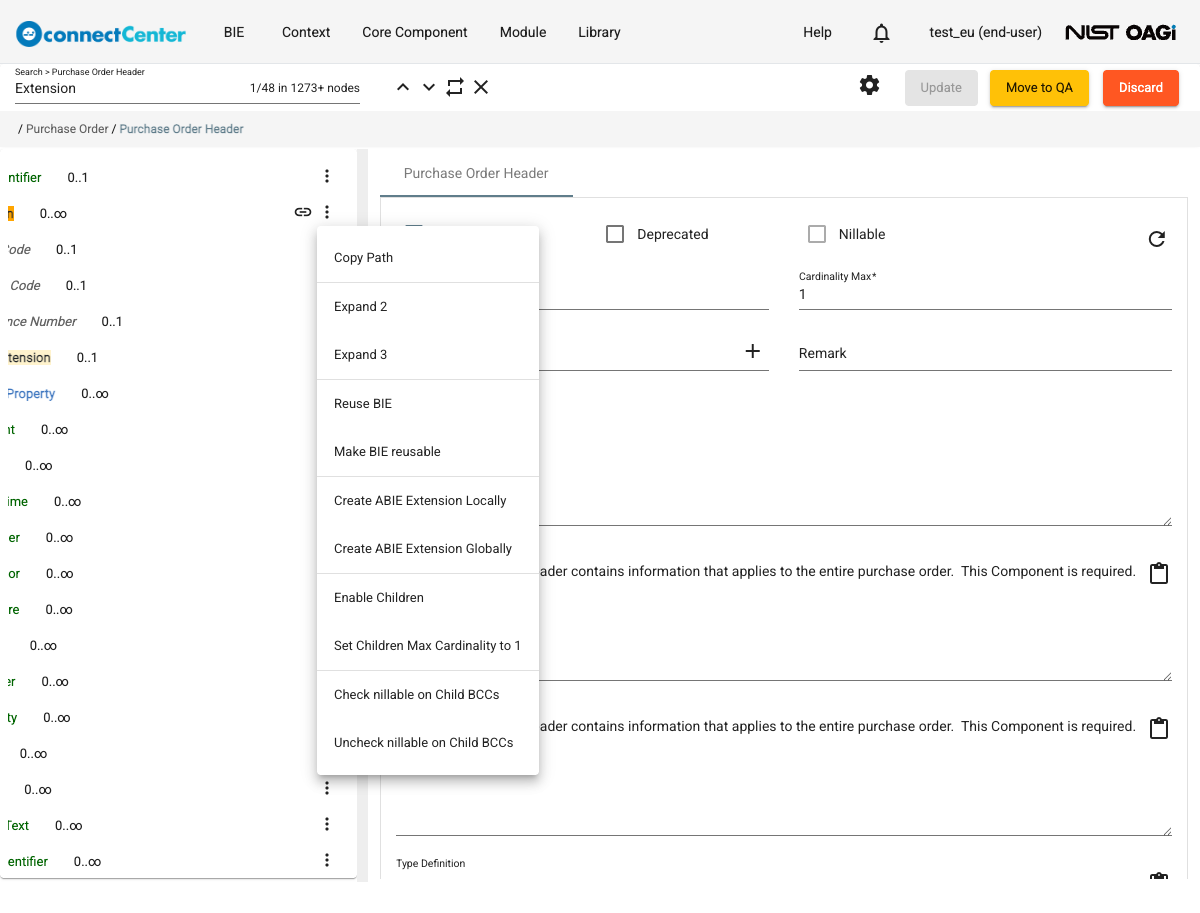
Once you have chosen to create an extension, you can append (i.e., create an association to) an ASCCP or a BCCP to the extension. Important: Click "Update" to save the BIE before invoking the extension — choosing either menu item navigates this browser tab straight to the UEGACC editing page, and any unsaved BIE changes are lost without warning.
A global BIE extension means that the added BCCP will appear globally in all BIEs' extension points. The user cannot add an ASCCP to a global BIE extension since it would create a cyclical structure (this is because most ASCCPs also contain the global extension) — the append dialog of the global extension therefore offers BCCPs only. Compared to a global BIE extension, a local BIE extension exists only in the component you have selected to extend (for example, data elements added to the Purchase Order Line's extension are specific to the Purchase Order Line component).
Global extension is a design/feature of the connectSpec standard. Making such an extension is generally very rare as any added data element will appear in all Extension components. One example situation could be when an entire enterprise architecture decided that all (extensible) data components should have a UUID.
To create an extension:
After either "Create ABIE Extension Locally" or "Create ABIE Extension Globally" context menu item is invoked, connectCenter displays the corresponding UEGACC (see the BIE extension fundamentals section). This is actually a Core Component editing view. Without going into details of this view, the user can keep expanding the tree to see generic data elements that already exist in any extension component. These are non-semantic extension data elements. However, the user can add semantic data elements to the UEGACC — right-click the root node and choose "Append Property at Last" (or "Insert Property at First"), see Add a property to an ACC. The user may also want to construct additional End User Core Components (EUCC) and use them in the UEGACC. See End User Core Component Management. A first-revision UEGACC still in WIP can be deleted from its page with the "Delete" button, fully backing out an extension that was invoked by mistake.
After additional data elements have been added to the UEGACC, they cannot be used or edited in the BIE while the UEGACC is still in the WIP state. Indeed, the UEGACC can be in three states as described below. Only when it is in the Production state can its content be used in BIEs:
-
WIP state that allows for appending and removing data elements (ASCCPs or BCCPs). In this state, no other user can invoke the extension on a BIE with the same underlying Extension component. Other users can however view the current content of the UEGACC by opening it from the "View/Edit Core Component" page under the "Core Component" menu. Current content of the UEGACC also shows up in corresponding BIE extensions; however, the content cannot be used or edited in the BIE.
-
QA state that allows other users to review and provide their comments (see Commenting). In this state, the UEGACC cannot be changed. However, the current owner of the CC can transition the state back to WIP for further editing or to the Production state. As in the WIP state, no other user can invoke a BIE extension that uses the same UEGACC; and the content of the UEGACC can be viewed by other users in the Core Component view and also in the corresponding BIE extensions, but it cannot be used or edited in the BIE.
-
Production state. In this state, the revision is permanently made to the UEGACC; it is like a commit in a version control. The significance of this state to the BIE development is that the content of the UEGACC can be used in corresponding BIE extensions. Note however that if the UEGACC uses any EUCC and the EUCC is not in the Production state, the BIE node corresponding to that EUCC still cannot be used or edited (see Life-cycle dependency between EUCC and BIE extension). Also, in this state, the BIE Extension can be invoked again on a BIE node that relies on the UEGACC. This results in a new revision of the UEGACC in which only backwardly compatible changes can be made (see Advanced BIE extension). See BIE States and BIE Review Process for additional information about BIE states.
There are two ways to open the UEGACC page again (if you have left the page). First, open it by invoking the BIE Extension menu item on the same extension node in the BIE as described above. While the UEGACC is in WIP this works only for its current owner; if it is in QA any end user is offered to review it read-only, and if it is in Production invoking the menu item starts an amendment (see Advanced BIE extension). The other way is via the Core Component page: click the "View/Edit Core Component" menu item under the "Core Component" menu and search for the UEGACC by its DEN — "<component name> User Extension Group. Details" for a local extension, or "All User Extension Group. Details" for the global extension (see BIE extension fundamentals). This option is available to both the current owner and other users.
Advanced BIE extension
Case 1: The UEGACC is being edited by another user, i.e., it is in WIP.
The user encounters this situation when he/she tries to extend a BIE node which uses the same Extension core component (or strictly speaking the UEGACC, see BIE extension fundamentals) as another BIE node also being extended. For example, while user A is extending the Application Area node within an Acknowledge BOM BIE, the respective Application Area UEGACC is being edited. If user B invokes the extension on the Application Area node within a Show Shipment BIE, user B receives a brief message reading "Editing extension already exist." and cannot perform an extension to the BIE at this time.
Case 2: Similar to case 1, but the Extension core component is in the QA state.
With respect to the example given in Case 1, user B receives a dialog headed "Attention!" reading "Another user is working on the extension. It is in the QA state. You can only review the extension. Would you like to open the extension to review?". Answering "Yes" opens the UEGACC read-only in a new browser tab, where user B can review it and provide comments about what changes he/she might want (see Commenting).
Case 3: The BIE has been extended before.
This case means that there is already a revision of the associated UEGACC in the Production state before the current BIE Extension invocation. In this case, connectCenter opens the UEGACC for amendment — immediately: as soon as the menu item is clicked, a new WIP revision of the UEGACC is created and its ownership transfers to the invoking user, before any edit is made. The "Cancel" button on the UEGACC page abandons the amendment and restores the previous Production revision. The user can update the UEGACC as described in Amend an ACC — except setting/removing a based ACC. To continue the example made in Case 1: user A has already moved the Application Area UEGACC to the Production state; if user B then invokes the extension on the Application Area BIE node, this results in the amendment of the Application Area UEGACC where its revision number increments by 1 and user B becomes its owner. For the amendment, only backwardly compatible changes can be made. Associations added in earlier revisions cannot be removed — their context menu offers no "Remove" option and only their Deprecated checkbox can be changed — while newly appended associations can still be removed; the Namespace and the based ACC are locked. It should be noted that, alternatively to invoking the BIE Extension on the same component, the user can also amend the UEGACC directly from the Core Component pages.
Life-cycle dependency between EUCC and BIE extension
As indicated earlier, a BIE extension, i.e., a UEGACC, may use other EUCCs at some of its descendant nodes. The states of these EUCCs (note that the UEGACC is also a kind of EUCC) can change independently, e.g., some may be in WIP, some in QA, and some in Production, and those in Production may also be amended at any time by any end user causing them to go back to WIP. connectCenter ensures the consistency between the BIE contents derived from these EUCCs while they are still changing by two mechanisms: 1) blocking the BIE from modification while the corresponding EUCC is not in the Production state and 2) only allowing backwardly compatible changes to the EUCC if the EUCC has revision number 2 or more.
Because of the first mechanism, BIE nodes corresponding to EUCCs that are not in the Production state are blocked from being used or changed in the BIE tree (their checkbox is disabled with the tooltip "This component is not in Published or Production state."). For example, if a UEGACC owned by user A uses an EUCC that is in WIP and is owned by user B, user A will not be able to profile the EUCC in the UEGACC until user B moves the EUCC into the Production state. And if another user C happens to amend the EUCC while user A is profiling the extension, user A will be profiling based on the pre-amendment version until the user refreshes the BIE page. If after refreshing the BIE page the EUCC is still in WIP or QA, user A will not be able to make further profiling until the EUCC is moved into the Production state again.
Search and retrieve a BIE
To find and retrieve a BIE:
-
On the top menu of the page, click "BIE".
-
Choose "View/Edit BIE" from the drop-down list.
-
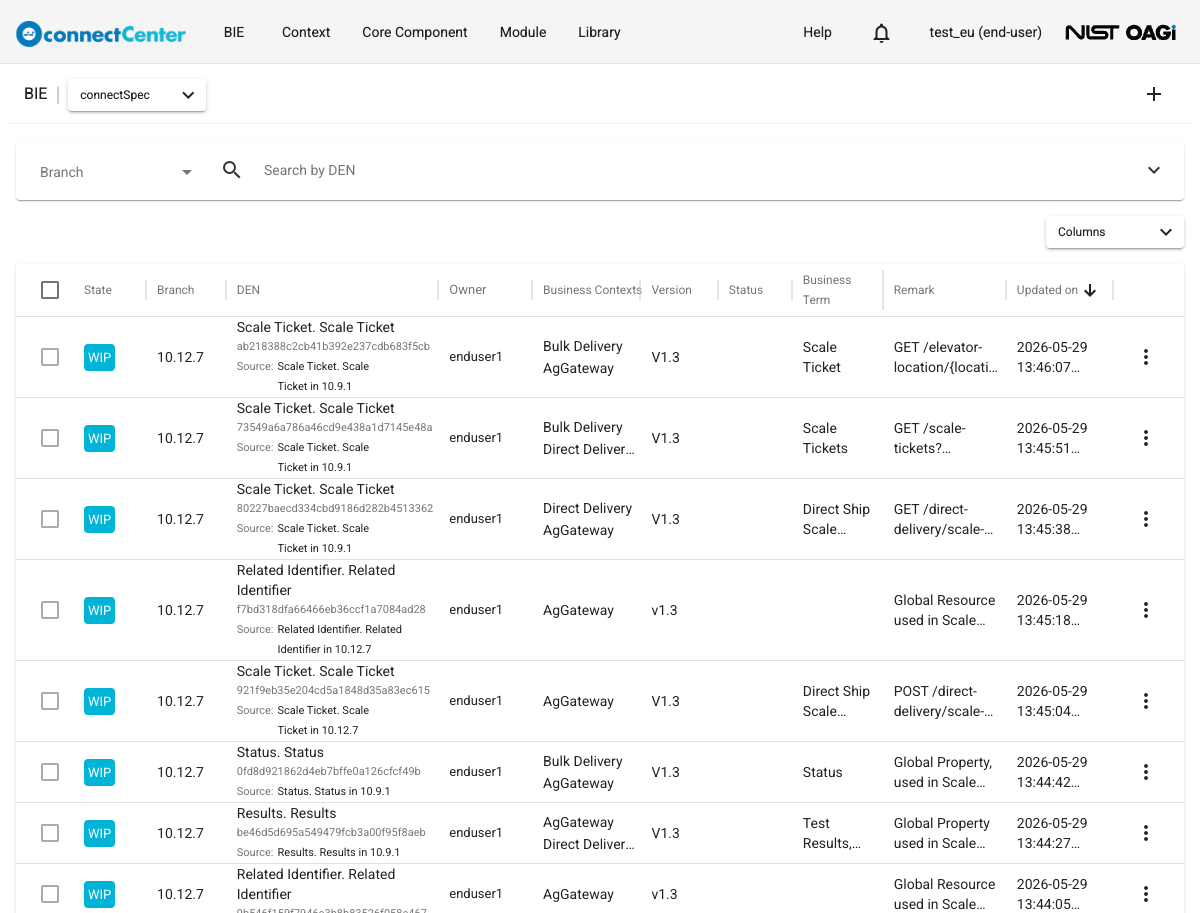
Search for the BIE you want via any of these options:
-
The pagination bar at the bottom.
-
Sorting the results by clicking a column header: State, Branch, DEN, Owner, Version, Status, Business Term, Remark, and Updated on are sortable (Business Contexts is not). The "Columns" selector above the table shows or hides columns.
-
The "Search by DEN" field. It also matches a BIE's display name, and while a search term is entered the results are ordered by relevance. See also How to use the Search field in general.
-
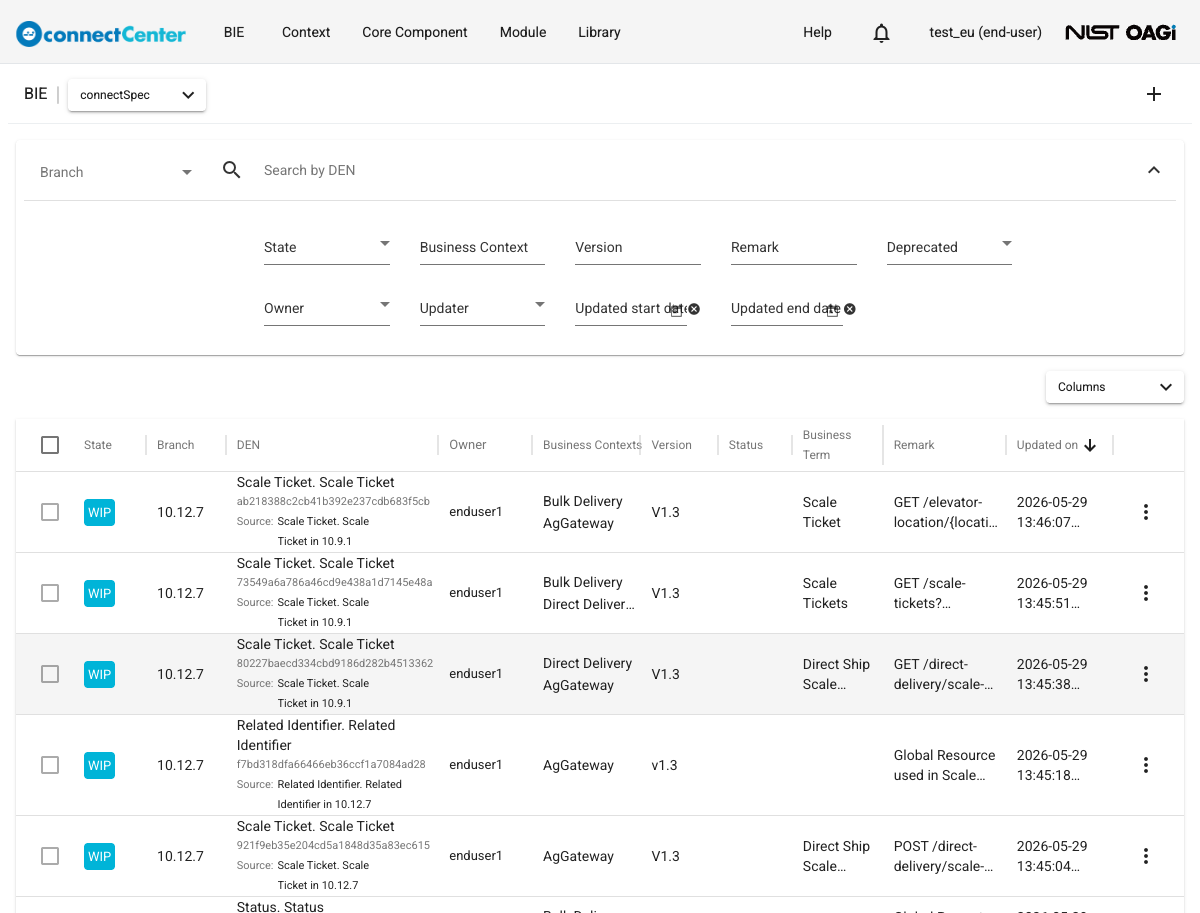
The advanced search filters: State, Business Context, Version, Remark, Deprecated, Owner, Updater, Updated start date and Updated end date. See also How to use Search Filters.
-
The Branch filter that allows for filtering BIEs based on their release. On this page it is a multi-select: choose one or more releases from the "Branch" drop-down near the top-left of the page (a "Select All / Unselect All" entry toggles all of them). The single-select Branch chosen on the "Create BIE" and "Express BIE" pages is remembered and shared across the BIE-related pages, including the "Code List" page when it is visited via "View/Edit Code List" under the "BIE" menu.
-
-
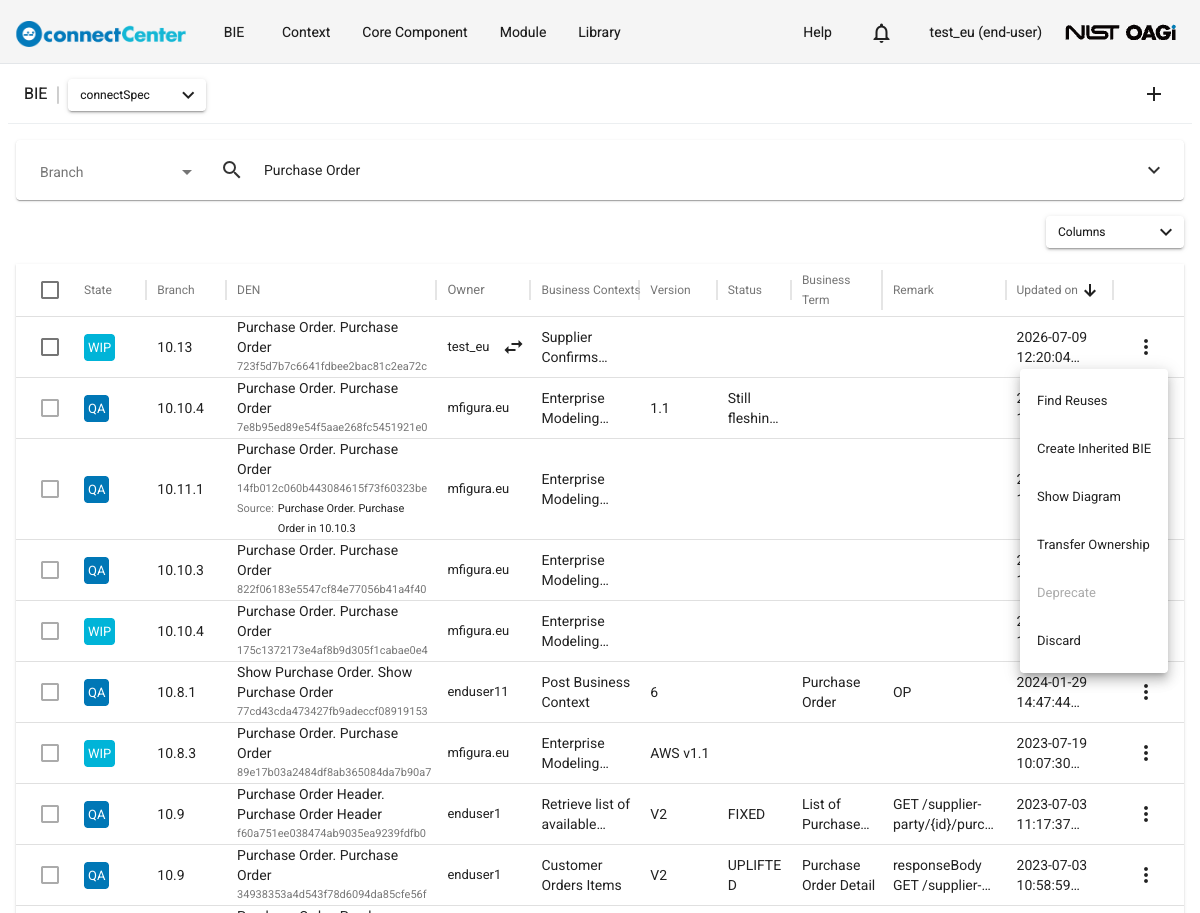
Click the checkbox located next to the BIE you want to act on (checkboxes are enabled only on your own BIEs; administrators can select any row). When rows are selected, toolbar buttons appear at the top of the list to "Move to QA", "Move to Production", "Back to WIP", "Discard", or "Transfer Ownership" for all selected BIEs in one action. Or, if you want to view or edit the BIE's details, click on its DEN (the GUID shown under the DEN is plain text, not a link). A BIE created by copying or uplifting shows a "Source:" line under its DEN linking to the BIE it came from; an inherited BIE shows a "Based on:" line (see BIE inheritance).
Each row also has an ellipsis (three-dot) menu at its right end with the "Find Reuses", "Create Inherited BIE", "Show Diagram", "Transfer Ownership", "Deprecate", and "Discard" actions ("Show Diagram" draws the BIE's used nodes as a diagram; "Deprecate" is offered to the owner of a Production BIE and records a reason and remark, shown afterwards as a "Deprecated" chip in the State column).
Search within the BIE Tree
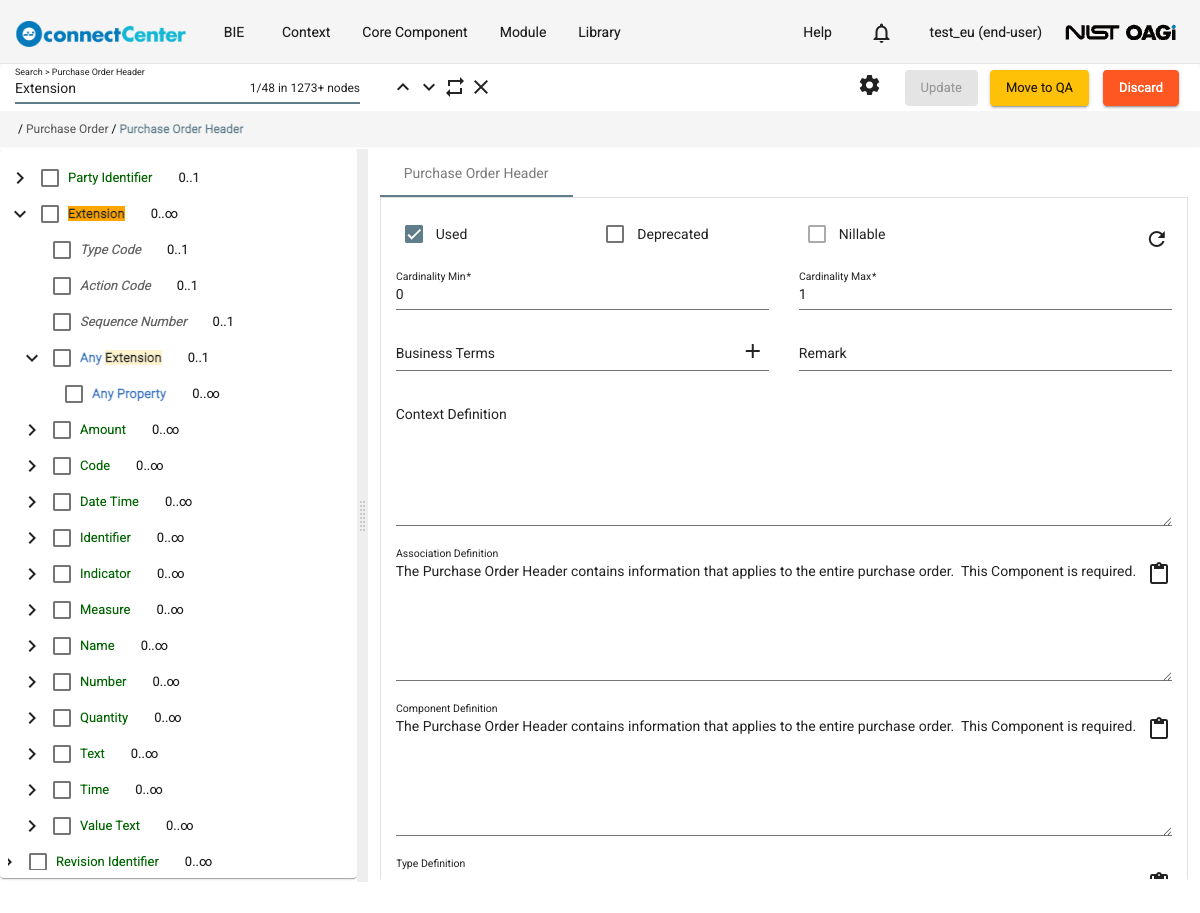
In the BIE detail page, the user can search the BIE tree. This allows the user to quickly locate the desired BIE node within possibly hundreds of thousands of nodes by the node label. To use the search within the BIE Tree:
-
On the Edit BIE page, click on a node within the BIE tree to set the scope of the search — the search box's label changes to "Search > <node name>". Selecting a lower-level node in the tree narrows down the scope of the search and also returns the result faster. To search the whole tree regardless of the selected node, prefix the search term with "/".
-
Input a search term in the search box near the top-left corner of the page and hit the "Enter" key or click the magnifying-glass icon. It should be noted that node labels are space-separated words and ID is spelled out as Identifier.
-
If there is any match with the search term, the number of matches is displayed in the search box, in the form "1/48 in 1273+ nodes". Use the adjacent Up/Down arrow icons to step through the search results. Because large trees are searched in batches, the magnifying-glass icon turns into a "Search more..." icon when more of the tree remains to be scanned — click it to continue the search deeper. The X icon clears the search.
Discard a BIE
Discarding a BIE permanently removes it from the database and CANNOT be undone. In order for a user to discard a BIE, he/she has to be the owner of the BIE and the BIE has to be in the WIP state (administrators can discard any BIE in any state). A BIE that is used in an OpenAPI Document cannot be discarded until it is removed from that document.
To discard a BIE:
-
On the top menu of the page, click "BIE".
-
Choose "View/Edit BIE" from the drop-down list.
-
Search and select one or more BIEs you want to discard by clicking on the corresponding checkboxes.
-
Click the "Discard" button at the top-right of the page. (Alternatively, use the "Discard" item of a row's ellipsis menu, or the "Discard" button on the Edit BIE page itself.)
-
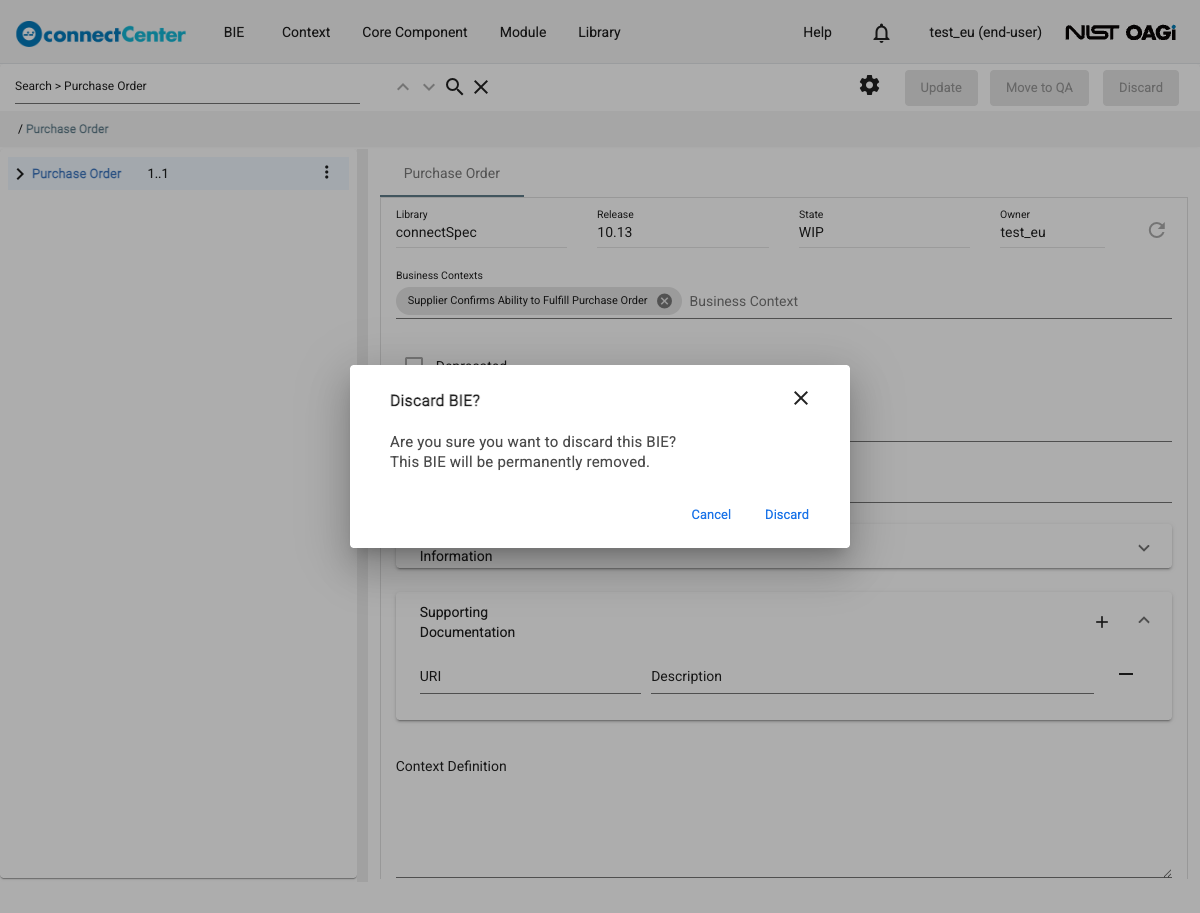
A dialog titled "Discard BIE?" is displayed, reading "Are you sure you want to discard this BIE?" and warning "This BIE will be permanently removed." When the BIE has reuse or inheritance relationships, the dialog also lists the "Associated BIEs" that may need to be discarded together — check them to discard them in the same action. Click "Discard" to confirm.
BIE Review Process
The BIE review process supports the collaborative aspect of the BIE development. This is enabled by the three BIE development states, namely WIP, QA and Production. They may be used in the following fashion.
-
A BIE developer creates a BIE and keeps it in the WIP state. He is the BIE owner and he is the only one who can edit the BIE in this state. Other users can open the BIE and view its details read-only at any time (see A Note About the BIE Visibility), keeping in mind that what they see may still be changing.
-
When he is done with the BIE development, he transitions it to the QA state. In this state, other users, such as other subject matter experts, developers, data or enterprise architects can access, review, and provide offline comments for the BIE.
-
For the BIE developer to make changes after receiving comments, he/she takes the BIE back to the WIP state. To change a BIE's state from QA to WIP, the BIE developer has to retrieve the BIE (see Search and retrieve a BIE) and then click "Back to WIP" at the top-right of the Edit BIE page. Steps 2 and 3 can be revisited to complete the BIE review cycles. In addition to the BIE state, the Status field in the root BIE node may be used for capturing detailed BIE development states, as it is a free text field. For example, the BIE developer may set the status field to 'Architecture Review' in the first few cycles of shuttling between the WIP and QA states. Then, he/she may set the status field to 'Implementation Test' the next time he puts the BIE into the QA state, and then 'Final Review/Approval'.
-
Once there are no more comments, the BIE developer himself may move the BIE to the Production state. To do so, the BIE developer retrieves the BIE (see Search and retrieve a BIE) that is already in the QA state and clicks "Move to Production". Alternatively, an organization may designate a user, such as an enterprise architect, to be the solely responsible user for the BIE life-cycle management. In such a case, the BIE developer would transfer the BIE ownership to the enterprise architect first, who makes the final decision whether to move the BIE to the Production state. The BIE developer or the enterprise architect may use the status field to indicate a detailed state such as Production. They may also use the version field in the root BIE to communicate the BIE revision, e.g., "OAGIS_10.4_BIE_1.0.0". Once the BIE is in the Production state, it can no longer be changed or discarded (an administrator can still discard it). The owner can however mark it as outdated with the "Deprecate" action in the BIE list's row menu, recording a reason and remark. To make a new revision of the BIE, see Copy a BIE.
Transfer BIE Ownership (Making BIE editable by another user)
A BIE can be edited only by the current owner. BIE ownership transfer may be used, for example, during the BIE Review Process, or when the owner of the BIE leaves the organization or wants to change the authorship so that another user can edit it. In order to transfer the ownership of a BIE, the BIE has to be in the WIP state. Transferring the ownership of a BIE is allowed either between developers or between end users — the selection dialog lists only users with the same role as the current owner.
Note that if the current BIE owner has left the organization, an administrator can transfer the ownership of any BIE directly — the transfer controls are enabled for administrators on every row regardless of state or ownership. When email notifications are enabled, a non-owner can also ask for a BIE with the "Request Ownership Transfer" item in the row's ellipsis menu, which emails the request to the current owner.
To transfer the ownership of a BIE:
-
Search and retrieve a BIE. Stay on the "BIE" page.
-
On the BIE page, click the transfer icon (two opposite horizontal arrows) that appears in the Owner column of your own WIP BIEs. Otherwise, click on the ellipsis located in the last column of the BIE entry and select the "Transfer Ownership" option in the context menu.
-
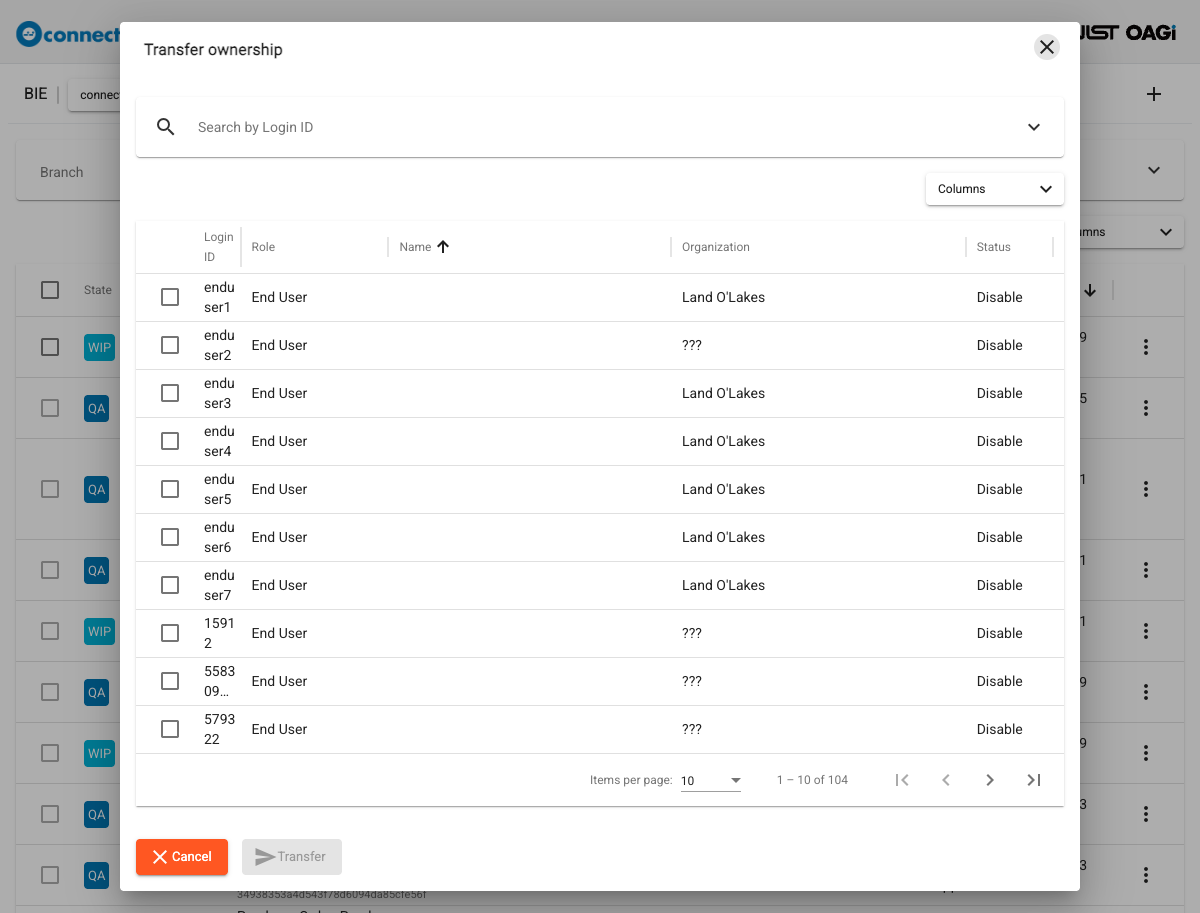
The "Transfer ownership" dialog is returned where all the users to whom the BIE can be transferred are displayed, with the Login ID, Role, Name, Organization, and Status columns.
-
Select the desired user by clicking anywhere in the row. You may also use the "Search by Login ID" bar and the Name and Organization filters to find the desired user (see also How to use the Search field in general).
-
Click "Transfer".
You may also click "Cancel" to return to the "BIE" page.
Copy a BIE
The user might want to use this function, for example, when a BIE has already been in the Production state (see BIE Review Process) or when the user would like to create a new BIE in another Business Context and does not want to start from scratch. A BIE can be copied when it is in the QA or Production state. A BIE in WIP can be copied by its owner only. To copy a BIE:
-
On the top menu, select "BIE".
-
Then, select "Copy BIE".
-
On the returned "Copy BIE" page, subtitled "Select Business Contexts", search for the desired Business Contexts to associate to the new BIE. To do so, you can use:
-
The "Search by Name" field (see also How to use the Search field in general)
-
The Updater, Updated start date and Updated end date filters (see How to use Search Filters).
-
A user can view the details of a Business Context before selecting it. To do so, he can click the Name of the Business Context and its detail will be displayed in a new tab.
If the desired Business Context does not exist, create it first — for example in another browser tab, then use the browser refresh button on this page and the new Business Context will show up for selection.
-
Select one or multiple Business Contexts to associate with the BIE by clicking the corresponding checkboxes.
-
Click "Next".
-
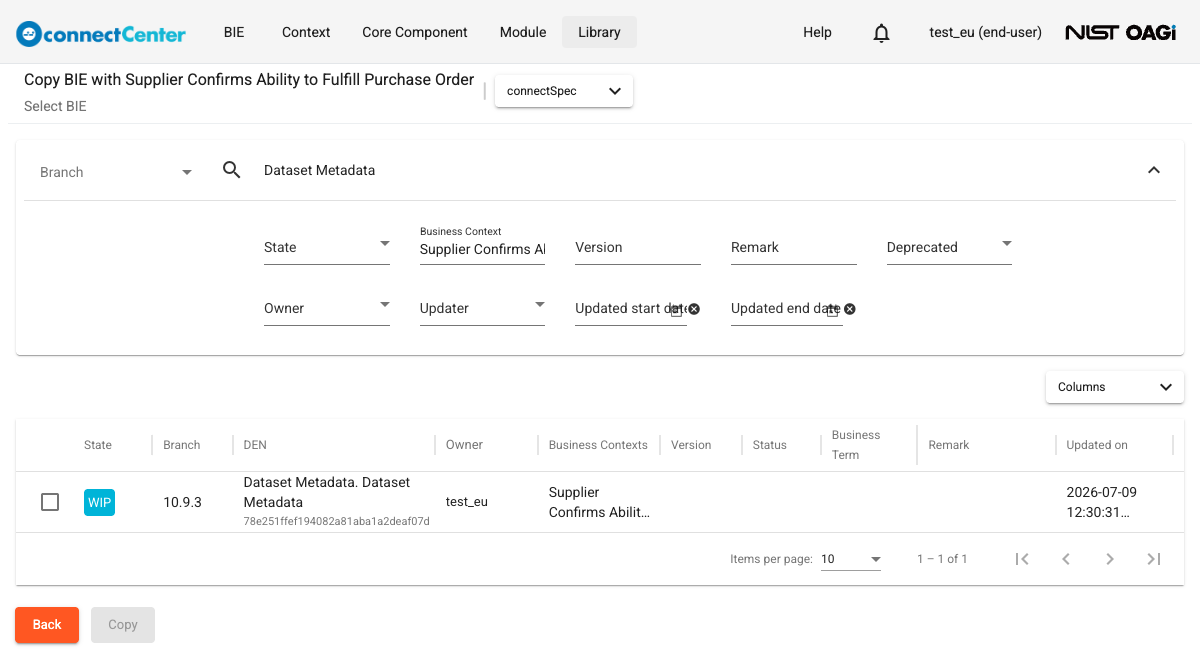
On the "Select BIE" step, find the BIE you want to copy and select it by clicking its corresponding checkbox. This page lists the BIEs that are allowed to be copied by the current user: other users' BIEs in the QA or Production state plus your own BIEs. These BIEs can be in any release; the resulting BIE will belong to the same release as the selected BIE. Note that the Business Context filter arrives pre-filled with the names of the Business Contexts you selected in the previous step, so initially only BIEs carrying those contexts are listed — clear the filter to see everything you can copy.
-
Click the "Copy" button at the bottom of the page. A "Request Received" message appears ("This may take a moment, so please check back shortly.") and the BIE page is returned, where the new BIE is created in the WIP state, in the same release and with the same Version, Status, and Inverse Mode as the source BIE; its DEN carries a "Source:" line linking back to the copied BIE. If the user wants to edit the BIE he can continue with Restrict a BIE. Note that until the BIE is successfully copied, it appears in the Initiating state — an indicator that the BIE is still being copied rather than an actual development state; its name is not clickable yet. Refresh the page or just click the search button to see whether the copying is finished, i.e., the Initiating state changed to WIP.
Note that when a developer copies a BIE owned by an end user, any descendant BIEs added by the end user to the Extension nodes are ignored (i.e., BIEs based on User Extension Group CCs are ignored). This is because a developer cannot extend a BIE nor use the associations of the extensions created by end users (see also Extend a BIE).
BIE inheritance
BIE inheritance allows a user to create a new top-level BIE that is based on another top-level BIE. The source BIE is the base BIE, and the new one is the inherited BIE. Unlike copying, inheritance keeps an explicit base relationship between the two BIEs.
In the current UI, an inherited BIE can be recognized in the following places:
- In the "View/Edit BIE" list, the DEN column shows a Based on: line under the inherited BIE, linking to its base BIE.
- In the BIE tree, inherited nodes show the inheritance icon with the tooltip "Inherited".
- On the edit page, inherited nodes provide an additional tab labeled Inherits from ... that shows the base BIE details in read-only form.
When an inherited BIE is created, it is initialized from the base BIE. The inherited BIE keeps the same release, business contexts, version, and status as the base BIE at the time of creation. The new inherited BIE is then owned by the user who created it and starts in the WIP state after the creation finishes.
The inherited BIE remains editable. At the same time, the base relationship is preserved so connectCenter can keep the inherited structure aligned with the base BIE: fields that the base BIE sets (for example Deprecated, Nillable, or facets) are locked on the corresponding inherited nodes, while the inherited BIE can still make its own further restrictions.
Create an inherited BIE
To create an inherited BIE:
-
On the top menu, click "BIE".
-
Choose "View/Edit BIE".
-
Search for the BIE you want to use as the base BIE. See Search and retrieve a BIE.
-
Click the ellipsis on the right side of the desired BIE row.
-
Click "Create Inherited BIE". This menu item is enabled only when the current user is allowed to inherit from that BIE. Developers can create an inherited BIE from a developer-owned BIE. End users can create an inherited BIE from an end-user-owned BIE.
-
A "Request Received" message appears, saying "This may take a moment, so please check back shortly."
-
Click "Search" or refresh the page after a short wait.
-
Find the newly created inherited BIE in the list. The new BIE shows a Based on: line in the DEN column. During creation, it may briefly appear in the Initiating state before it becomes WIP.
-
Click the DEN of the inherited BIE to open its edit page.
-
Review the inherited content. The BIE tree marks inherited nodes with the inheritance icon. For an inherited node, the Inherits from ... tab shows the corresponding base BIE details in read-only form.
A base BIE can also be assigned to (or removed from) an existing top-level BIE you are editing: the root node's context menu offers "Use Base BIE", which opens the same "Select Profile BIE to reuse" dialog to pick the base, and "Remove Base BIE".
BIE reuse
BIE reuse allows for a top-level BIE to be reused (called reused BIE) under another top-level BIE (called reusing BIE). The reused BIE can be in any state and owned by any user. However, in order for a reusing BIE to be moved to the QA or Production state, its reused BIEs have to be moved to compatible states as well — the state-change dialog lists them and lets you transition them together (see BIE States).
A target node is a BIE node that the user would like to assign a reuse. The target node must be an aggregate node (i.e., a node with the bold-blue font). An aggregate node is an Association Business Information Entity (ASBIE). An ASBIE represents a complex business characteristic and it is derived from an Association Core Component (ASCC) in a specific business context. Similar to an ASCC, it consists of the Associating ABIE based on an ACC and the ASBIE Property (ASBIEP) based on an ASCCP, and so it can be reusable (see also Make a BIE reusable).
An end user can reuse a BIE owned either by a developer or an end user, while a developer can reuse developer-owned BIEs only — end-user BIEs do not show up in a developer's reuse selection, and the server rejects such an attempt ("Developers are not permitted to reuse end users' BIEs.").
To reuse a BIE under another top-level BIE (the reusing BIE must be a WIP BIE you own):
-
Expand the BIE tree.
-
Click on the ellipsis located next to a target aggregate node — the target node.
-
Click on the "Reuse BIE" option.
-
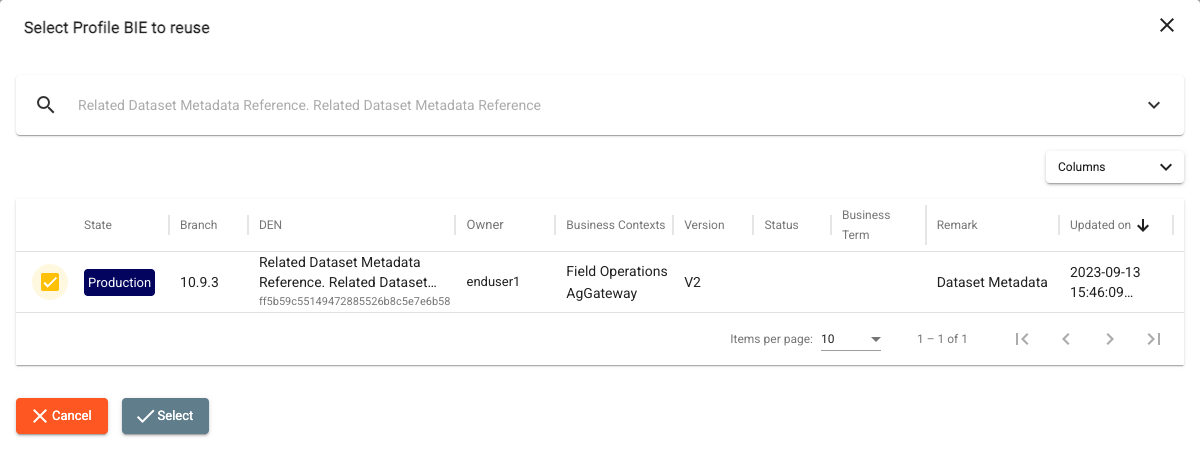
In the "Select Profile BIE to reuse" dialog, the top-level BIEs that can be reused on the target node are displayed for selection: those based on the same ASCCP, in the same release and library as the BIE being edited (the BIE being edited itself is excluded). To narrow down the results, you can filter the BIEs by State, Owner, Updater, the updated-date range, Version, Remark, or the Business Context field (see also How to use Search Filters). Note that clicking on a BIE's DEN opens its detail in another browser tab where you can inspect every detail of the BIE.
-
Select a BIE by clicking its corresponding checkbox.
-
Click the "Select" button. The reuse is applied immediately — any details previously entered on the target node's descendants are replaced by the reused BIE's content.
At this point, the target node is replaced by the selected BIE, marked with a link icon indicating it is a BIE reuse node. You can view the details of the corresponding reused top-level BIE in another tab by clicking on this icon.
The details of the reused BIE and its descendants cannot be changed. However, on the detail pane of the reused BIE node, you can still change the details of the association to the reused top-level BIE — the Used, Deprecated, Nillable, Cardinality Min, Cardinality Max, and Context Definition fields — and a read-only "From Reused BIE" section summarizes the reused top-level BIE (its library, release, state, owner, business contexts, version, status, and context definition).
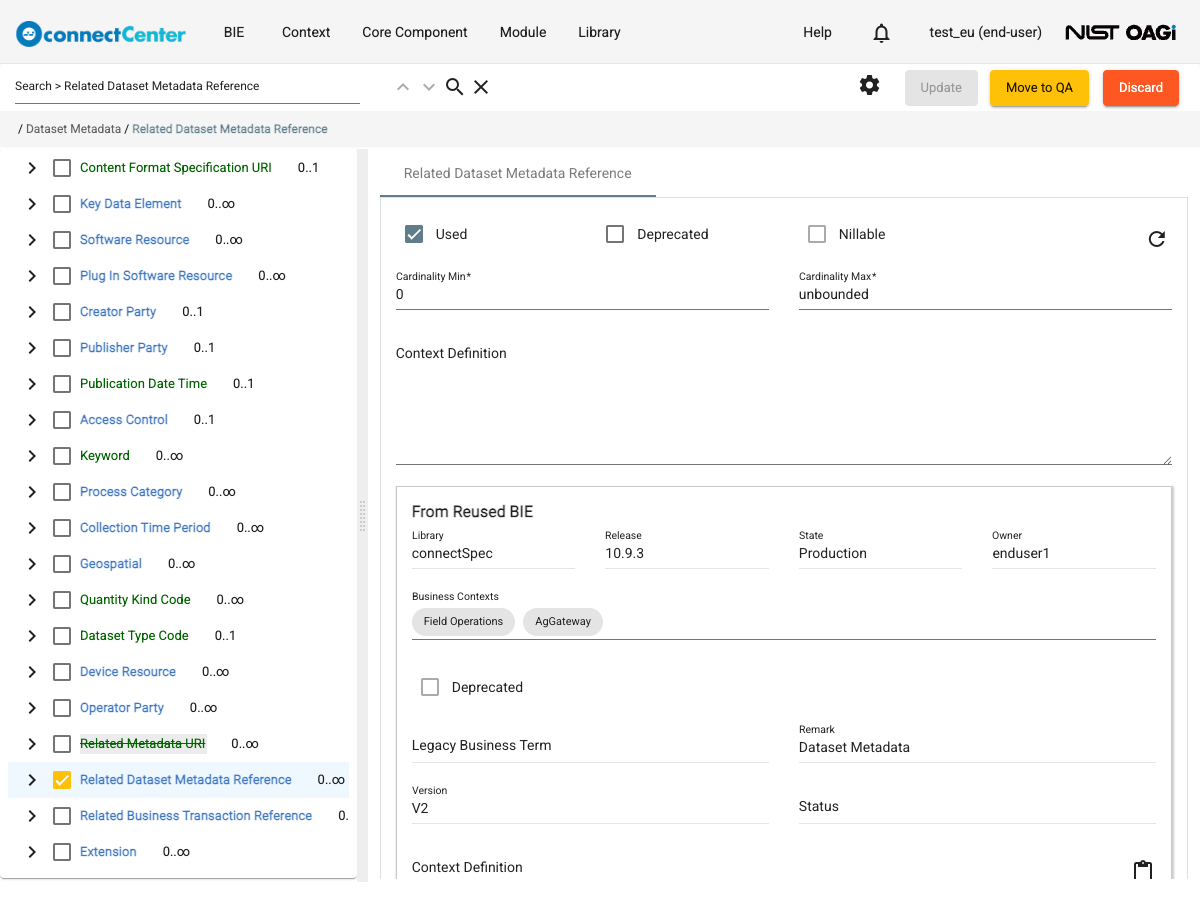
The reuse node's context menu offers follow-up actions: "Find Reuses" (see Find reused BIE), "Remove Reused BIE", which detaches the reused BIE and returns the node to its unprofiled state (confirmation "Remove reused BIE?"), and "Retain Reused BIE", which detaches the reused BIE but copies its content into the reusing BIE as ordinary editable nodes (confirmation "Retain reused BIE?").
Make a BIE reusable
This function offers the ability to make an aggregate BIE node (a node with the bold-blue font) within a (source) top-level BIE reusable. That is, to create a top-level BIE from a descendant node of a source top-level BIE. The source top-level BIE must be in the WIP state and owned by the current user. The interested node may contain a reuse BIE node; the resulting top-level BIE will also reuse those BIEs. (In multi-tenant deployments this function is disabled.)
To make a BIE reusable:
-
Expand the tree of the top-level BIE.
-
Click on the ellipsis located next to an aggregate BIE node (a node with the bold-blue font).
-
Click on the "Make BIE reusable" option.
-
Click the "Make" button in the returned "Make BIE reusable?" confirmation dialog.
-
A message appears: "The request for making the BIE is processing. The processed BIE will appear on the BIE list.", with a "Go to 'View/Edit BIE' page" action.
-
Click "Go to 'View/Edit BIE' page".
At this point the BIE list page is returned where the new BIE is listed. Until this BIE is successfully created, it is in the Initiating state; a state that indicates that the BIE is being created. Once the creation process is finished, the BIE goes to the WIP state (refresh the page or click the search button to see if the creation is done). This BIE inherits the Business Contexts and release association of its source top-level BIE. At this stage, the user can still make changes to the BIE.
Manage OpenAPI Document bindings from the BIE root
When you select the top-level (root) node of a BIE on its edit page, an OpenAPI Document Information panel appears (above Supporting Documentation) when at least one OpenAPI Document exists and the BIE either already has bindings or is editable by you. The panel lists every operation that binds this BIE across all OpenAPI Documents — one card per binding — so you can review and manage a BIE's OpenAPI usage without leaving the BIE editor. If the BIE is not yet used in any OpenAPI Document, the panel reads "This BIE is not used in any OpenAPI Document yet."
Each binding card shows the bound OpenAPI Document as a title · version chip that opens the document in a new tab and, when your BIE is editable, exposes the same operation fields as the OpenAPI Document editor:
- Verb —
GET,PUT,POST,DELETEorPATCH. - Message Body —
RequestorResponse(aRequestbody is not available for aGET). - Resource Name and Operation ID — validated exactly as in the OpenAPI Document editor (see Operation ID naming and validation); each (Resource Name, Verb) can have only one Request and one Response body.
- Security — mirrors the OpenAPI Document editor's Security column; the pencil opens the same per-operation dialog (see Set Operation Security).
- Error Response — the operation's error-response body type; when OAGi Confirm Message is chosen, a Selected Confirm Message link and picker appear (see Configure Error Responses).
- Tag.
- Make as an array and Suppress a root property checkboxes.
When a binding's OpenAPI Document targets OpenAPI 3.0 and the binding is a DELETE with a
Request message body, an amber warning appears on that card: "A Request Body on a DELETE operation
is ignored in OpenAPI 3.0. Set this OpenAPI Document's Version to 3.1 on the OpenAPI Document screen
to include it in the generated document." (see DELETE operations with a request body).
To add this BIE to an OpenAPI Document from the BIE root:
-
Search and retrieve a BIE and select its top-level (root) node.
-
Expand the OpenAPI Document Information panel and click the add (
+) button in its header (tooltip "Add to an OpenAPI Document"). -
On the returned "Add to OpenAPI Document" dialog, select the target OpenAPI Document, choose the Verb and Message Body, and check Make as an array or Suppress a root property if needed. The Resource Name and Operation ID are shown read-only as a preview. If the chosen (Verb, Message Body) would duplicate a body the BIE already has on that document, an inline message ("This endpoint already has a Request body." / "... Response body.") blocks the "Add" button.
-
Click the "Add" button.
To change a binding, edit its fields on the card and click the "Update OpenAPI Information" button.
To remove a binding, click the minus (−) icon on its card ("Remove this operation from the OpenAPI
Document").
BIE Expression generation
The user uses BIE expression generation to represent a BIE in a chosen syntax. The page supports XML Schema, JSON Schema, OpenAPI 3 templates, Open Document Spreadsheet, and Avro Schema.
The Express BIE list offers a BIE for expression when at least one of the following conditions is met:
-
The user owns the BIE, or
-
The BIE belongs to another user, but it is in the QA or Production state.
To generate a BIE expression:
-
On the top menu of the page, click "BIE".
-
Choose "Express BIE" from the menu items.
-
If necessary, choose the desired Library using the selector at the top of the page. If the user has not chosen a library preference yet, connectCenter preselects the default library.
-
Choose the desired release from the "Branch" drop-down list near the top-left of the page.
-
Find the BIE from which you want to generate an expression. See Step 3 in Search and retrieve a BIE for help with finding a BIE.
-
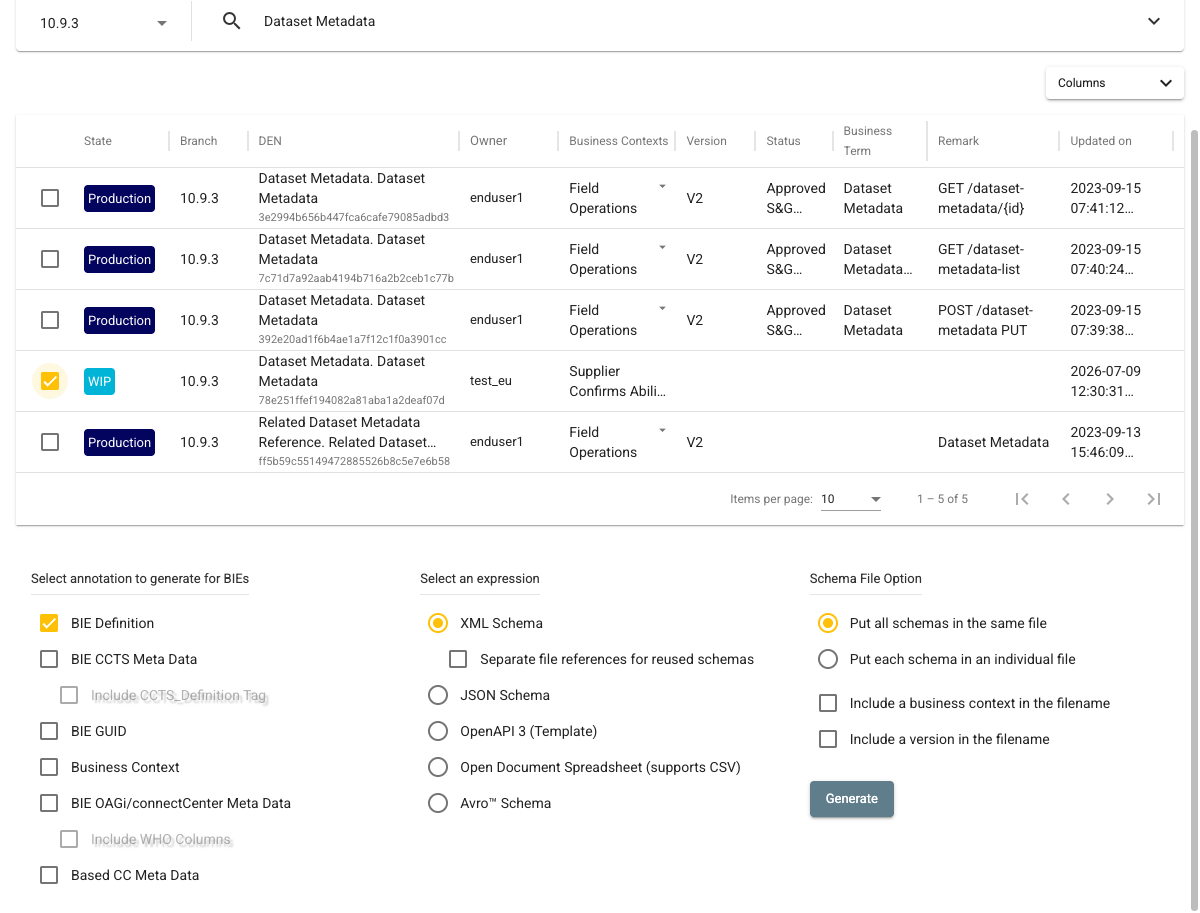
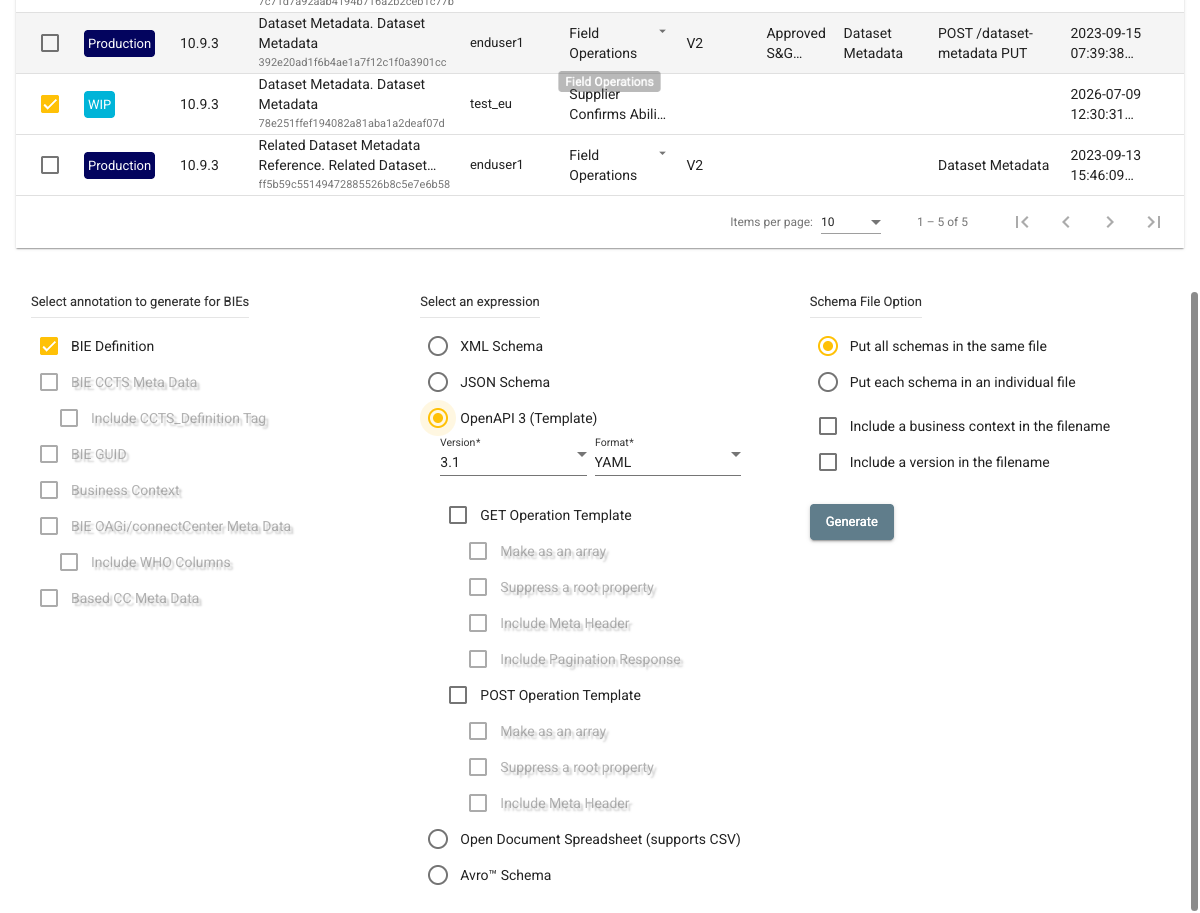
Select the BIE by using the checkbox in the first column. Multiple BIEs can be selected; the expression options appear below the table once at least one BIE is selected. For each BIE, you may choose the Business Context you want to include in the name of the downloaded file: click the down-arrow icon in the "Business Contexts" column and select the desired Business Context (the default is the first business context assigned to the BIE). The "Include a business context in the filename" checkbox below the options controls whether the business context appears in the file name at all, and the "Include a version in the filename" checkbox does the same for the BIE's version. Depending on these two checkboxes, the filename of the downloaded file is [BIE Property Term], [BIE Property Term]-[Business Context], [BIE Property Term]-[Version], or [BIE Property Term]-[Business Context]-[Version].
-
Under "Select annotation to generate for BIEs", choose what annotations to generate along with the BIE structure definition. The available options depend on the selected expression type.
-
BIE Definition (checked by default): The generated expression includes the Context Definition specified on each BIE node.
-
BIE CCTS Meta Data: Available only for XML Schema. The generated schema includes BIE information such as Dictionary Entry Name, Object Class Term Name, and Business Term according to the Core Component Specification. If Include CCTS_Definition Tag is also selected, the BIE Definition content is duplicated into the CCTS_Definition element as part of the CCTS metadata.
-
Include CCTS_Definition Tag: Available only for XML Schema, and only when BIE CCTS Meta Data is selected.
-
BIE GUID: Available only for XML Schema. The generated schema includes the BIE GUID.
-
Business Context: Available only for XML Schema. The generated schema includes the details of the BIE's Business Context.
-
BIE OAGi/connectCenter Meta Data: Available only for XML Schema. The generated schema includes connectCenter-specific information such as version, state, status, and remark. If Include WHO Columns is also selected, ownership and timestamp information is included.
-
Include WHO Columns: Available only for XML Schema, and only when BIE OAGi/connectCenter Meta Data is selected.
-
Based CC Meta Data: Available for XML Schema and JSON Schema. The generated expression includes information from the Core Component on which the BIE is based.
-
-
Under "Select an expression", select the expression type and related options.
-
XML Schema (the default): Generates the BIE as XML Schema. This option also supports Separate file references for reused schemas. When that option is selected, reused schemas are emitted as separate referenced files.
-
JSON Schema: Generates the BIE as JSON Schema. The Version field allows the user to choose either 2020-12 (the default) or Draft-04. The option Separate file references for reused schemas is available only for 2020-12. JSON Schema also supports Make as an array, Include Meta Header, and Include Pagination Response; checking one of the latter two opens a dialog to pick the Meta Header or Pagination Response profile BIE to embed, and limits the schema package option to individual files.
-
OpenAPI 3 (Template): Generates the BIE as an OpenAPI template. The Version field allows the user to choose either 3.1 (the default) or 3.0, and the Format field either YAML (the default) or JSON. The user can enable a GET Operation Template, a POST Operation Template, or both. Each selected operation template provides the options Make as an array, Suppress a root property, and Include Meta Header, and the GET template also Include Pagination Response (in the GET template, Suppress a root property cannot be combined with Include Meta Header or Include Pagination Response).
-
Open Document Spreadsheet (supports CSV): Generates the BIE as a spreadsheet-style document. The Format field allows the user to choose ODS (the default), FODS, or XLSX.
-
Avro™ Schema: Generates the BIE as Avro Schema.
-
-
Select the Schema File Option.
-
Put all schemas in the same file (the default): Generates one root expression document. If Separate file references for reused schemas is selected and reused schemas exist, the downloaded result contains the root file and the referenced files together.
-
Put each schema in an individual file: Generates one file for each selected schema. In this case, a zip file containing the generated files is downloaded.
The Open Document Spreadsheet and Avro™ Schema expressions use individual files only.
-
-
Click "Generate". The generated file is automatically downloaded, typically to the "Downloads" folder in the user profile folder of your computer.
Find reused BIE
connectCenter allows for finding where a BIE is reused. This could be very handy particularly during uplifting. There are two ways to retrieve this information — find the reuses of an individual BIE or get a full report for the entire repository.
To find reuses of an individual BIE:
-
On the top menu of the page, click "BIE".
-
Choose the "View/Edit BIE" option from the drop-down list.
-
Locate the BIE you want.
-
Click on the three-dot ellipsis on the right of the BIE, then click the "Find Reuses" option. (The same option appears in the context menu of a reused node in the BIE tree.)
-
In the returned dialog, titled "BIEs reused '<DEN>'", the reusing BIEs are listed. Click on the DEN of a reusing BIE in order to view its details in a new tab. The reusing BIE is opened, and the BIE tree is expanded to the reused BIE node.
To get the full reuse report:
-
On the top menu of the page, click "BIE".
-
Choose "Reuse Report" from the drop-down list.
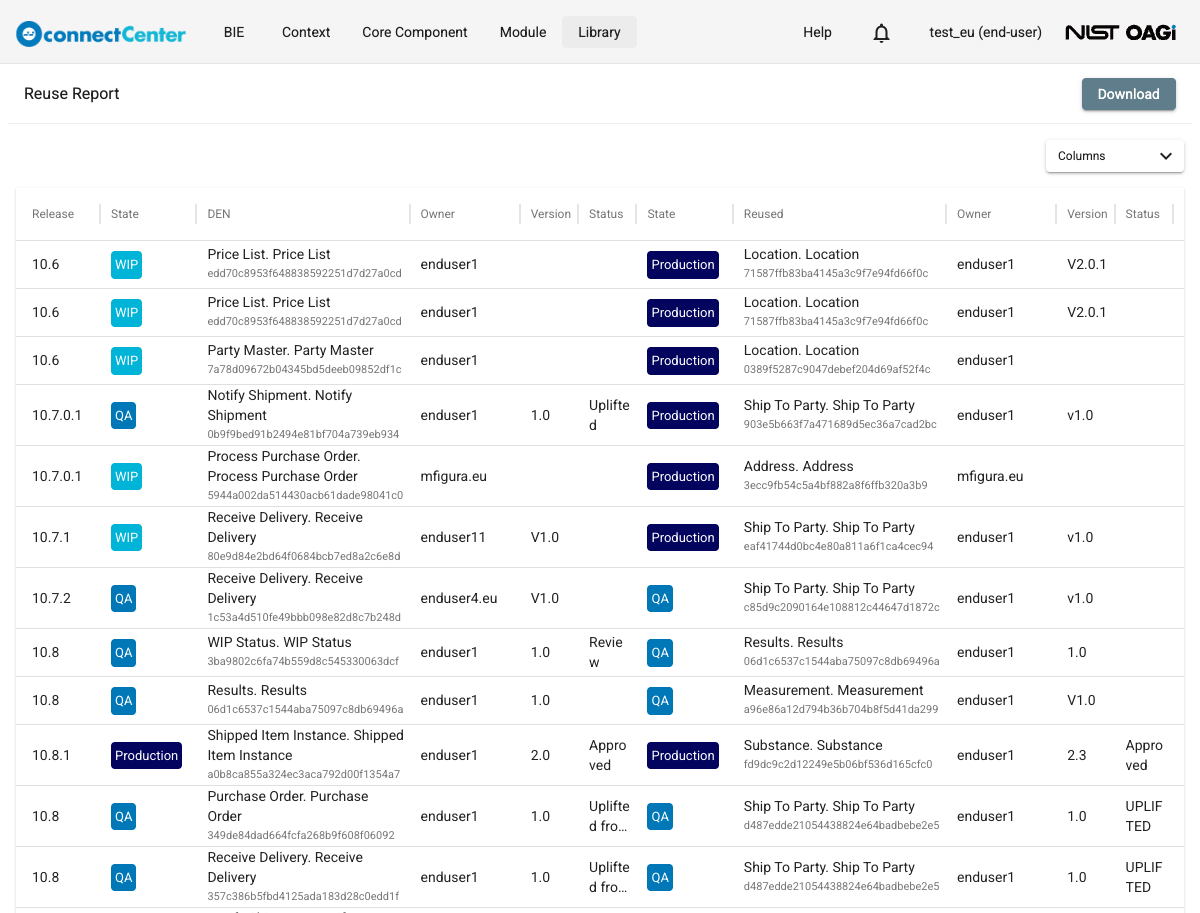
Each entry of the returned "Reuse Report" page contains a reusing BIE and its corresponding reused BIE. In particular, the top-level BIE (the reusing BIE) under which a BIE is reused is shown on the left side of the entry and the reused BIE is shown on the right side. Click on the DEN of a reusing BIE to view its details in a new tab: the reusing BIE is opened, and the BIE tree is expanded to the reused BIE node. You can also click on the DEN of a reused BIE to view its details in a new tab. The "Download" button at the top of the page exports the report as a comma-separated file.
Uplift a BIE
BIE uplift allows for transferring BIEs that are based on a previous standard CC release to a newer release. In the BIE uplifting process, the BIE based on the older CC release is called the source BIE while the resulting BIE is called the uplifted BIE. The CC release to which the source BIE is uplifted is called the target release. Correspondingly, the CC release associated with the source BIE is called the source release. There is no change applied to the source BIE in the uplifting process.
The BIE uplifting process aims to assist the user in transferring information of the source BIE to the uplifted BIE taking into account the changes in CCs between the target and the source releases. Business contexts associated with the source BIE are also transferred to the uplifted BIE automatically.
BIEs in the QA or Production state can be uplifted by anyone, while BIEs in the WIP state can be uplifted by their owners only. Whoever uplifts the BIE becomes the owner of the uplifted BIE. Therefore, multiple users can uplift the same BIE to different newer releases.
connectCenter requires limited user involvement for uplifting a BIE. When a BIE is being uplifted, the information of the used nodes of the source BIE is transferred to the uplifted BIE. That is, the uplifted BIE contains the information of the used nodes along with their details. To this purpose, connectCenter creates the uplifted BIE based on the top-level ASCCP of the source BIE. Afterward, connectCenter matches the nodes of the source BIE to the nodes of the uplifted BIE and transfers their details.
The current version of connectCenter performs that matching based on the GUID of the CCs that the nodes of the BIE derive from. If a CC has been changed during a release, connectCenter presents the corresponding BIE node as unmatched and requires the user to manually perform this matching. Matching is allowed only between nodes of the same type, i.e., ASBIE/ASBIEP/ABIE node with ASBIE/ASBIEP/ABIE node, BBIE node with BBIE node, and BBIE_SC node with BBIE_SC node. The user can also skip the manual matching procedure and leave some nodes unmatched. In that case, the uplifted BIE does not include any information about the unmatched nodes.
In case the source BIE contains a node that reuses a BIE, matching is performed in the same way as described above. However, the user has to select the BIE to be reused in the uplifted BIE. This BIE should belong to the same release as the uplifted BIE. Therefore, it is recommended that the BIE which is reused under the source BIE be uplifted before uplifting the source BIE. The user can also create a completely new BIE in the newer release and reuse it under the uplifted BIE (see also BIE reuse). When a reuse BIE is selected for a reuse node, the uplifted BIE keeps a reference to that reused BIE. If a reuse node is left without a reuse BIE selected, its fields are copied directly into the uplifted BIE and no reference to a reused BIE is kept; connectCenter warns about this before the uplift proceeds (see Step 6 below).
To uplift a BIE:
-
Select "Uplift BIE" in the "BIE" menu at the top of the page.
-
On the returned "Uplift BIE" page, subtitled "Select BIE":
-
Select a source release in the Source Branch dropdown. The latest release should not be selected — the BIEs belonging to the latest release cannot be uplifted, and no target branch is offered for it.
-
Choose the target release in the Target Branch dropdown; only releases newer than the source are offered. The uplifted BIE will be associated with this release.
-
Choose a source BIE from the listing table below. The list contains the BIEs in the source release that you are allowed to uplift. Use the pagination at the bottom or the "Search by DEN" bar, the Business Context filter, or the other filters on the page to find the desired source BIE (see How to use the Search field in general and How to use Search Filters). Optionally, click on the DEN of a BIE to see its details.
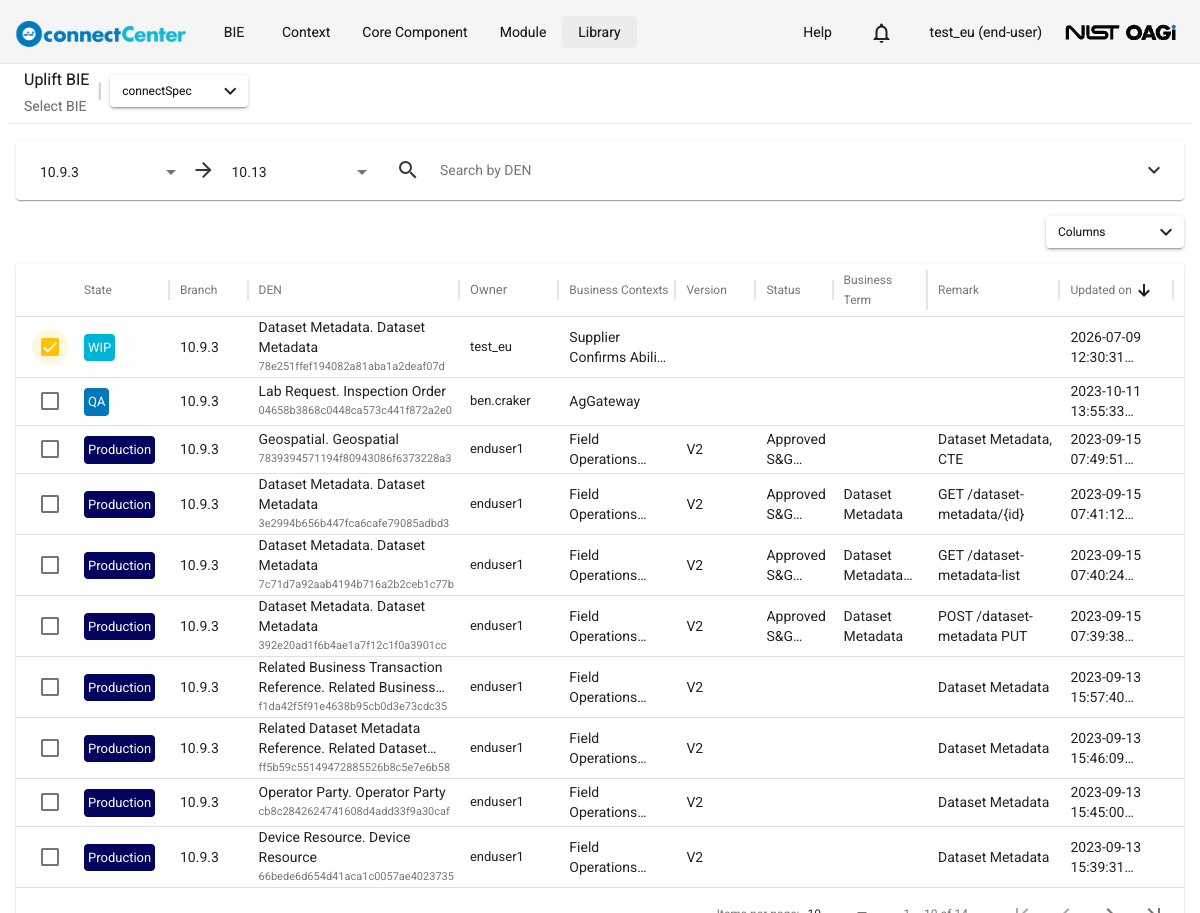
-
-
Click the "Next" button.
-
The "Uplift BIE" page, subtitled "Verification", is returned displaying the source BIE tree on the left side and the target BIE tree on the right side. The target BIE represents how the source BIE will become the uplifted BIE. The source BIE tree shows only used nodes, while the target BIE tree shows all possible, used and unused, nodes. connectCenter automatically maps used nodes in the source BIE tree with nodes in the target BIE that share exactly the same underlying CCs based on CC GUIDs. Automatically mapped nodes in the source BIE are displayed without a checkbox, and a banner reads "All contents are mapped." when nothing was left unmapped. The user can click on a source BIE tree node to see how it is mapped in the target BIE tree. Each tree has its own search box, and a pager at the top-left steps through the source nodes. The following tasks are optional.
-
Manually map* the unmapped nodes in the source BIE tree to nodes in the target BIE. There can be unmapped nodes in the source BIE due to some changes in the CCs or extensions made in the source BIE. This step is optional, i.e., the user can choose to not carry those nodes to the new release. To map a node, click a node with a checkbox in the source BIE tree, then click the checkbox of the desired node in the target BIE*. The system then checks both checkboxes to indicate that the map has been performed. The user can review the map again by clicking on the source BIE node. The system will highlight the mapped node in the target BIE tree.
-
Select a BIE for a BIE reuse node. If the source BIE has a BIE reuse node, which is marked with a recycling icon, and it has already been mapped, the system displays an exclamation icon (tooltip "Select BIE") next to the target BIE node.
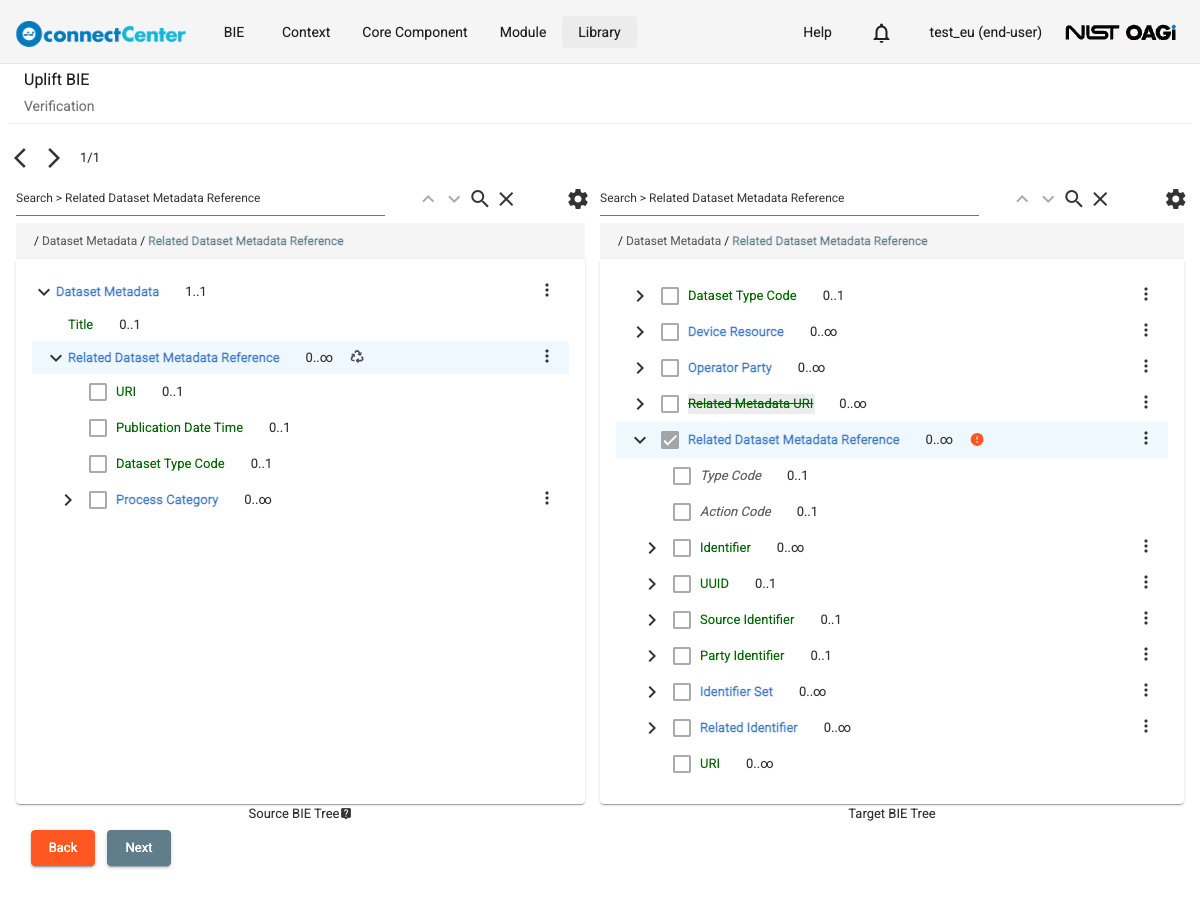
The user can select a BIE in the target release to make the target BIE node a BIE reuse node as well. To do so, make sure that the reuse node is selected on the source BIE tree — the system brings the mapped target BIE node into focus. Click on the exclamation icon. The system brings up a dialog that lists compatible top-level BIEs to choose from. Search and select the desired BIE. See BIE reuse for more information about BIE reuse. If the desired BIE is not present, the user may have to uplift that BIE first or create a new one. This step is optional. If no BIE is selected for the target node, the uplifted BIE node will contain only the association information if it was mapped in the target BIE.
-
-
Click the "Next" button.
-
The "Uplift BIE Report" dialog opens, where the user can view or download the uplifting report. The report presents the details about mapped and unmapped nodes as well as reuse information. In addition, the report indicates that some BIE nodes may use a developer code list or end-user code list that needs to be manually input again when the uplifted BIE is opened**. The "View Issues Only" checkbox at the top — checked by default — limits the table to the rows that need more attention and manual work; uncheck it to see every row. Click the "Download" button to save the report as a comma-separated file, or "Cancel" to go back to the previous page.
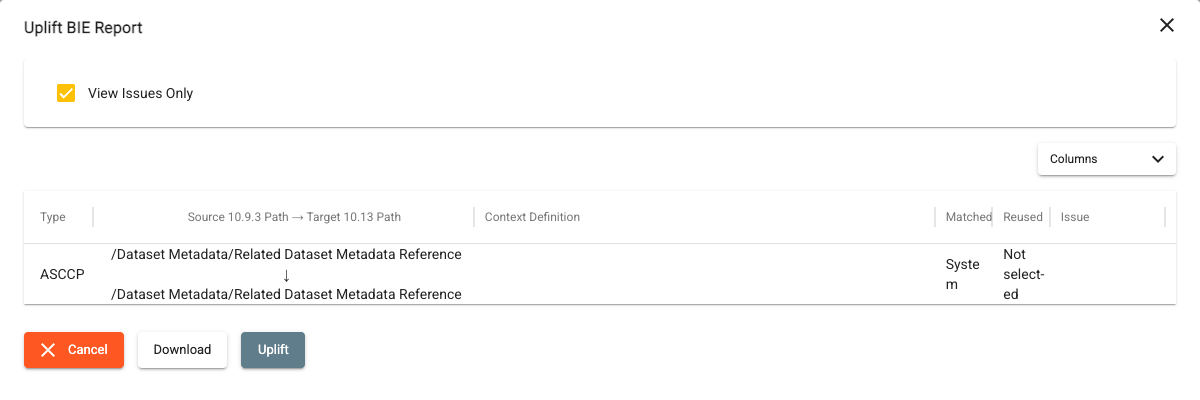
The report table consists of:
-
The Type column that presents the type of the node of the source BIE, e.g., BCCP, ASCCP.
-
A combined path column, headed "Source <source release> Path → Target <target release> Path", presenting the path of the source BIE node above the path of the matched node in the target BIE. A blank target path means the source node was not mapped.
-
The Context Definition column presents the Context Definition field of the BIE node.
-
The Matched column conveys how the nodes have been mapped. The values can be "System" — mapped by connectCenter, "Manual" — mapped by the user, or "Unmatched" — no map was performed for the source path.
-
The Reused column has three possible values: blank, "Selected", and "Not selected". Blank means the source path is not a BIE reuse node. "Selected" or "Not selected" means the source path is a BIE reuse node; "Not selected" means that the user did not assign a BIE to the mapped node in the target BIE.
-
The Issue column presents details about a specific issue. The user should take care of the issue manually when editing the uplifted BIE.
-
-
-
Click "Uplift". If every BIE reuse node in the source BIE was assigned a reuse BIE in the target release (see Step 4.2 above), or the source BIE has no reuse nodes, the uplift proceeds directly. However, if one or more used reuse nodes were left without a reuse BIE selected for the target release, connectCenter displays a confirmation dialog titled "Proceed without selecting reuse BIEs?" before continuing. The dialog explains that the listed reuse nodes have no reuse BIE selected for the target release and that, if you continue, their fields will be copied into the uplifted BIE and the reference to the reused BIE will NOT be kept. It also lists the path of each unselected reuse node. To preserve the reference to the reused BIE instead, click "Cancel" to return to the verification page, then click the reuse (exclamation) icon on each listed node to select a target BIE (see Step 4.2). To proceed and inline-copy the fields of the unselected reuse nodes, click "Continue".
-
The new uplifted BIE is created and opened. At this stage the user can make further changes to the BIE as described in Restrict a BIE or resolve the reported issues manually.
Important
*The user's manual map may have a cardinality and/or domain value restriction conflict. For example, a cardinality conflict is present when a source node has 0..n but the target node has 1..n by default based on the corresponding CC. If this happens, connectCenter copies over the invalid cardinality. The domain value conflict can occur if the user maps a BBIE (green or italic grey node) or BBIE_SC node (red node) to one with incompatible primitives. For example, when the user maps Description to Creation Date Time. In such a case, connectCenter may not properly copy the Value Domain Restriction and Value Domain details from the source to the target node. The user should fix these conflicts in the uplifted BIE. In any case, it is recommended that the user checks the domain value restriction of all manually mapped nodes in the uplifted BIE. It is also prudent to express both the source BIE and the uplifted BIE and perform a diff to ensure that only expected differences are present.
**An end-user code list assigned to a source BIE node can be carried into the uplifted BIE only if an end-user code list with the same name, list ID, and agency ID exists (or has been uplifted) in the target release and it is allowed by the target BIE node. If this is not the case, an issue is reported in the uplifting report; and the default primitive will be assigned to that BIE node instead. The user can use the report to make necessary adjustments to the uplifted BIE. Therefore, it is recommended that the user download the report before uplifting the BIE. Developer code lists used in source BIE nodes will be matched based on the internal ID and carried forward if they are allowed in the target node. If a code list is not allowed in the target node, an issue is reported in the uplifting report and the default primitive is used in the uplifted BIE. For example, if the user/system maps a source node with System Environment Code to a target node with Action Code, the issue will be reported because the two codes are not compatible. The same logic applies to the agency ID list.